什麼是Angular Schematics?如何搭建?(詳解)

什麼是Angular Schematics?
Angular Schematics 是基於模板(Template-based)的,Angular 特有的程式碼生成器,當然它不僅僅是生成程式碼,也可以修改我們的程式碼,它使得我們可以基於 Angular CLI 去實現我們自己的一些自動化操作。【相關教學推薦:《》】
相信在平時開發 Angular 專案的同時,大家都用過 ng generate component component-name, ng add @angular/materials, ng generate module module-name,這些都是 Angular 中已經為我們實現的一些 CLI,那麼我們應該如何在自己的專案中去實現基於自己專案的 CLI 呢?本文將會基於我們在 ng-devui-admin 中的實踐來進行介紹。歡迎大家持續的關注,後續我們將會推出更加豐富的 CLI 幫助大家更快搭建一個 Admin 頁面。
如何在本地開發你的 Angular Schematics
在本地開發你需要先安裝 schematics 腳手架
npm install -g @angular-devkit/schematics-cli

# 安裝完成之後新建一個schematics專案
schematics blank --name=your-schematics
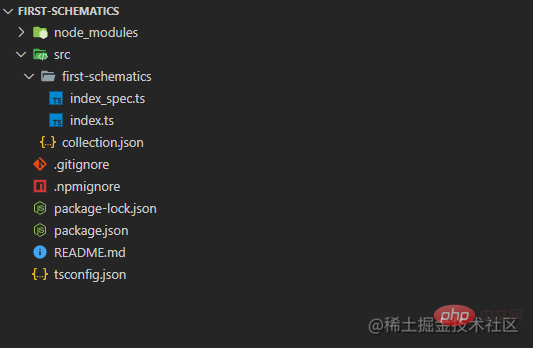
新建專案之後你會看到如下目錄結構,代表你已經成功建立一個 shematics 專案。

重要檔案介紹
tsconfig.json: 主要與專案打包編譯相關,在這不做具體介紹collection.json:與你的 CLI 命令相關,用於定義你的相關命令
{
  "$schema": "../node_modules/@angular-devkit/schematics/collection-schema.json",
  "schematics": {
    "first-schematics": {
      "description": "A blank schematic.",
      "factory": "./first-schematics/index#firstSchematics"
    }
  }
}first-schematics: 命令的名字,可以在專案中通過 ng g first-schematics:first-schematics 來執行該命令。description: 對該條命令的描述。factory: 命令執行的入口函數
通常還會有另外一個屬性 schema,我們將在後面進行講解。
index.ts:在該檔案中實現你命令的相關邏輯
import { Rule, SchematicContext, Tree } from '@angular-devkit/schematics';

export function firstSchematics(_options: any): Rule {
  return (tree: Tree, _context: SchematicContext) => {
    return tree;
  };
}在這裡我們先看幾個需要了解的引數:tree:在這裡你可以將 tree 理解為我們整個的 angular 專案,你可以通過 tree 新增檔案,修改檔案,以及刪除檔案。_context:該引數為 schematics 執行的上下文,比如你可以通過 context 執行 npm install。Rule:為我們制定的操作邏輯。
實現一個 ng-add 指令
現在我們通過實現一個 ng-add 指令來更好的熟悉。
同樣是基於以上我們已經建立好的專案。
新建命令相關的檔案
首先我們在 src 目錄下新建一個目錄 ng-add,然後在該目錄下新增三個檔案 index.ts, schema.json, schema.ts,之後你的目錄結構應該如下:

設定 collection.json
之後我們在 collection.json 中設定該條命令:
{
  "$schema": "../node_modules/@angular-devkit/schematics/collection-schema.json",
  "schematics": {
    ...,
    "ng-add": {
      "factory": "./ng-add/index",
      "description": "Some description about your schematics",
      "schema": "./ng-add/schema.json"
    }
  }
}
在 files 目錄中加入我們想要插入的檔案
關於 template 的語法可以參考 ejs 語法
app.component.html.template
<div class="my-app">
  <% if (defaultLanguage === 'zh-cn') { %>你好,Angular Schematics!<% } else { %>Hello, My First Angular Schematics!<% } %>
  <h1>{{ title }}</h1>
</div>
app.component.scss.template
.app {
  display: flex;
  justify-content: center;
  align-item: center;
}
app.component.ts.template
import { Component } from '@angular/core';

@Component({
  selector: 'app-root',
  templateUrl: './app.component.html',
  styleUrls: ['./app.component.scss']
})
export class AppComponent {
  title = <% if (defaultLanguage === 'zh-cn') { %>'你好'<% } else { %>'Hello'<% } %>;
}
開始實現命令邏輯
schema.json:在該檔案中定義與使用者的互動
{
  "$schema": "http://json-schema.org/schema",
  "id": "SchematicsDevUI",
  "title": "DevUI Options Schema",
  "type": "object",
  "properties": {
    "defaultLanguage": {
      "type": "string",
      "description": "Choose the default language",
      "default": "zh-cn",
      "x-prompt": {
        "message": "Please choose the default language you want to use: ",
        "type": "list",
        "items": [
          {
            "value": "zh-cn",
            "label": "簡體中文 (zh-ch)"
          },
          {
            "value": "en-us",
            "label": "English (en-us)"
          }
        ]
      }
    },
    "i18n": {
      "type": "boolean",
      "default": true,
      "description": "Config i18n for the project",
      "x-prompt": "Would you like to add i18n? (default: Y)"
    }
  },
  "required": []
}
在以上的定義中,我們的命令將會接收兩個引數分別為 defaultLanguage,i18n,我們以 defaultLanguage 為例講解對引數的相關設定:
{
  "defaultLanguage": {
    "type": "string",
    "description": "Choose the default language",
    "default": "zh-cn",
    "x-prompt": {
      "message": "Please choose the default language you want to use: ",
      "type": "list",
      "items": [
        {
          "value": "zh-cn",
          "label": "簡體中文 (zh-ch)"
        },
        {
          "value": "en-us",
          "label": "English (en-us)"
        }
      ]
    }
  }
}
type 代表該引數的型別是 string。default 為該引數的預設值為 zh-cn。x-prompt 定義與使用者的互動,message 為我們對使用者進行的相關提問,在這裡我們的 type 為 list 代表我們會為使用者提供 items 中列出的選項供使用者進行選擇。
schema.ts:在該檔案中定義我們接收到的引數型別
export interface Schema {
  defaultLanguage: string;
  i18n: boolean;
}index.ts:在該檔案中實現我們的操作邏輯,假設在此次ng-add操作中,我們根據使用者輸入的defaultLanguage,i18n來對使用者的專案進行相應的更改,並且插入相關的 npm 包,再進行安裝。
import {
  apply,
  applyTemplates,
  chain,
  mergeWith,
  move,
  Rule,
  SchematicContext,
  SchematicsException,
  Tree,
  url
} from '@angular-devkit/schematics';
import { NodePackageInstallTask } from '@angular-devkit/schematics/tasks';
import { Schema as AddOptions } from './schema';

let projectWorkspace: {
  root: string;
  sourceRoot: string;
  defaultProject: string;
};

export type packgeType = 'dependencies' | 'devDependencies' | 'scripts';
export const PACKAGES_I18N = [
  '@devui-design/icons@^1.2.0',
  '@ngx-translate/core@^13.0.0',
  '@ngx-translate/http-loader@^6.0.0',
  'ng-devui@^11.1.0'
];
export const PACKAGES = ['@devui-design/icons@^1.2.0', 'ng-devui@^11.1.0'];
export const PACKAGE_JSON_PATH = 'package.json';
export const ANGULAR_JSON_PATH = 'angular.json';

export default function (options: AddOptions): Rule {
  return (tree: Tree, context: SchematicContext) => {
    // 獲取專案空間中我們需要的相關變數
    getWorkSpace(tree);

    // 根據是否選擇i18n插入不同的packages
    const packages = options.i18n ? PACKAGES_I18N : PACKAGES;
    addPackage(tree, packages, 'dependencies');

    // 執行 npm install
    context.addTask(new NodePackageInstallTask());

    // 自定義的一系列 Rules
    return chain([removeOriginalFiles(), addSourceFiles(options)]);
  };
}
下面時使用到的函數的具體實現:
// getWorkSpace
function getWorkSpace(tree: Tree) {
  let angularJSON;
  let buffer = tree.read(ANGULAR_JSON_PATH);
  if (buffer) {
    angularJSON = JSON.parse(buffer.toString());
  } else {
    throw new SchematicsException(
      'Please make sure the project is an Angular project.'
    );
  }

  let defaultProject = angularJSON.defaultProject;
  projectWorkspace = {
    root: '/',
    sourceRoot: angularJSON.projects[defaultProject].sourceRoot,
    defaultProject
  };

  return projectWorkspace;
}
// removeOriginalFiles
// 根據自己的需要選擇需要刪除的檔案
function removeOriginalFiles() {
return (tree: Tree) => {
[
`${projectWorkspace.sourceRoot}/app/app.component.ts`,
`${projectWorkspace.sourceRoot}/app/app.component.html`,
`${projectWorkspace.sourceRoot}/app/app.component.scss`,
`${projectWorkspace.sourceRoot}/app/app.component.css`
]
.filter((f) => tree.exists(f))
.forEach((f) => tree.delete(f));
};
}將 files 下的檔案拷貝到指定的路徑下,關於 chain, mergeWith, apply, template 的詳細使用方法可以參考 Schematics
// addSourceFiles
function addSourceFiles(options: AddOptions): Rule {
  return chain([
    mergeWith(
      apply(url('./files'), [
        applyTemplates({
          defaultLanguage: options.defaultLanguage
        }),
        move(`${projectWorkspace.sourceRoot}/app`)
      ])
    )
  ]);
}
// readJson
function readJson(tree: Tree, file: string, type?: string): any {
if (!tree.exists(file)) {
return null;
}
const sourceFile = tree.read(file)!.toString('utf-8');
try {
const json = JSON.parse(sourceFile);
if (type && !json[type]) {
json[type] = {};
}
return json;
} catch (error) {
console.log(`Failed when parsing file ${file}.`);
throw error;
}
}
// writeJson
export function writeJson(tree: Tree, file: string, source: any): void {
tree.overwrite(file, JSON.stringify(source, null, 2));
}
// readPackageJson
function readPackageJson(tree: Tree, type?: string): any {
return readJson(tree, PACKAGE_JSON_PATH, type);
}
// writePackageJson
function writePackageJson(tree: Tree, json: any): any {
return writeJson(tree, PACKAGE_JSON_PATH, json);
}
// addPackage
function addPackage(
tree: Tree,
packages: string | string[],
type: packgeType = 'dependencies'
): Tree {
const packageJson = readPackageJson(tree, type);
if (packageJson == null) {
return tree;
}
if (!Array.isArray(packages)) {
packages = [packages];
}
packages.forEach((pck) => {
const splitPosition = pck.lastIndexOf('@');
packageJson[type][pck.substr(0, splitPosition)] = pck.substr(
splitPosition + 1
);
});
writePackageJson(tree, packageJson);
return tree;
}為了保持 index.ts 檔案的簡潔,可以將相關操作的方法抽取到一個新的檔案中進行參照。
測試 ng-add
至此我們已經完成了 ng-add 命令,現在我們對該命令進行測試:
ng new test初始化一個 Angular 專案cd test && mkdir libs在專案中新增一個 libs 資料夾,將圖中標藍的檔案拷貝到其中

- 之後在命令列中執行
npm link libs/ - link 完成之後
cd libs && npm run build && cd .. - 現在執行
ng add first-schematics之後會看到如下提示

- 最後我們通過
npm start來檢視執行的結果如下

結語
綜上簡單介紹了一個 Schematics 的實現,更多的一些應用歡迎大家檢視 ng-devui-admin 中的實現。
更多程式設計相關知識,請存取:!!
以上就是什麼是Angular Schematics?如何搭建?(詳解)的詳細內容,更多請關注TW511.COM其它相關文章!