機器學習實戰-決策樹
1.決策樹的構造
1.1優缺點
優點:-
計算複雜度不高:以ID3為例,每次運算都是基於某一列特徵,特徵計算完後,下次計算不考慮該最有特徵,並且通過適當剪枝可以簡化複雜度
-
輸出結果易於理解:因為輸出的是一個樹的結構,樹的走向一目瞭然
-
對中間值的缺失不敏感
-
可以處理不相關特 徵資料:是基於每列特徵來計算,不考慮特徵之間的依賴關係
缺點:可能會產生過度匹配問題。
適用資料型別:數值型和標稱型。
1.2資訊熵
主要用來度量資訊的混亂程度,資訊越混亂,說明能夠包含的資訊量越多,則熵越大。反之若資訊越有序說明包含的資訊量越少,則熵越小。1.3資訊增益
標準的說法就是:一個隨機變數的引入導致了另一個隨機變數的混亂性變化(約束),如果約束越大,資訊增益就越大。舉個通俗易懂的例子就是:比如你去銀行貸款,如果你自己的個人資訊你對貸款員什麼都不說,那貸款員是不是就很不確定是否貸款給你,如果你只說了你的薪資,那較之前相比,貸款員是否給你貸款是不是就多了一種判斷的依據,也就是說,你告訴貸款員你的個人資訊越多,貸款員是否給你貸款就越確定,此時的資訊增益也就是最大。在舉一個例子:瞭解一個人的資訊,如果給一個身份證號,由於每個人的身份證號都是唯一的,所以一個身份證號就可以判斷這個的所有資訊,也就是引入身份證號這個屬性之後,就會唯一確定一個人,這時身份證號對判斷這個人的約束是最大,資訊增益也就是最大。2.決策樹的構造
2.1熵的計算
資料集:
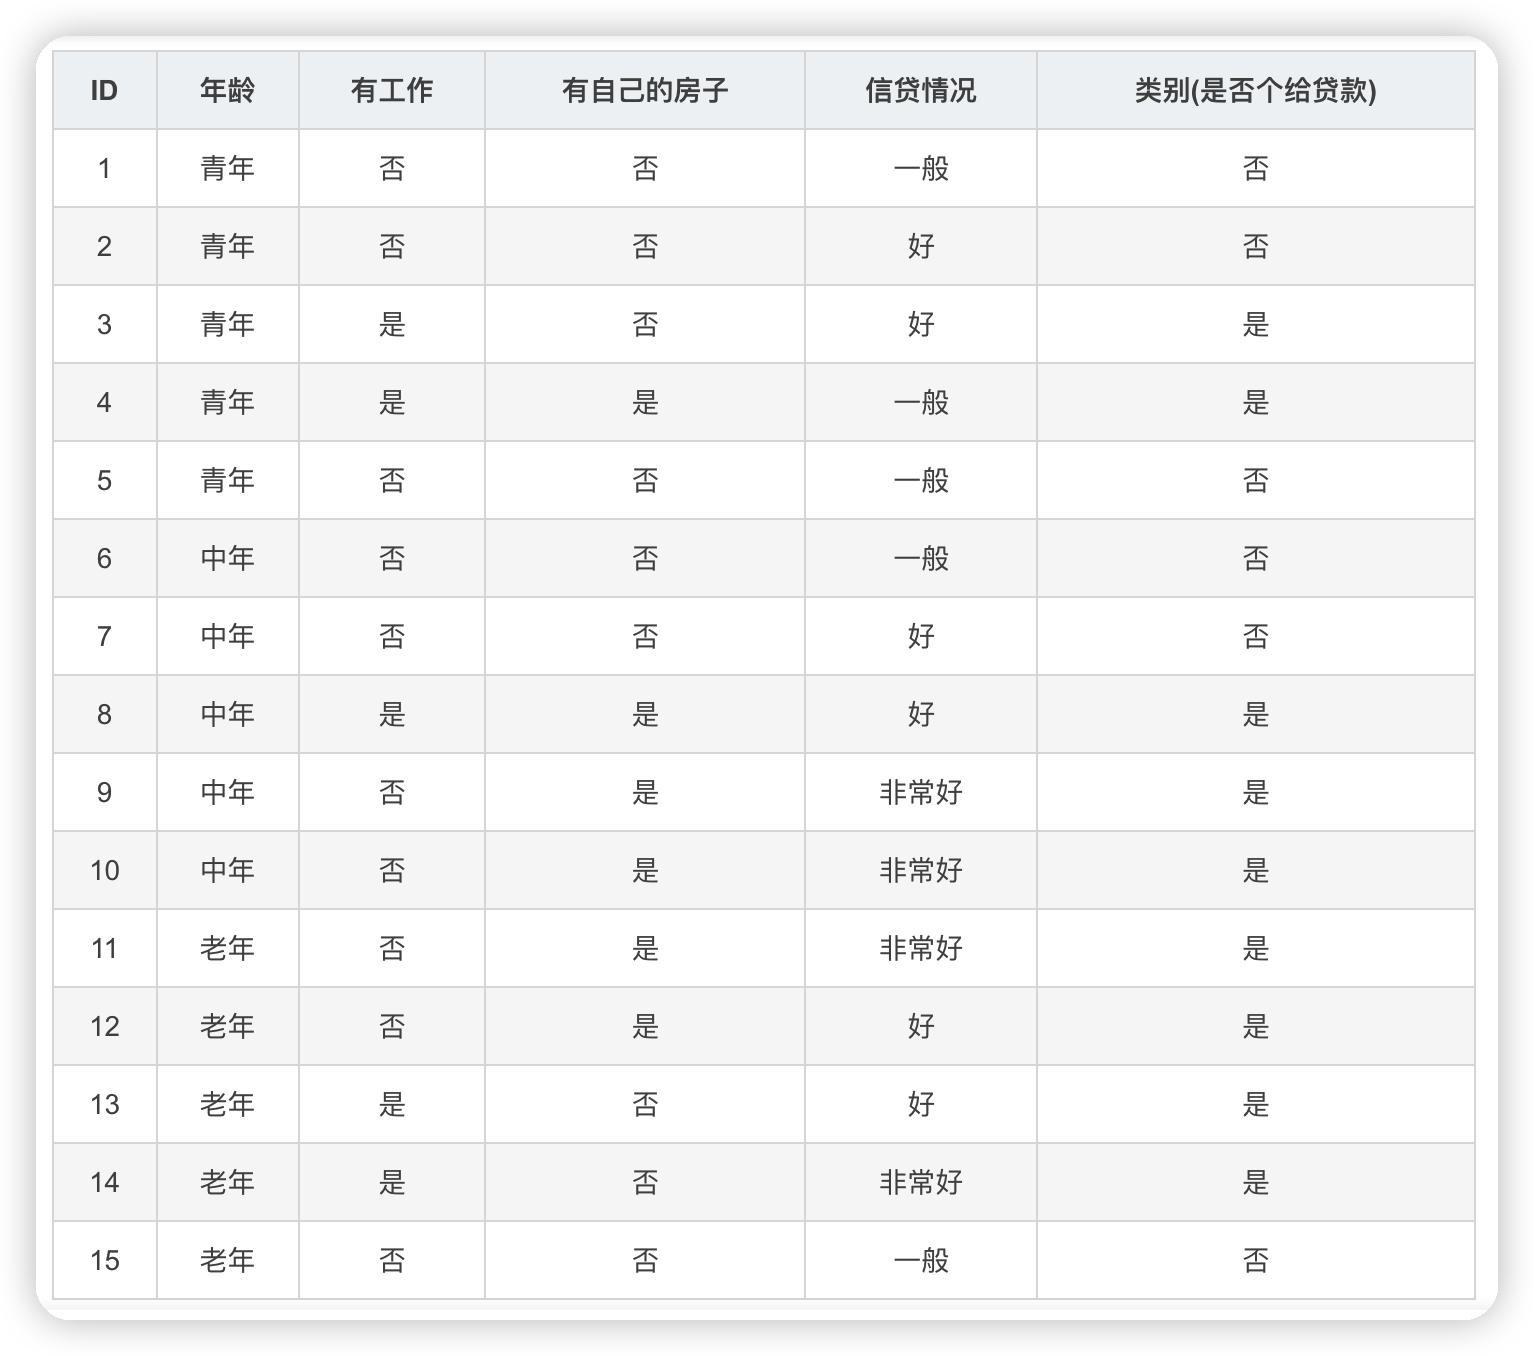
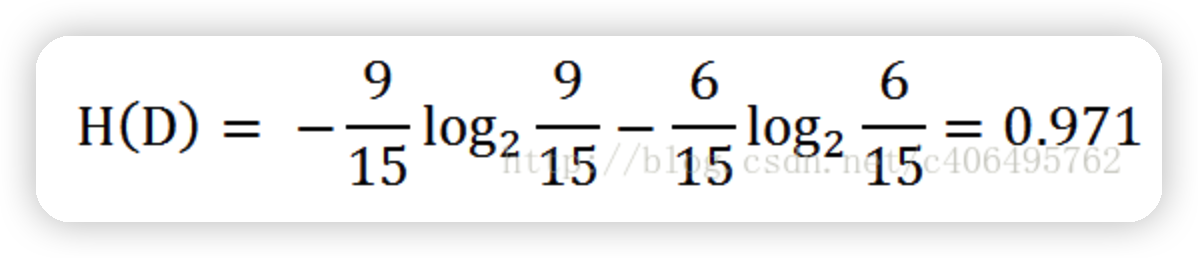
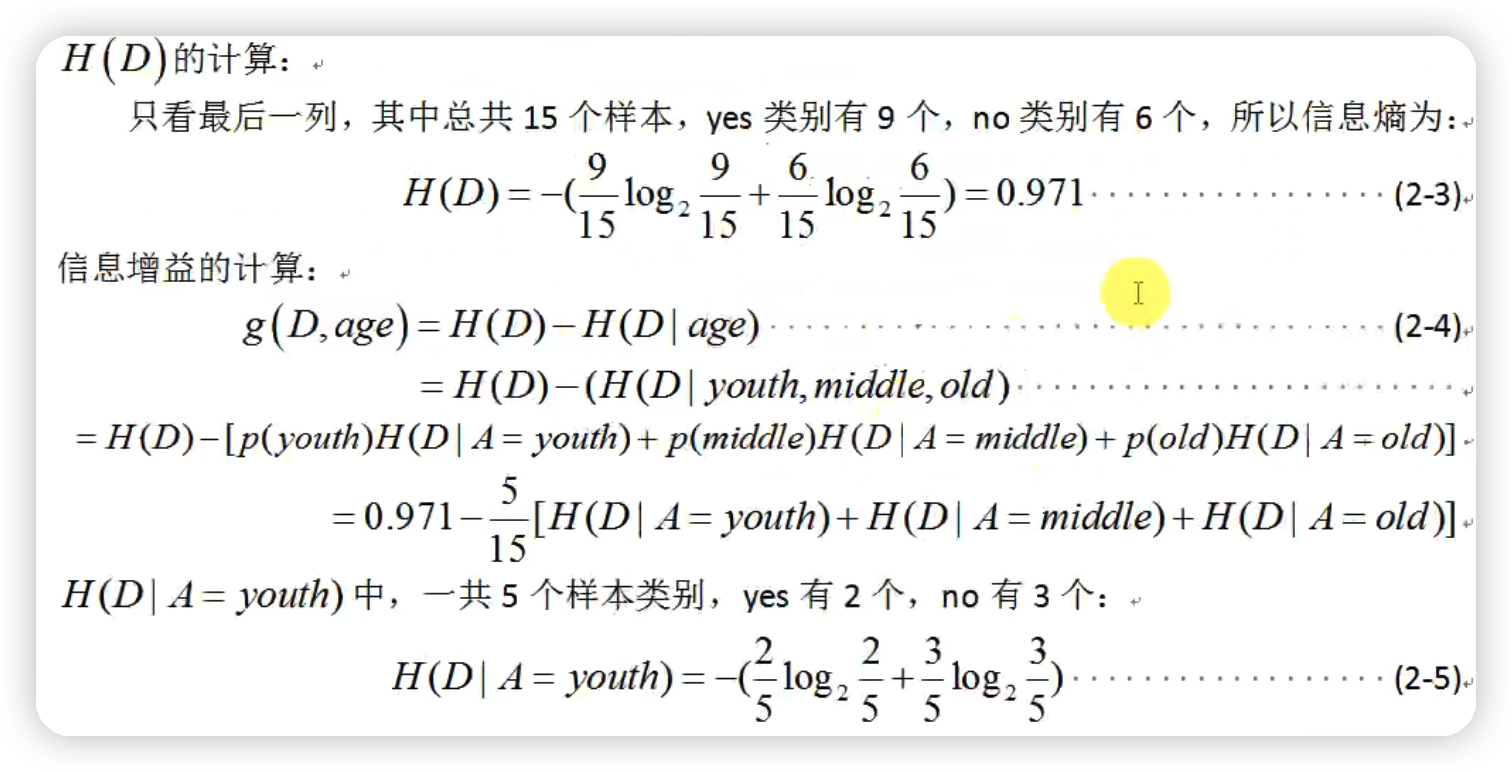
根據表中的資料統計可知,在15個資料中,9個資料的結果為放貸,6個資料的結果為不放貸。所以資料集D的經驗熵H(D)為:
def calcShannonEnt(dataSet):
numEntires = len(dataSet) #返回資料集的行數
labelCounts = {} #儲存每個標籤(Label)出現次數的字典
for featVec in dataSet: #featVec代表一行一行的資料 #對每組特徵向量進行統計
currentLabel = featVec[-1] #取每一行的最後一列也即是否貸款的值
if currentLabel not in labelCounts.keys(): #如果標籤(Label)沒有放入統計次數的字典,新增進去
labelCounts[currentLabel] = 0#鍵對應的值設為零
labelCounts[currentLabel] += 1 #鍵對應的值加一
shannonEnt = 0.0 #經驗熵(夏農熵)
for key in labelCounts: #計算夏農熵
prob = float(labelCounts[key]) / numEntires #選擇該標籤(Label)的概率
shannonEnt -= prob * log(prob, 2) #利用公式計算
return shannonEnt
def createDataSet():
#年齡:0代表青年,1代表中年,2代表老年
#信貸情況:0代表一般,1代表好,2代表非常好
dataSet = [[0, 0, 0, 0, 'no'], # 資料集
[0, 0, 0, 1, 'no'],
[0, 1, 0, 1, 'yes'],
[0, 1, 1, 0, 'yes'],
[0, 0, 0, 0, 'no'],
[1, 0, 0, 0, 'no'],
[1, 0, 0, 1, 'no'],
[1, 1, 1, 1, 'yes'],
[1, 0, 1, 2, 'yes'],
[1, 0, 1, 2, 'yes'],
[2, 0, 1, 2, 'yes'],
[2, 0, 1, 1, 'yes'],
[2, 1, 0, 1, 'yes'],
[2, 1, 0, 2, 'yes'],
[2, 0, 0, 0, 'no']]
labels = ['年齡', '有工作', '有自己的房子', '信貸情況'] # 特徵標籤
return dataSet, labels # 返回資料集和分類屬性
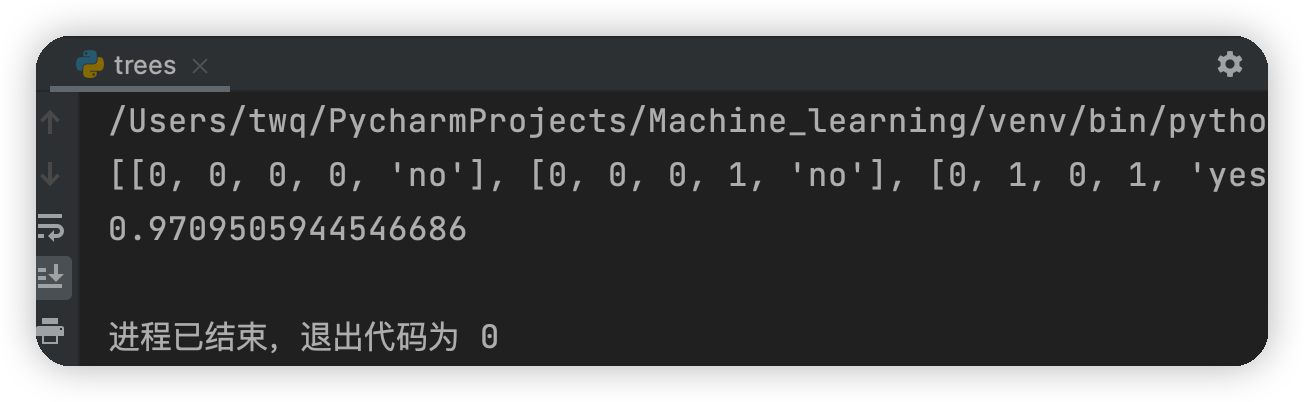
myDat,labels=createDataSet()
print(myDat)
print(calcShannonEnt(myDat))
測試結果:
2.2劃分資料集
2.2.1按照給定特徵劃分資料集
#三個輸入引數:待劃分的資料集、劃分資料集的特徵、需要返回的特徵的值
def splitDataSet(dataSet, axis, value):
    retDataSet = []                 #建立返回的資料集列表
    for featVec in dataSet:             #遍歷資料集
        if featVec[axis] == value:
            reducedFeatVec = featVec[:axis]    #去掉axis特徵
            reducedFeatVec.extend(featVec[axis+1:])     #將符合條件的新增到返回的資料集
            retDataSet.append(reducedFeatVec)
    return retDataSet        #返回劃分後的資料集
上面程式碼的解釋,假設axis=0,value=1,表示的是在第一列年齡的屬性中,找到值為1(也即為中年)的所有行,然後去掉每一行中第一列的資料(其實很多餘,因為在算熵的時候只取最後一列的資料),然後每一行的剩餘列的資料儲存
以新增年齡之後算此時是否貸款的資訊增益的方法如下圖:
2.2.2選擇最好的資料集劃分方式
程式碼實現:def chooseBestFeatureToSplit(dataSet):
numFeatures = len(dataSet[0]) - 1 #特徵數量
baseEntropy = calcShannonEnt(dataSet) #計算資料集的夏農熵
bestInfoGain = 0.0 #資訊增益
bestFeature = -1 #最優特徵的索引值
for i in range(numFeatures): #遍歷所有特徵
#獲取dataSet的第i個所有特徵-第i列全部的值
featList = [example[i] for example in dataSet]
uniqueVals = set(featList) #建立set集合{},元素不可重複
newEntropy = 0.0 #經驗條件熵
for value in uniqueVals: #計算資訊增益
subDataSet = splitDataSet(dataSet, i, value) #subDataSet劃分後的子集
prob = len(subDataSet) / float(len(dataSet)) #計運算元集的概率如上圖的p(youth),p(middle),p(old)的值
newEntropy += prob * calcShannonEnt(subDataSet) #根據公式計算經驗條件熵
infoGain = baseEntropy - newEntropy #資訊增益=h(D)-h(D|A)
# print("第%d個特徵的增益為%.3f" % (i, infoGain)) #列印每個特徵的資訊增益
if (infoGain > bestInfoGain): #取出資訊增益的最大值 #計算資訊增益
bestInfoGain = infoGain #更新資訊增益,找到最大的資訊增益
bestFeature = i #記錄資訊增益最大的特徵的索引值
return bestFeature
2.3遞迴構建決策樹
#當所有的特徵及屬性都遍歷完成之後任然不能確定是否貸款
#此時可根據classlist中是否貸款各自的數量,取最大票數的即可
def majorityCnt(classList):
    classCount = {}
    for vote in classList:                                        #統計classList中每個元素出現的次數
        if vote not in classCount.keys():
            classCount[vote] = 0
        classCount[vote] += 1
    sortedClassCount = sorted(classCount.items(), key = operator.itemgetter(1), reverse = True) #根據字典的值降序排序
    return sortedClassCount[0][0]                                #返回classList中出現次數最多的元素

#建立樹的函數程式碼
def createTree(dataSet, labels, featLabels):
    classList = [example[-1] for example in dataSet]#取分類標籤(是否放貸:yes or no)
    # print("classlist:")
    # print(classList)
    if classList.count(classList[0]) == len(classList):            #如果類別完全相同則停止繼續劃分
        return classList[0]
    if len(dataSet[0]) == 1: #遍歷完所有特徵時返回出現次數最多的類標籤
        return majorityCnt(classList)
    bestFeat = chooseBestFeatureToSplit(dataSet) #選擇最優特徵
    bestFeatLabel = labels[bestFeat]#最優特徵的標籤
    featLabels.append(bestFeatLabel)
    myTree = {bestFeatLabel:{}}#根據最優特徵的標籤生成樹
    del(labels[bestFeat])    #刪除已經使用特徵標籤
    featValues = [example[bestFeat] for example in dataSet]  #得到訓練集中所有最優特徵的屬性值
    uniqueVals = set(featValues) #去掉重複的屬性值
    for value in uniqueVals:   #遍歷特徵,建立決策樹。
        myTree[bestFeatLabel][value] = createTree(splitDataSet(dataSet, bestFeat, value), labels, featLabels)
    return myTree
遞迴函數的第一個停止條件是所有的
類標籤完全相同,則直接返回該類標籤。遞迴函數的第二個停止條件是使用完了所有特徵,任然不能將資料集劃分成僅包含唯一類別的分組 。由於第二個條件無法簡單地返回唯一的類標 籤,這裡使用投票表決的函數挑選出現次數最多的類別作為返回值
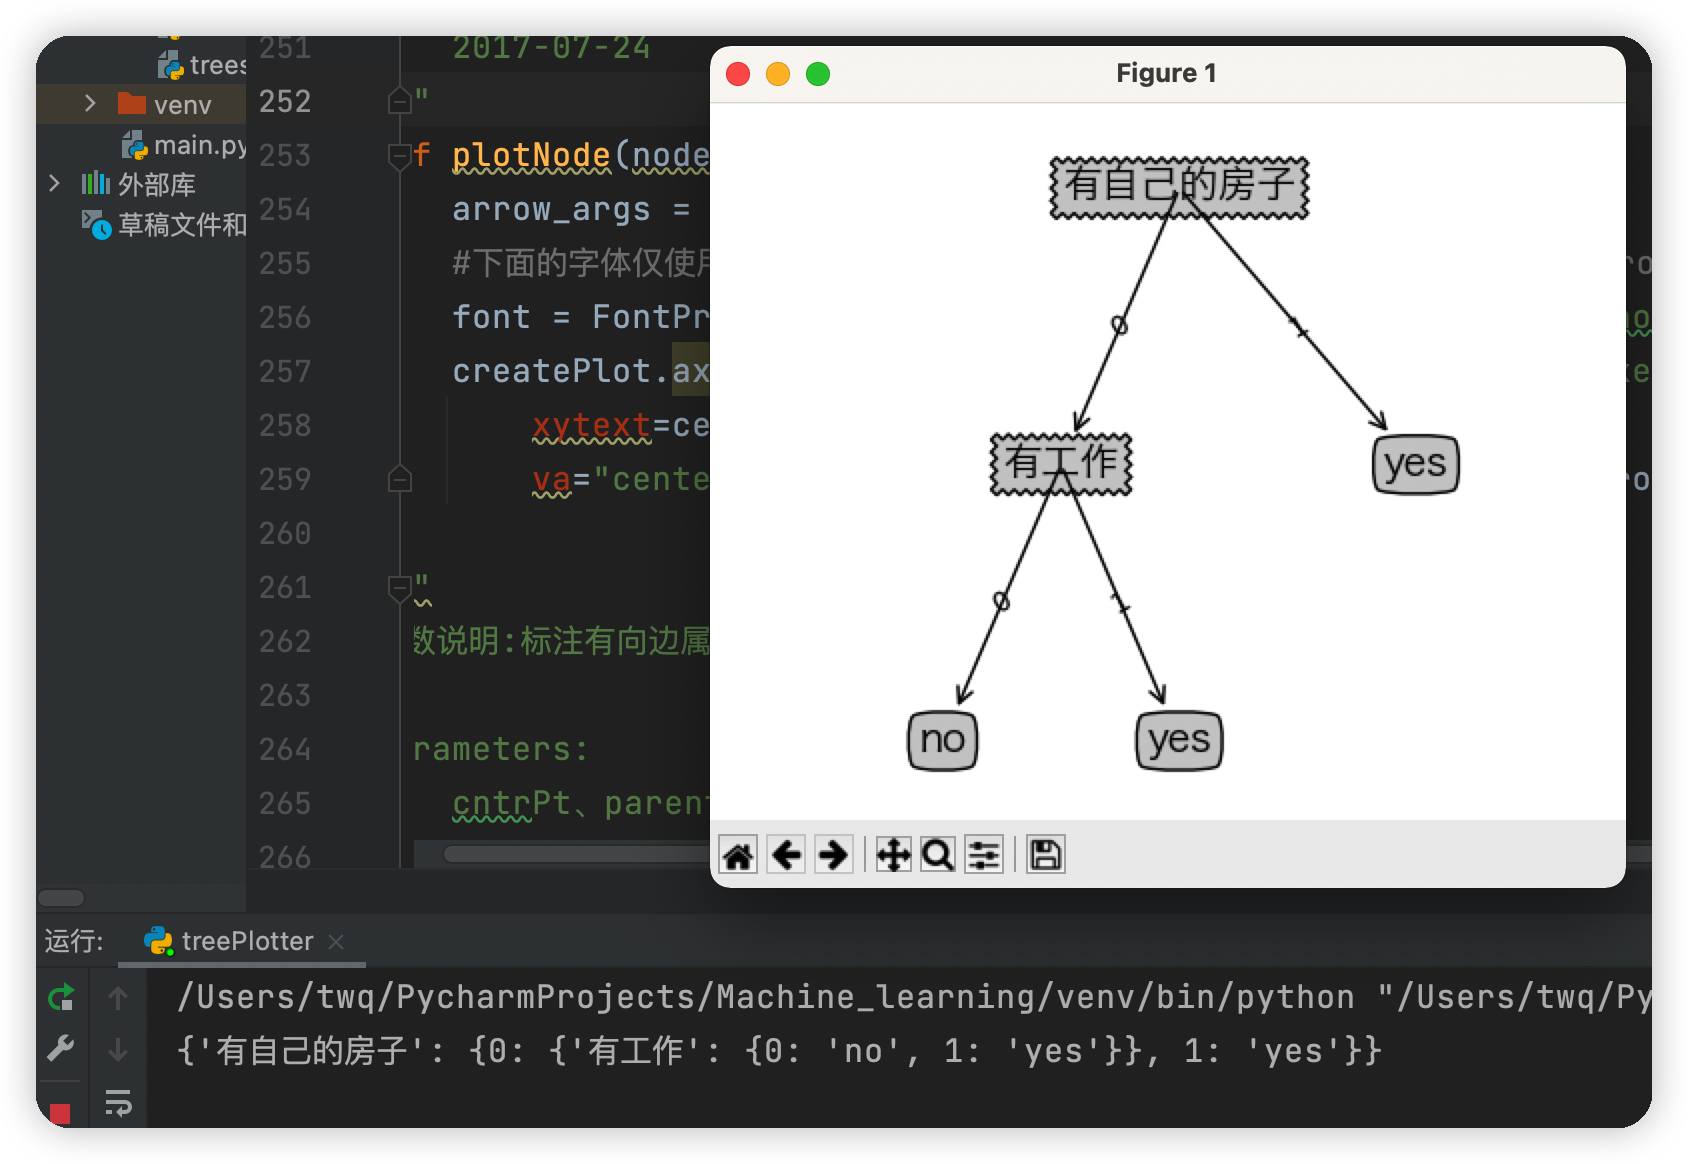
執行結果
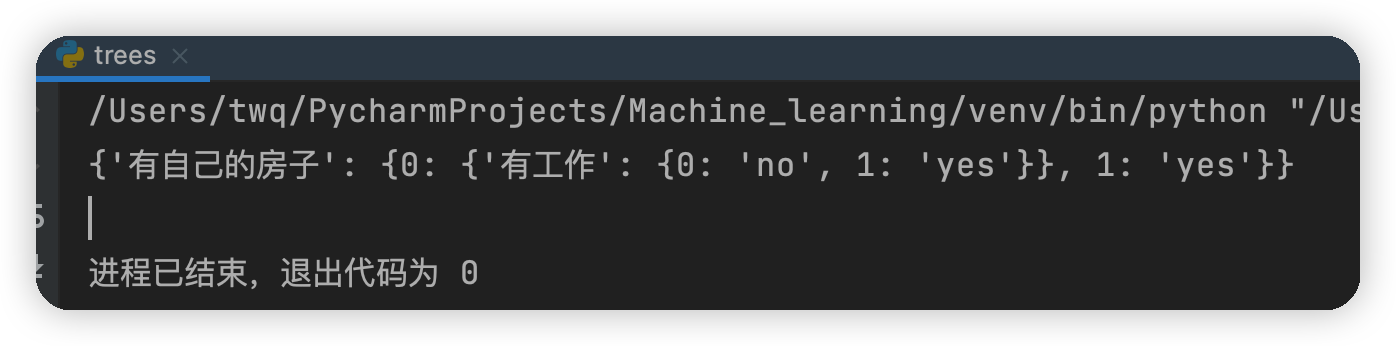
由上面建立的決策樹可知,首先判斷你是否有房子,如果有就可以貸款給你,如果沒有房子再看你是否有工作,如果既沒有房子也沒有工作,就不貸款給你,如果有沒有房子,但有工作,也貸款給你
3.使用 Matplotlib 註解繪製樹形圖
使用Matplotlib的註解功能繪製樹形圖,它可以對文字著色並提供多種形狀以供選擇, 而且我們還可以反轉箭頭,將它指向文字方塊而不是資料點。#獲取決策樹葉子結點的數目
def getNumLeafs(myTree):
numLeafs = 0 #初始化葉子
firstStr = next(iter(myTree)) #python3中myTree.keys()返回的是dict_keys,不在是list,所以不能使用myTree.keys()[0]的方法獲取結點屬性,可以使用list(myTree.keys())[0]
secondDict = myTree[firstStr] #獲取下一組字典
for key in secondDict.keys():
if type(secondDict[key]).__name__=='dict': #測試該結點是否為字典,如果不是字典,代表此結點為葉子結點
numLeafs += getNumLeafs(secondDict[key])
else: numLeafs +=1
return numLeafs
#獲取決策樹的層數
def getTreeDepth(myTree):
maxDepth = 0 #初始化決策樹深度
firstStr = next(iter(myTree)) #python3中myTree.keys()返回的是dict_keys,不在是list,所以不能使用myTree.keys()[0]的方法獲取結點屬性,可以使用list(myTree.keys())[0]
secondDict = myTree[firstStr] #獲取下一個字典
for key in secondDict.keys():
if type(secondDict[key]).__name__=='dict': #測試該結點是否為字典,如果不是字典,代表此結點為葉子結點
thisDepth = 1 + getTreeDepth(secondDict[key])
else: thisDepth = 1
if thisDepth > maxDepth: maxDepth = thisDepth #更新層數
return maxDepth
#繪製結點
def plotNode(nodeTxt, centerPt, parentPt, nodeType):
arrow_args = dict(arrowstyle="<-") #定義箭頭格式
#下面的字型僅使用與Mac使用者,如果您是Windows使用者請修改為font = FontProperties(fname=r"c:\windows\fonts\simsun.ttc", size=14)
font = FontProperties(fname=r'/System/Library/Fonts/Hiragino Sans GB.ttc', size=14) #設定中文字型
createPlot.ax1.annotate(nodeTxt, xy=parentPt, xycoords='axes fraction', #繪製結點
xytext=centerPt, textcoords='axes fraction',
va="center", ha="center", bbox=nodeType, arrowprops=arrow_args, fontproperties=font)
#標註有向邊屬性值
def plotMidText(cntrPt, parentPt, txtString):
xMid = (parentPt[0]-cntrPt[0])/2.0 + cntrPt[0] #計算標註位置
yMid = (parentPt[1]-cntrPt[1])/2.0 + cntrPt[1]
createPlot.ax1.text(xMid, yMid, txtString, va="center", ha="center", rotation=30)
#繪製決策樹
def plotTree(myTree, parentPt, nodeTxt):
decisionNode = dict(boxstyle="sawtooth", fc="0.8") #設定結點格式
leafNode = dict(boxstyle="round4", fc="0.8") #設定葉結點格式
numLeafs = getNumLeafs(myTree) #獲取決策樹葉結點數目,決定了樹的寬度
depth = getTreeDepth(myTree) #獲取決策樹層數
firstStr = next(iter(myTree)) #下個字典
cntrPt = (plotTree.xOff + (1.0 + float(numLeafs))/2.0/plotTree.totalW, plotTree.yOff) #中心位置
plotMidText(cntrPt, parentPt, nodeTxt) #標註有向邊屬性值
plotNode(firstStr, cntrPt, parentPt, decisionNode) #繪製結點
secondDict = myTree[firstStr] #下一個字典,也就是繼續繪製子結點
plotTree.yOff = plotTree.yOff - 1.0/plotTree.totalD #y偏移
for key in secondDict.keys():
if type(secondDict[key]).__name__=='dict': #測試該結點是否為字典,如果不是字典,代表此結點為葉子結點
plotTree(secondDict[key],cntrPt,str(key)) #不是葉結點,遞迴呼叫繼續繪製
else: #如果是葉結點,繪製葉結點,並標註有向邊屬性值
plotTree.xOff = plotTree.xOff + 1.0/plotTree.totalW
plotNode(secondDict[key], (plotTree.xOff, plotTree.yOff), cntrPt, leafNode)
plotMidText((plotTree.xOff, plotTree.yOff), cntrPt, str(key))
plotTree.yOff = plotTree.yOff + 1.0/plotTree.totalD
#建立繪製面板
def createPlot(inTree):
fig = plt.figure(1, facecolor='white') #建立fig
fig.clf() #清空fig
axprops = dict(xticks=[], yticks=[])
createPlot.ax1 = plt.subplot(111, frameon=False, **axprops) #去掉x、y軸
plotTree.totalW = float(getNumLeafs(inTree)) #獲取決策樹葉結點數目
plotTree.totalD = float(getTreeDepth(inTree)) #獲取決策樹層數
plotTree.xOff = -0.5/plotTree.totalW; plotTree.yOff = 1.0; #x偏移
plotTree(inTree, (0.5,1.0), '') #繪製決策樹
plt.show() #顯示繪製結果
if __name__ == '__main__':
dataSet, labels = createDataSet()
featLabels = []
myTree = createTree(dataSet, labels, featLabels)
print(myTree)
createPlot(myTree)
執行遇到的錯誤:
-
1.AttributeError:module 'backend_interagg' has no attribute 'FigureCanvas'
解決方法:
在pycharm中開啟" File --> Settings --> Tools --> Python Scientific ",將"Show plots in toolwindow"去掉勾選,並應用。 -
2.'Annotation' object has no property 'FontProperties'
解決方法:
找了一會發現是字型問題,因為我的電腦是Mac系統,在字型設定與Windows有些區別,讀者可以根據如下步驟修改:首先在終端輸入open /System/Library/Fonts然後找到一種字型,並複製其路徑,另外在呼叫的時候FontProperties要寫成小寫,否則也會報錯,如下圖
最終問題解決之後,執行結果如下圖