Nginx安裝(從Linx包安裝)
目前,nginx軟體包可用於以下發行版和版本:
RHEL/CentOS:
| 版本 | 支援的平台 |
|---|---|
| 5.x | x86_64, i386 |
| 6.x | x86_64, i386 |
| 7.x | x86_64, ppc64le |
Debian:
| 版本 | 程式碼名稱(codename) |
支援的平台 |
|---|---|---|
| 7.x | wheezy | x86_64, i386 |
| 8.x | jessie | x86_64, i386 |
Ubuntu:
| 版本 | 程式碼名稱(codename) |
支援的平台 |
|---|---|---|
| 12.04 | precise | x86_64, i386 |
| 14.04 | trusty | x86_64, i386, aarch64/arm64 |
| 16.04 | xenial | x86_64, i386, ppc64el |
| 16.10 | yakkety | x86_64, i386 |
SLES:
| 版本 | 支援的平台 |
|---|---|
| 12 | x86_64 |
要實現Linux軟體包的自動更新,可以為RHEL/CentOS發行版設定yum儲存庫,Debian/Ubuntu發行版的apt儲存庫,以及SLES的zypper儲存庫。
在本文中,我們重點以Debian/Ubuntu發行版的apt儲存庫作為一個演示,並在Ubuntu系統上安裝Nginx。
1. 用於穩定版本的預構建軟體包
RHEL/CentOS系統平台
要設定RHEL/CentOS的yum儲存庫,需要建立一個名稱為/etc/yum.repos.d/nginx.repo的檔案,其中包含以下內容:
[nginx]
name=nginx repo
baseurl=http://nginx.org/packages/OS/OSRELEASE/$basearch/
gpgcheck=0
enabled=1
根據所使用的分配,將「OS」替換為「rhel」或「centos」,對於5.x,6.x或7.x,請將「OSRELEASE」替換為「5」,「6」或「7」 版本。
有關於如何檢視系統版本 -
[root@localhost nginx-1.10.3]# lsb_release -a
bash:lsb_release: command not found
[root@localhost nginx-1.10.3]# yum install lsb –y
[root@localhost nginx-1.10.3]# lsb_release -a
LSB Version:    :core-4.1-amd64:core-4.1-noarch:cxx-4.1-amd64:cxx-4.1-noarch:desktop-4.1-amd64:desktop-4.1-noarch:languages-4.1-amd64:languages-4.1-noarch:printing-4.1-amd64:printing-4.1-noarch
Distributor ID: CentOS
Description:    CentOS Linux release 7.3.1611 (Core)
Release:        7.3.1611
Codename:       Core
[root@localhost nginx-1.10.3]#
第二種方法:
[root@localhost ~]# cat /etc/redhat-release
CentOS Linux release 7.3.1611 (Core)
[root@localhost ~]#
Debian/Ubuntu系統平台
對於Debian/Ubuntu,為了驗證nginx儲存庫簽名,並且在安裝nginx軟體包時消除關於缺少PGP金鑰的警告,必須將用於將nginx軟體包和儲存庫簽署的金鑰新增到apt程式金鑰環中。 請從Nginx官方網站下載金鑰:http://nginx.org/keys/nginx_signing.key , 並使用以下命令將其新增到apt程式金鑰環:
sudo apt-key add nginx_signing.key
Debian系統則將Debian程式碼替換為Debian發行版程式碼(codename),並將以下內容附加到/etc/apt/sources.list檔案的末尾:
deb http://nginx.org/packages/debian/ codename nginx
deb-src http://nginx.org/packages/debian/ codename nginx
對於Ubuntu將Ubuntu發行版代號替換codename,並將以下內容附加到/etc/apt/sources.list檔案的末尾:
deb http://nginx.org/packages/ubuntu/ codename nginx
deb-src http://nginx.org/packages/ubuntu/ codename nginx
對於Debian / Ubuntu,請執行以下命令:
apt-get update
apt-get install nginx
SLES系統平台
對於SLES,執行以下命令:
zypper addrepo -G -t yum -c 'http://nginx.org/packages/sles/12' nginx
2. 原始碼包
包原始碼包可以在包原始碼原始碼庫中找到: http://hg.nginx.org/pkg-oss?_ga=1.85593177.1509956953.1490042234 。
預設分支儲存當前主線版本的包原始碼,而stable-*分支則用於穩定版本的最新的原始碼包。 要構建二進位制包,可在Debian/Ubuntu上的debian/目錄中或在RHEL/CentOS/SLES上的rpm/SPECS/中執行make命令。
包原始碼分佈在與nginx相同的2條BSD類許可證下。
3. Ubuntu Server安裝Nginx範例
對於Debian/Ubuntu,為了驗證nginx儲存庫簽名,並且在安裝nginx軟體包時消除關於缺少PGP金鑰的警告,必須將用於將nginx軟體包和儲存庫簽署的金鑰新增到apt程式金鑰環中。 請從Nginx官方網站下載金鑰:http://nginx.org/keys/nginx_signing.key , 並使用以下命令將其新增到apt程式金鑰環:
yiibai@ubuntu:~$ wget -c http://nginx.org/keys/nginx_signing.key
--2017-03-31 20:13:06--  http://nginx.org/keys/nginx_signing.key
Resolving nginx.org (nginx.org)... 95.211.80.227, 206.251.255.63, 2001:1af8:4060:a004:21::e3, ...
Connecting to nginx.org (nginx.org)|95.211.80.227|:80... connected.
HTTP request sent, awaiting response... 200 OK
Length: 1561 (1.5K) [application/octet-stream]
Saving to: ‘nginx_signing.key’

nginx_signing.key   100%[===================>]   1.52K  --.-KB/s    in 0s

2017-03-31 20:13:06 (105 MB/s) - ‘nginx_signing.key’ saved [1561/1561]

yiibai@ubuntu:~$ ls
nginx_signing.key
yiibai@ubuntu:~$
yiibai@ubuntu:~$ sudo apt-key add nginx_signing.key
檢視 Ubuntu發行版代號,使用以下命令 -
yiibai@ubuntu:~$ sudo lsb_release -a
No LSB modules are available.
Distributor ID: Ubuntu
Description:    Ubuntu 16.04.1 LTS
Release:        16.04
Codename:       xenial
yiibai@ubuntu:~$
Ubuntu將Ubuntu發行版代號替換codename,並將以下兩行內容附加到/etc/apt/sources.list檔案的末尾:
deb http://nginx.org/packages/ubuntu/ xenial nginx
deb-src http://nginx.org/packages/ubuntu/ xenial nginx
如下所示 -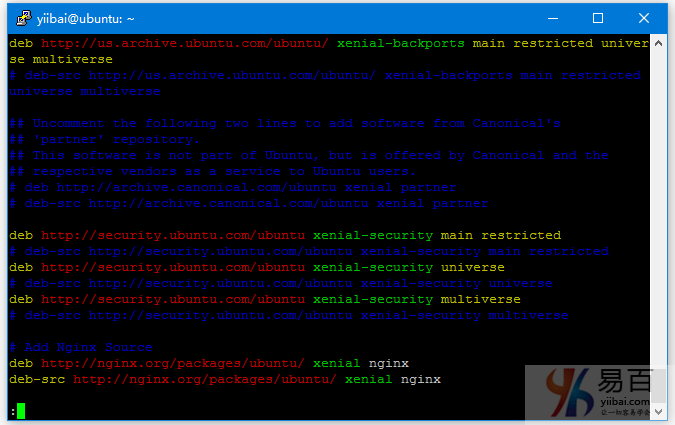
現在,可以執行下面命令來安裝nginx了:
yiibai@ubuntu:~$ sudo apt-get update
Get:1 http://nginx.org/packages/ubuntu xenial InRelease [3,589 B]
Hit:2 http://us.archive.ubuntu.com/ubuntu xenial InRelease
Get:3 http://nginx.org/packages/ubuntu xenial/nginx Sources [4,139 B]
Get:4 http://us.archive.ubuntu.com/ubuntu xenial-updates InRelease [102 kB]
Get:5 http://nginx.org/packages/ubuntu xenial/nginx amd64 Packages [7,012 B]
Get:6 http://nginx.org/packages/ubuntu xenial/nginx i386 Packages [6,999 B]
Get:7 http://us.archive.ubuntu.com/ubuntu xenial-backports InRelease [102 kB]
Get:8 http://security.ubuntu.com/ubuntu xenial-security InRelease [102 kB]
Fetched 328 kB in 5s (61.3 kB/s)
Reading package lists... Done
yiibai@ubuntu:~$
yiibai@ubuntu:~$ sudo apt-get install nginx
... ...
... ...
Selecting previously unselected package nginx.
(Reading database ... 54601 files and directories currently installed.)
Preparing to unpack .../nginx_1.10.3-1~xenial_amd64.deb ...
----------------------------------------------------------------------

Thanks for using nginx!

Please find the official documentation for nginx here:
* http://nginx.org/en/docs/

Commercial subscriptions for nginx are available on:
* http://nginx.com/products/

----------------------------------------------------------------------
Unpacking nginx (1.10.3-1~xenial) ...
Processing triggers for man-db (2.7.5-1) ...
Processing triggers for systemd (229-4ubuntu7) ...
Processing triggers for ureadahead (0.100.0-19) ...
Setting up nginx (1.10.3-1~xenial) ...
Processing triggers for systemd (229-4ubuntu7) ...
Processing triggers for ureadahead (0.100.0-19) ...
組態檔案預設會被安裝到: /etc/nginx 目錄下 -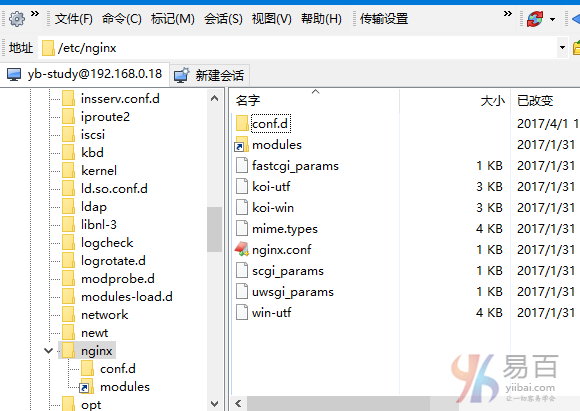
1. 啟動 Nginx 測試 -
yiibai@ubuntu:~$ sudo /etc/init.d/nginx
Usage: /etc/init.d/nginx {start|stop|status|restart|reload|force-reload|upgrade|configtest|check-reload}
yiibai@ubuntu:~$ sudo /etc/init.d/nginx start
[ ok ] Starting nginx (via systemctl): nginx.service.
yiibai@ubuntu:~$
2. 查詢nginx進程
yiibai@ubuntu:~$ ps -ef | grep nginx
root       9933      1  0 20:36 ?        00:00:00 nginx: master process /usr/sbi                        n/nginx -c /etc/nginx/nginx.conf
nginx      9938   9933  0 20:36 ?        00:00:00 nginx: worker process
yiibai     9978   8461  0 20:40 pts/0    00:00:00 grep --color=auto nginx
yiibai@ubuntu:~$
上面輸出結果中,master就代表該進程是nginx的主進程,它的進程ID是:9933。
3. 停止nginx
要停止Nginx,可以使用以下命令 -
kill -QUIT 主進程號
本例中就是 : kill -QUIT 9933
當然還有通用的停止進程的命令,那就是暴力停止了。kill -9 進程號
kill一個進程,在查詢一下進程是否還存在,一個個的kill,全部kill完就可以了。
4. 測試nginx服務
開啟瀏覽器或或在終端上使用 curl localhost存取目標伺服器,如下 -
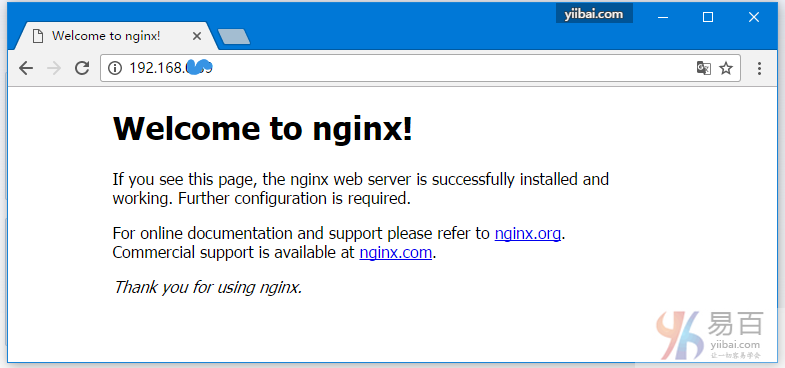
或在終端上使用:curl localhost -
yiibai@ubuntu:~$ curl localhost
<!DOCTYPE html>
<html>
<head>
<title>Welcome to nginx!</title>
<style>
    body {
        width: 35em;
        margin: 0 auto;
        font-family: Tahoma, Verdana, Arial, sans-serif;
    }
</style>
</head>
<body>
<h1>Welcome to nginx!</h1>
<p>If you see this page, the nginx web server is successfully installed and
working. Further configuration is required.</p>

<p>For online documentation and support please refer to
<a href="http://nginx.org/">nginx.org</a>.<br/>
Commercial support is available at
<a href="http://nginx.com/">nginx.com</a>.</p>

<p><em>Thank you for using nginx.</em></p>
</body>
</html>
yiibai@ubuntu:~$