JDBC簡單範例程式碼
本文章教學中將演示如何建立一個簡單的JDBC應用程式的範例。 這將顯示如何開啟資料庫連線,執行SQL查詢並顯示結果。
這個範例程式碼中涉及所有步驟,一些步驟將在本教學的後續章節中進行說明。
建立JDBC應用程式
構建JDBC應用程式涉及以下六個步驟 -
- 匯入包:需要包含包含資料庫程式設計所需的JDBC類的包。 大多數情況下,使用
import java.sql.*就足夠了。 - 註冊JDBC驅動程式:需要初始化驅動程式,以便可以開啟與資料庫的通訊通道。
- 開啟一個連線:需要使用
DriverManager.getConnection()方法建立一個Connection物件,它表示與資料庫的物理連線。 - 執行查詢:需要使用型別為
Statement的物件來構建和提交SQL語句到資料庫。 - 從結果集中提取資料:需要使用相應的
ResultSet.getXXX()方法從結果集中檢索資料。 - 清理環境:需要明確地關閉所有資料庫資源,而不依賴於JVM的垃圾收集。
範例程式碼
當您以後需要建立自己的JDBC應用程式時,可將此範例可以作為模板使用,建議您收藏好此網頁。
此範例程式碼是基於上一章完成的環境和資料庫設定之後編寫的。
在FirstExample.java (F:\worksp\jdbc\FirstExample.java)中複製並貼上以下範例,編譯並執行如下 -
//STEP 1. Import required packages
import java.sql.*;

public class FirstExample {
   // JDBC driver name and database URL
   static final String JDBC_DRIVER = "com.mysql.jdbc.Driver";
   static final String DB_URL = "jdbc:mysql://localhost/emp";

   //  Database credentials
   static final String USER = "root";
   static final String PASS = "123456";

   public static void main(String[] args) {
   Connection conn = null;
   Statement stmt = null;
   try{
      //STEP 2: Register JDBC driver
      Class.forName("com.mysql.jdbc.Driver");

      //STEP 3: Open a connection
      System.out.println("Connecting to database...");
      conn = DriverManager.getConnection(DB_URL,USER,PASS);

      //STEP 4: Execute a query
      System.out.println("Creating statement...");
      stmt = conn.createStatement();
      String sql;
      sql = "SELECT id, first, last, age FROM Employees";
      ResultSet rs = stmt.executeQuery(sql);

      //STEP 5: Extract data from result set
      while(rs.next()){
         //Retrieve by column name
         int id  = rs.getInt("id");
         int age = rs.getInt("age");
         String first = rs.getString("first");
         String last = rs.getString("last");

         //Display values
         System.out.print("ID: " + id);
         System.out.print(", Age: " + age);
         System.out.print(", First: " + first);
         System.out.println(", Last: " + last);
      }
      //STEP 6: Clean-up environment
      rs.close();
      stmt.close();
      conn.close();
   }catch(SQLException se){
      //Handle errors for JDBC
      se.printStackTrace();
   }catch(Exception e){
      //Handle errors for Class.forName
      e.printStackTrace();
   }finally{
      //finally block used to close resources
      try{
         if(stmt!=null)
            stmt.close();
      }catch(SQLException se2){
      }// nothing we can do
      try{
         if(conn!=null)
            conn.close();
      }catch(SQLException se){
         se.printStackTrace();
      }//end finally try
   }//end try
   System.out.println("There are so thing wrong!");
}//end main
}//end FirstExample
把上面程式碼存放到 F:\worksp\jdbc\FirstExample.java 檔案中,並建立一個目錄:F:\worksp\jdbc\libs,下載 mysql-connector-java-5.1.40-bin.jar 放入到F:\worksp\jdbc\libs 目錄中。
下載地址:http://downloads.mysql.com/archives/c-j/
使用命令列編譯Java程式並載入指定目錄中的Jar包(mysql-connector-java-5.1.40-bin.jar):
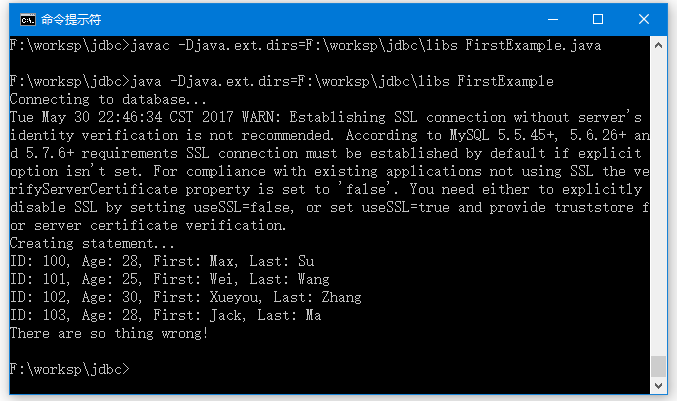
F:\worksp\jdbc> javac -Djava.ext.dirs=./libs FirstExample.java
##-- 或者
F:\worksp\jdbc> javac -Djava.ext.dirs=F:\worksp\jdbc\libs FirstExample.java
編譯上面程式碼後,得到以下結果 -
## F:\worksp\jdbc>javac -Djava.ext.dirs=./libs FirstExample.java
## 執行程式 -
F:\worksp\jdbc>java -Djava.ext.dirs=./libs FirstExample
Connecting to database...
Tue May 30 22:43:18 CST 2017 WARN: Establishing SSL connection without server's identity verification is not recommended. According to MySQL 5.5.45+, 5.6.26+ and 5.7.6+ requirements SSL connection must be established by default if explicit option isn't set. For compliance with existing applications not using SSL the verifyServerCertificate property is set to 'false'. You need either to explicitly disable SSL by setting useSSL=false, or set useSSL=true and provide truststore for server certificate verification.
Creating statement...
ID: 100, Age: 28, First: Max, Last: Su
ID: 101, Age: 25, First: Wei, Last: Wang
ID: 102, Age: 30, First: Xueyou, Last: Zhang
ID: 103, Age: 28, First: Jack, Last: Ma
There are so thing wrong!

F:\worksp\jdbc>
完整的執行過程如下 -
或者使用 Eclipse 或其它IDE建立程式碼執行。