RabbitMQ day1
一、訊息佇列MQ概述
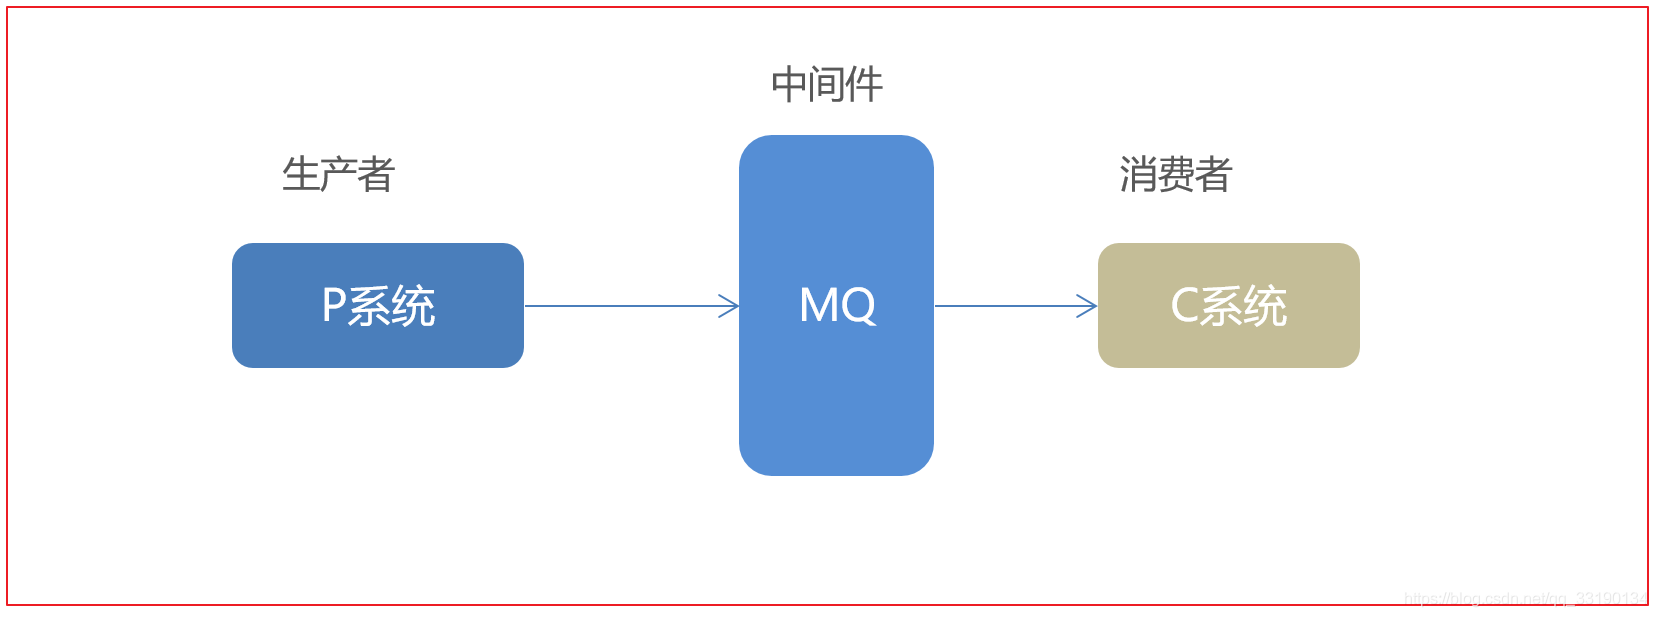
MQ全稱爲Message Queue,訊息佇列是應用程式和應用程式之間的通訊方法。
RabbitMQ是一個Erlang開發的AMQP(Advanced Message Queuing Protocol )的開源實現。
1.1 爲什麼使用MQ
在專案中,可將一些無需即時返回且耗時的操作提取出來,進行非同步處理,而這種非同步處理的方式大大的節省了伺服器的請求響應時間,從而提高了系統的吞吐量。
開發中訊息佇列通常有如下應用場景:
**(1) 非同步提速: **
任務非同步處理將不需要同步處理的並且耗時長的操作由訊息佇列通知訊息接收方進行非同步處理。提高了應用程式的響應時間。
**(2) 應用解耦: **
應用程式解耦合,MQ充當中介,生產方通過MQ與消費方互動,它將應用程式進行解耦合
**(3) 削峯填谷: **
在存取量劇增的情況下,應用仍然需要繼續發揮作用,但是這樣的突發流量並不常見;如果爲以能處理這類峯值存取爲標準來投入資源隨時待命無疑是巨大的浪費。使用MQ能夠使關鍵元件頂住突發的存取壓力,而不會因爲突發的超負荷的請求而完全崩潰。
**(4) 可恢復性: **
系統的一部分元件失效時,不會影響到整個系統。MQ降低了進程間的耦合度,所以即使一個處理訊息的進程掛掉,加入佇列中的訊息仍然可以在系統恢復後被處理。
(5) 排序保證:
訊息佇列可以控制數據處理的順序,因爲訊息佇列本身使用的是佇列這個數據結構,FIFO(先進選出),在一些場景數據處理的順序很重要,比如商品下單順序等。
1.2. 訊息佇列產品
市場上常見的訊息佇列有如下:
- ActiveMQ:基於JMS實現, 比較均衡, 不是最快的, 也不是最穩定的.
- ZeroMQ:基於C語言開發, 目前最好的佇列系統.
- RabbitMQ:基於AMQP協定,erlang語言開發,穩定性好, 數據基本上不會丟失
- RocketMQ:基於JMS,阿裡巴巴產品, 目前已經捐獻給apahce, 還在孵化器中孵化.
- Kafka:類似MQ的產品;分佈式訊息系統,高吞吐量, 目前最快的訊息伺服器, 不保證數據完整性.
1.3. AMQP 和 JMS
Dubbo協定:Dubbo 預設協定採用單一長連線和 NIO 非同步通訊,適合於小數據量大併發的服務呼叫,以及服務消費者機器數遠大於服務提供者機器數的情況。
HTTP協定(HyperText Transfer Protocol,超文字傳輸協定)是因特網上應用最爲廣泛的一種網路傳輸協定,所有的WWW檔案都必須遵守這個標準。
AMQP協定:即Advanced Message Queuing Protocol,一個提供統一訊息服務的應用層標準高階訊息佇列協定,是應用層協定的一個開放標準,爲訊息導向中介層設計。
MQ是訊息通訊的模型;實現MQ的大致有兩種主流方式:AMQP、JMS。
1.3.1. AMQP
AMQP,即Advanced Message Queuing Protocol,一個提供統一訊息服務的應用層標準高階訊息佇列協定,是應用層協定的一個開放標準,爲訊息導向中介層設計。更準確的說是一種binary wire-level protocol(鏈接協定)。這是其和JMS的本質差別,AMQP不從API層進行限定,而是直接定義網路交換的數據格式。
1.3.2. JMS
JMS即Java訊息服務(JavaMessage Service)應用程式介面,是一個Java平臺中關於訊息導向中介軟體(MOM)的API,用於在兩個應用程式之間,或分佈式系統中發送訊息,進行非同步通訊。
1.3.3. AMQP 與 JMS 區別
JMS是定義了統一的介面,來對訊息操作進行統一;AMQP是通過規定協定來統一數據互動的格式JMS限定了必須使用Java語言;AMQP只是協定,不規定實現方式,因此是跨語言的。JMS規定了兩種訊息模式;而AMQP的訊息模式更加豐富.
| JMS | AMQP | |
|---|---|---|
| 定義 | Java api | Wire-protocol |
| 跨語言 | 否 | 是 |
| 跨平臺 | 否 | 是 |
1.4. RabbitMQ
RabbitMQ是由erlang語言開發,基於AMQP(Advanced Message Queue 高階訊息佇列協定)協定實現的訊息佇列,它是一種應用程式之間的通訊方法,訊息佇列在分佈式系統開發中應用非常廣泛。
RabbitMQ官方地址:http://www.rabbitmq.com/
RabbitMQ提供了6種模式:Hello Word簡單模式,work工作模式,Publish/Subscribe發佈與訂閱模式,Routing路由模式,Topics主題模式(萬用字元模式),RPC遠端呼叫模式(遠端呼叫,不太算MQ;不作介紹)
官網對應模式介紹:https://www.rabbitmq.com/getstarted.html
應用場景:
1、雙十一商品秒殺/搶票功能實現
我們在雙11的時候,當我們凌晨大量的秒殺和搶購商品,然後去結算的時候,就會發現,介面會提醒我們,讓我們稍等,以及一些友好的圖片文字提醒。而不是像前幾年的時代,動不動就頁面卡死,報錯等來呈現給使用者。
2、積分兌換(積分可用於多平臺)
積分兌換模組,有一個公司多個部門都要用到這個模組,這時候就可以通過訊息佇列解耦這個特性來實現。 各部門系統做各部門的事,但是他們都可以用這個積分系統進行商品的兌換等。其他模組與積分模組完全解耦。
3、大平臺使用者註冊
發送郵件、使用者大數據分析操作等 基於同步變非同步功能實現
使用者註冊真實操作步驟:
- 使用者註冊選擇的興趣標籤,根據使用者的屬性,行爲進行使用者分析,計算出推薦內容
- 註冊後可能需要發送郵件給使用者
- 發送簡訊給使用者
- 發送給使用者指南的系統通知
- …等等
正常情況註冊,不出現高併發,假如有大量的使用者註冊,發生了高併發,就會出現如下情況:
郵件介面承受不住,或是分析資訊時的大量計算使 cpu 滿載,這將會出現雖然用戶數據記錄很快的新增到數據庫中了,但是卻卡在發郵件或分析資訊時的情況,導致請求的響應時間大幅增長,甚至出現超時,這就有點不劃算了。面對這種情況一般也是將這些操作放入訊息佇列(生產者消費者模型),訊息佇列慢慢的進行處理,同時可以很快的完成註冊請求,不會影響使用者使用其他功能。
1.5 相關定義:
- **Connection:**publisher/consumer 和 broker 之間的 TCP 連線
- Channel: 訊息通道,在用戶端的每個連線裡,可建立多個channel,每個channel代表一個對談任務
- Exchange: 訊息交換機,它指定訊息按什麼規則,路由到哪個佇列
- Queue: 訊息佇列載體,每個訊息都會被投入到一個或多個佇列
- VHost: 虛擬主機,一個broker裡可以開設多個vhost,用作不同使用者的許可權分離。
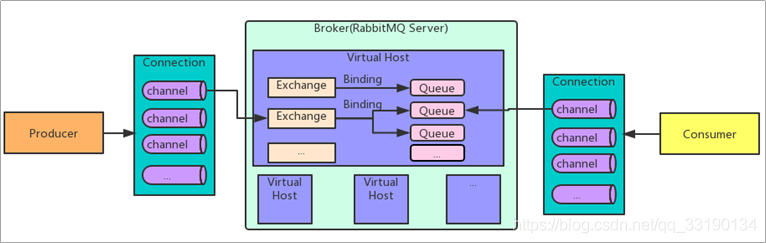
由Exchange、Queue、RoutingKey三個才能 纔能決定一個訊息從Exchange到Queue的唯一的線路。
二、安裝及設定RabbitMQ
2.1. docker中安裝RabbitMq
- 下載映象
docker pull rabbitmq:management
- 建立容器
docker run -di --name=changgou_rabbitmq -p 5671:5617 -p 5672:5672 -p4369:4369 -p 15671:15671 -p 15672:15672 -p 25672:25672 rabbitmq:management
解釋如下:
15672 (if management plugin is enabled.管理介面 )

15671 management監聽埠

5672, 5671 (AMQP 0-9-1 without and with TLS 訊息佇列協定是一個訊息協定)

4369 (epmd) epmd 代表 Erlang 埠對映守護行程

25672 (Erlang distribution)
- 存取後臺
瀏覽器中輸入地址
http://192.168.200.128:15672/
- 設定容器開機自動啓動
docker update --restart=always 容器ID
2.2. 使用者以及Virtual Hosts設定
2.2.1. 使用者角色
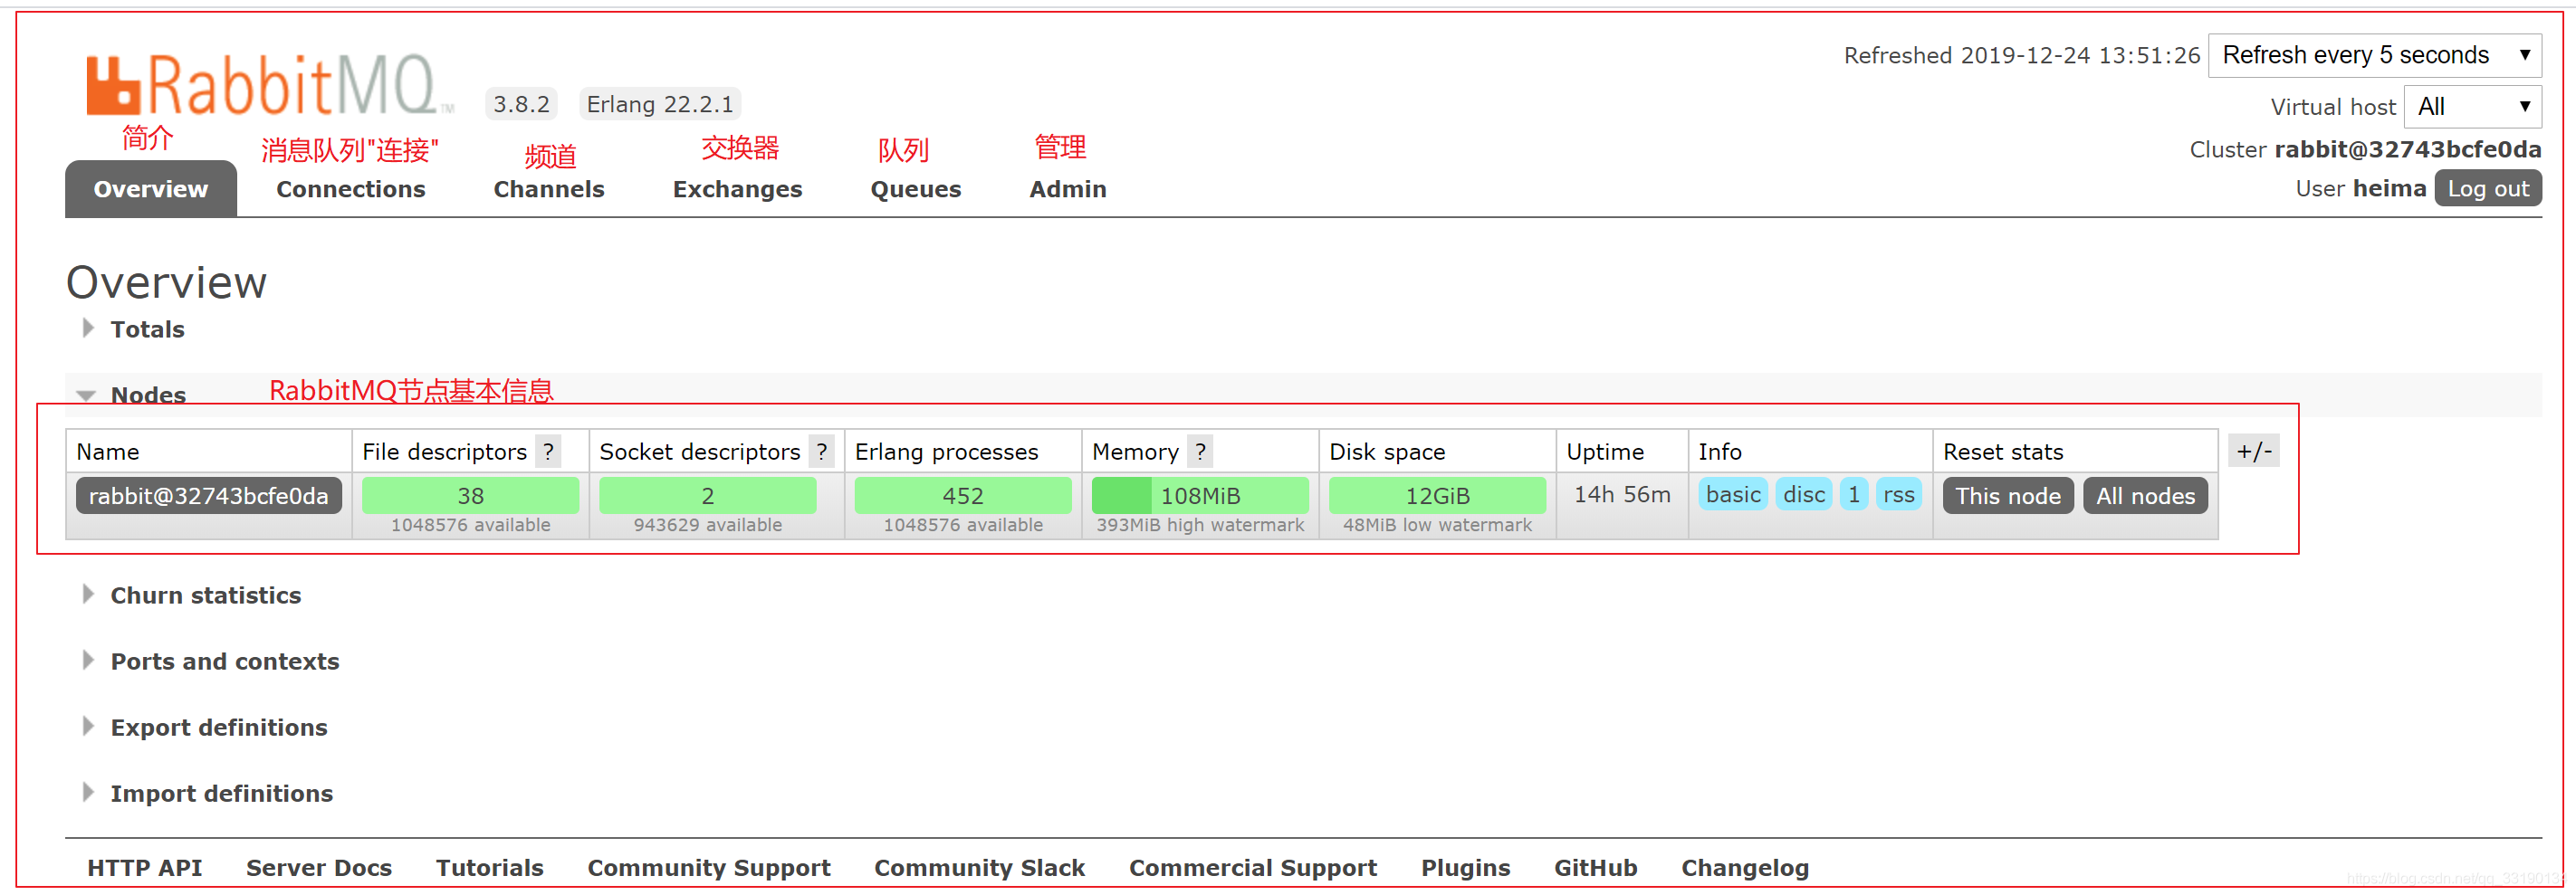
RabbitMQ在安裝好後,可以存取http://localhost:15672;其自帶了guest/guest的使用者名稱和密碼;如果需要建立自定義使用者;那麼也可以登錄管理介面後,如下操作:
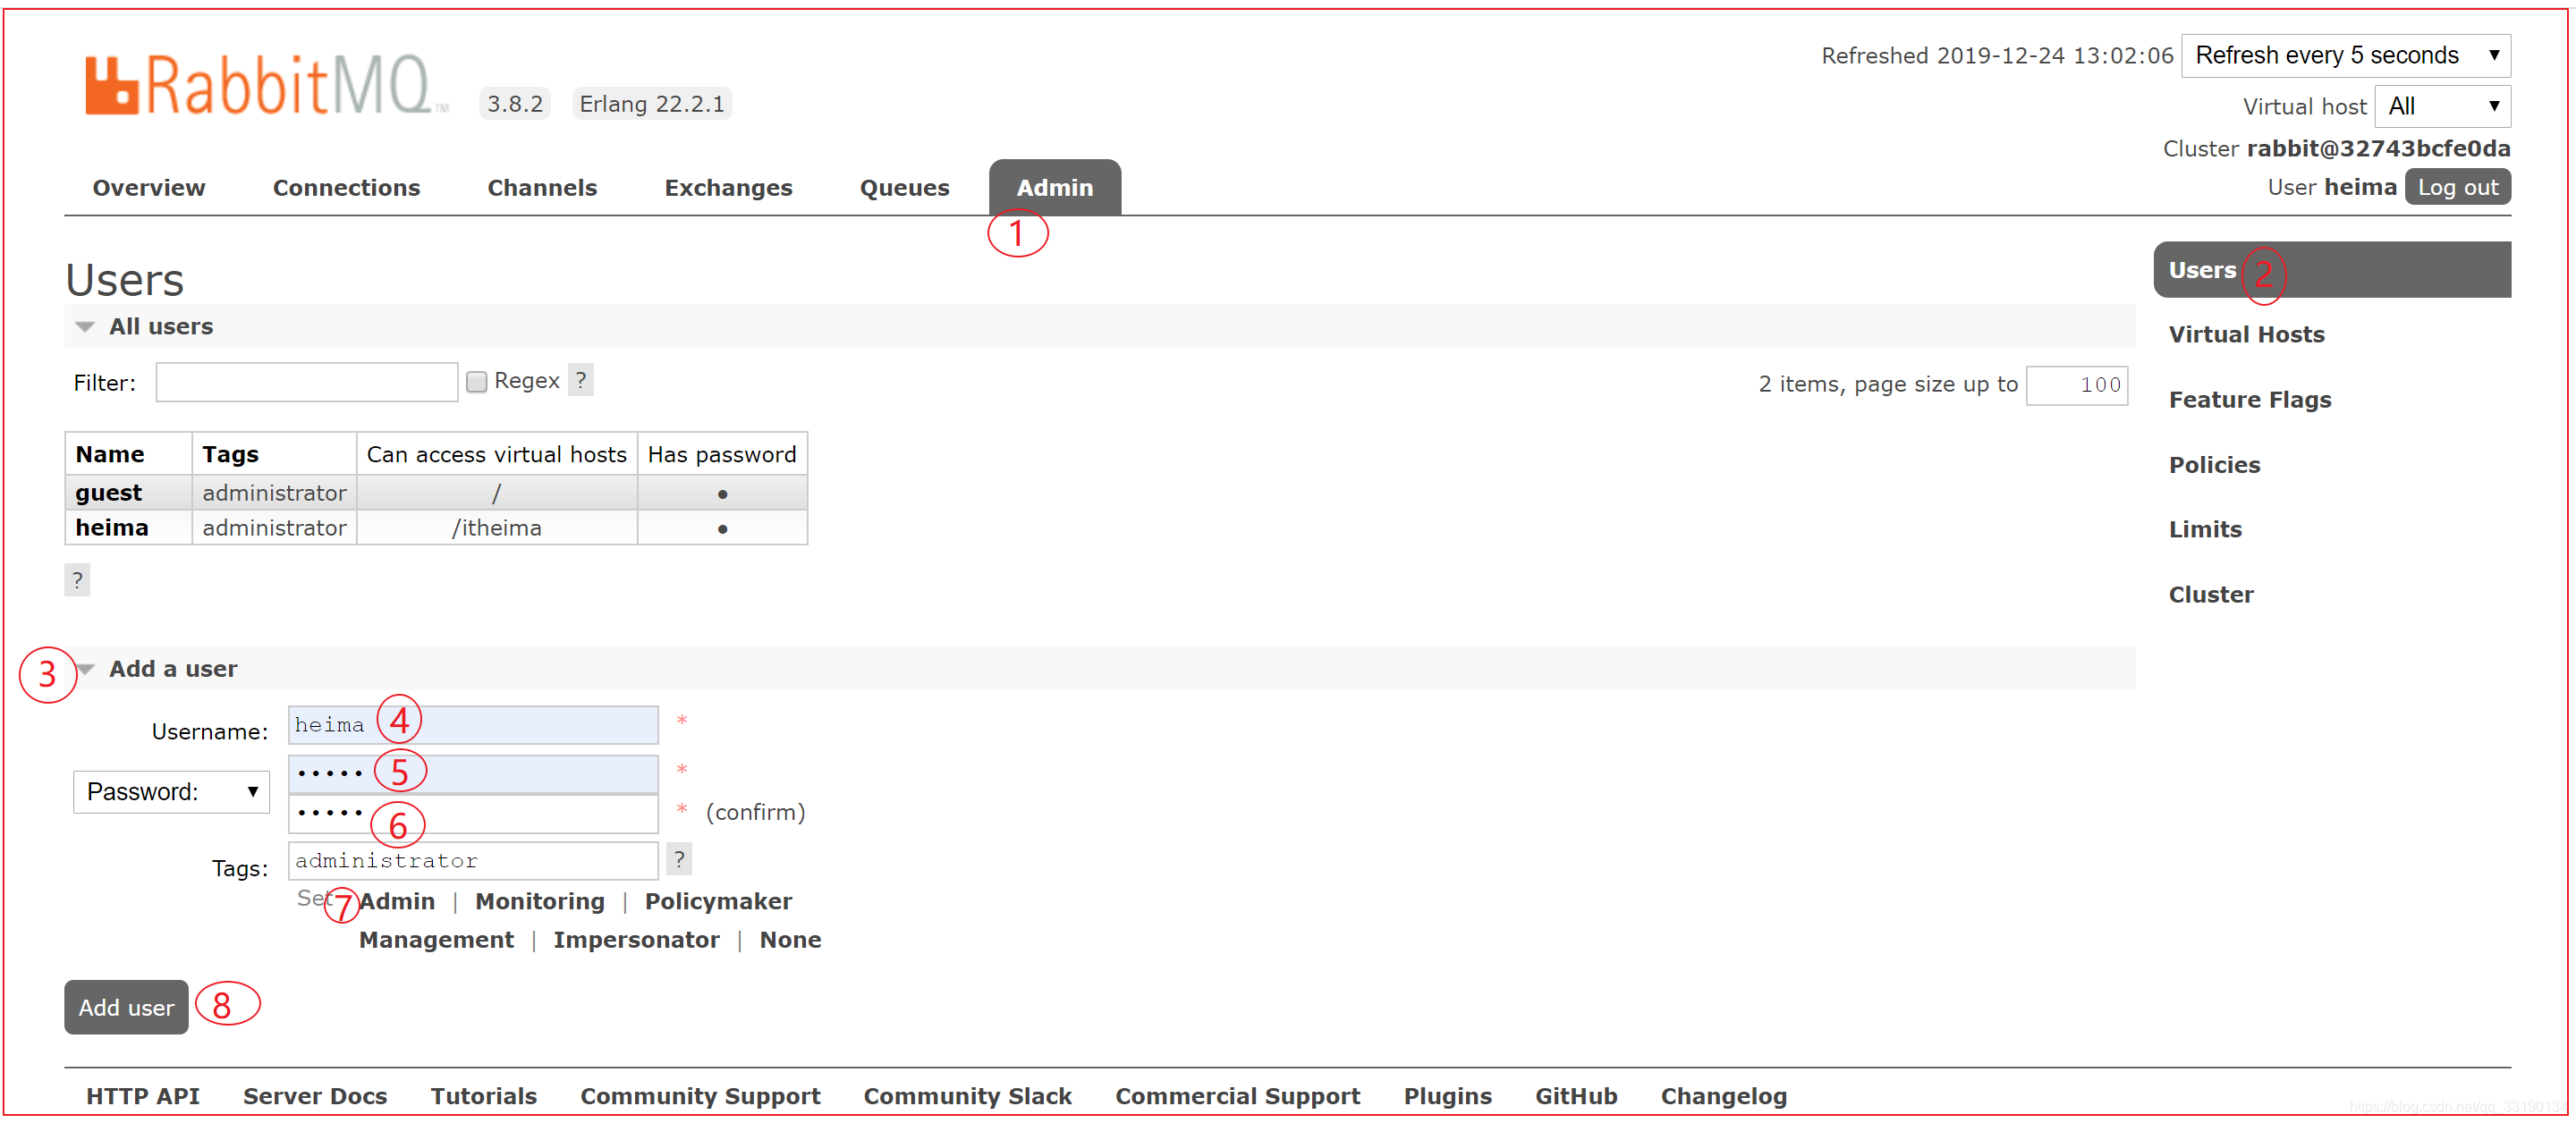
角色說明:
1、超級管理員(administrator)可登陸管理控制檯,可檢視所有的資訊,並且可以對使用者,策略(policy)進行操作。
2、監控者(monitoring)可登陸管理控制檯,同時可以檢視rabbitmq節點的相關資訊(進程數,記憶體使用情況,磁碟使用情況等)
3、策略制定者(policymaker)可登陸管理控制檯, 同時可以對policy進行管理。但無法檢視節點的相關資訊(上圖紅框標識的部分)。
4、普通管理者(management)僅可登陸管理控制檯,無法看到節點資訊,也無法對策略進行管理。
5、其他無法登陸管理控制檯,通常就是普通的生產者和消費者。
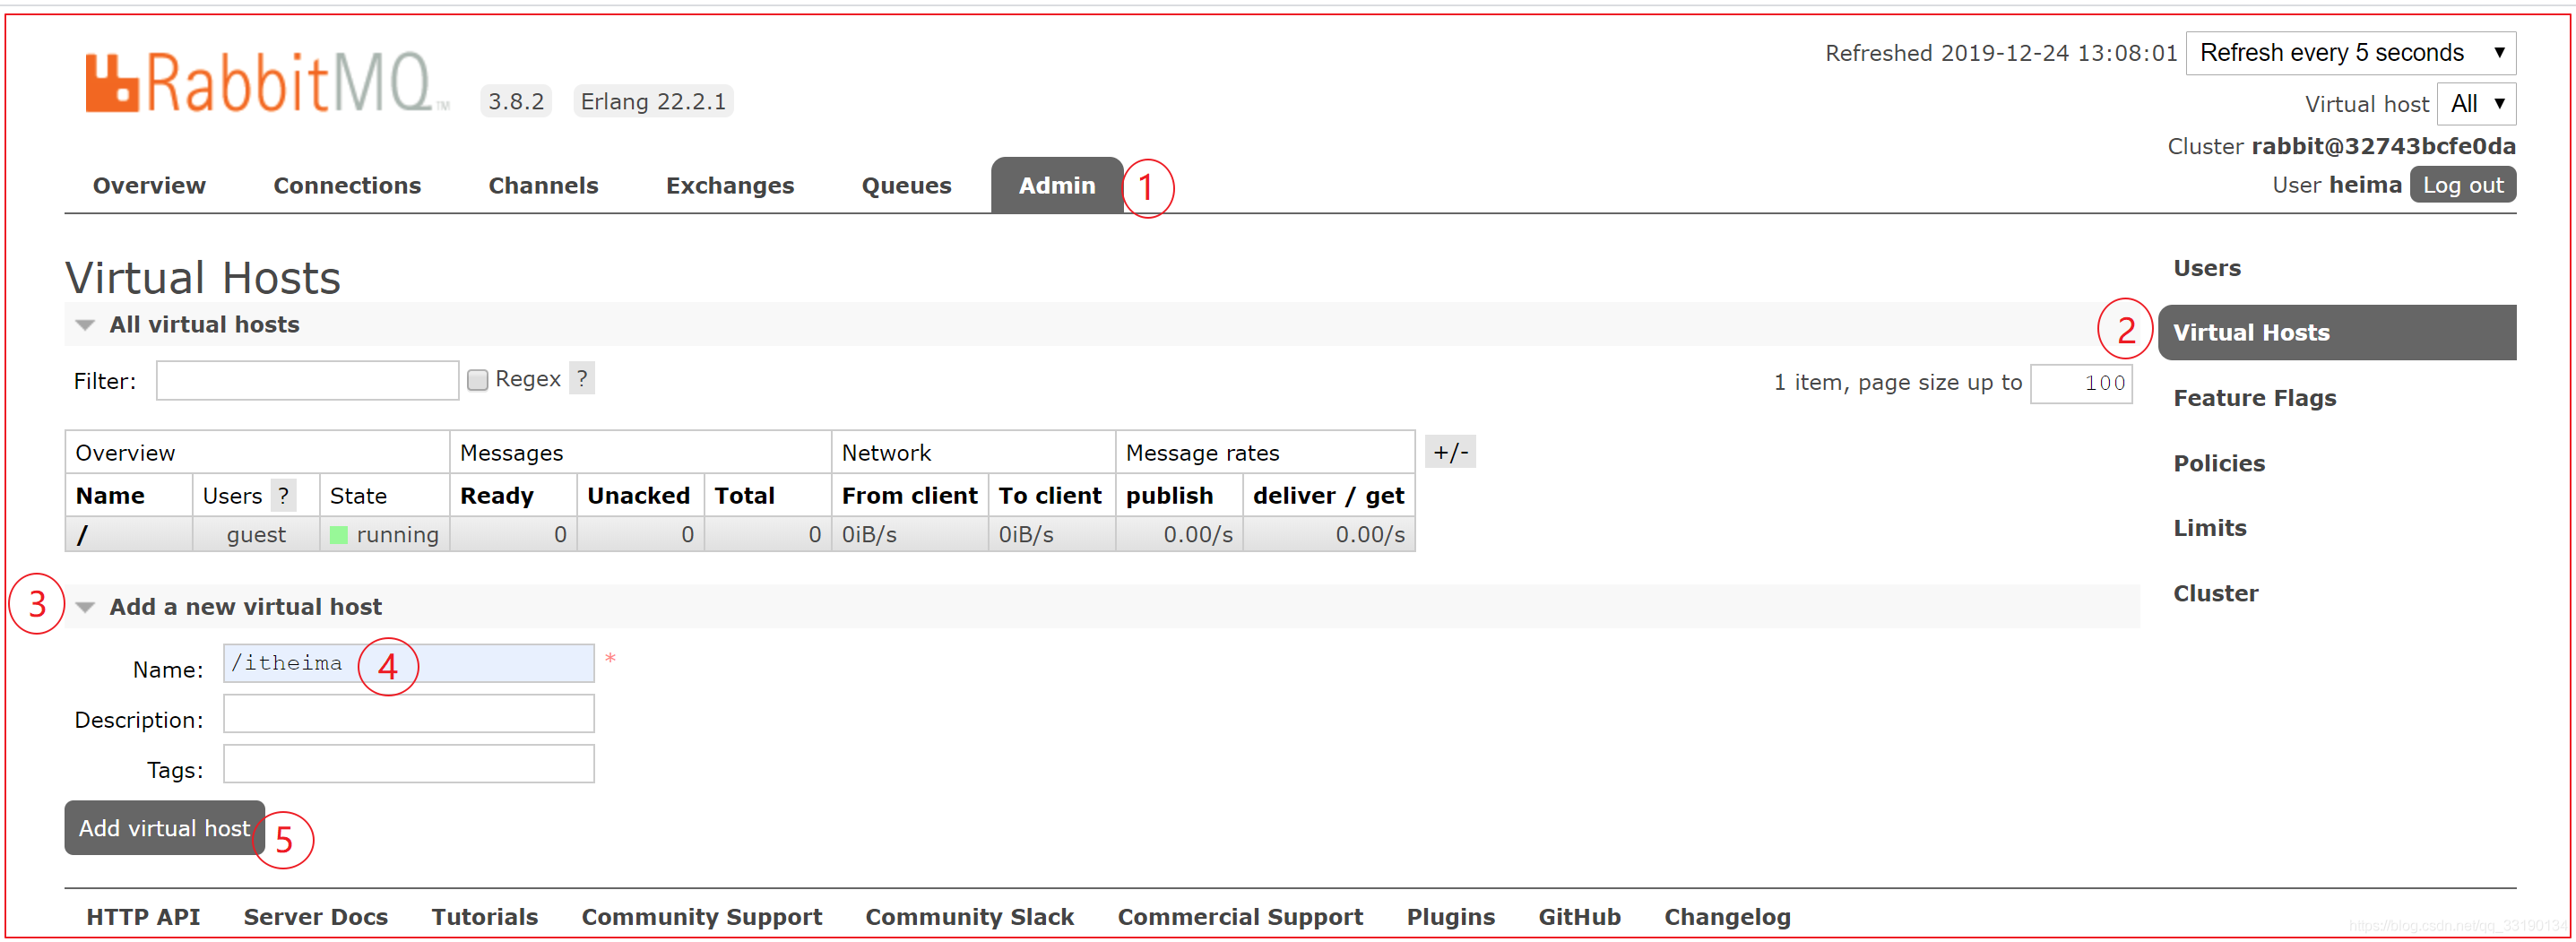
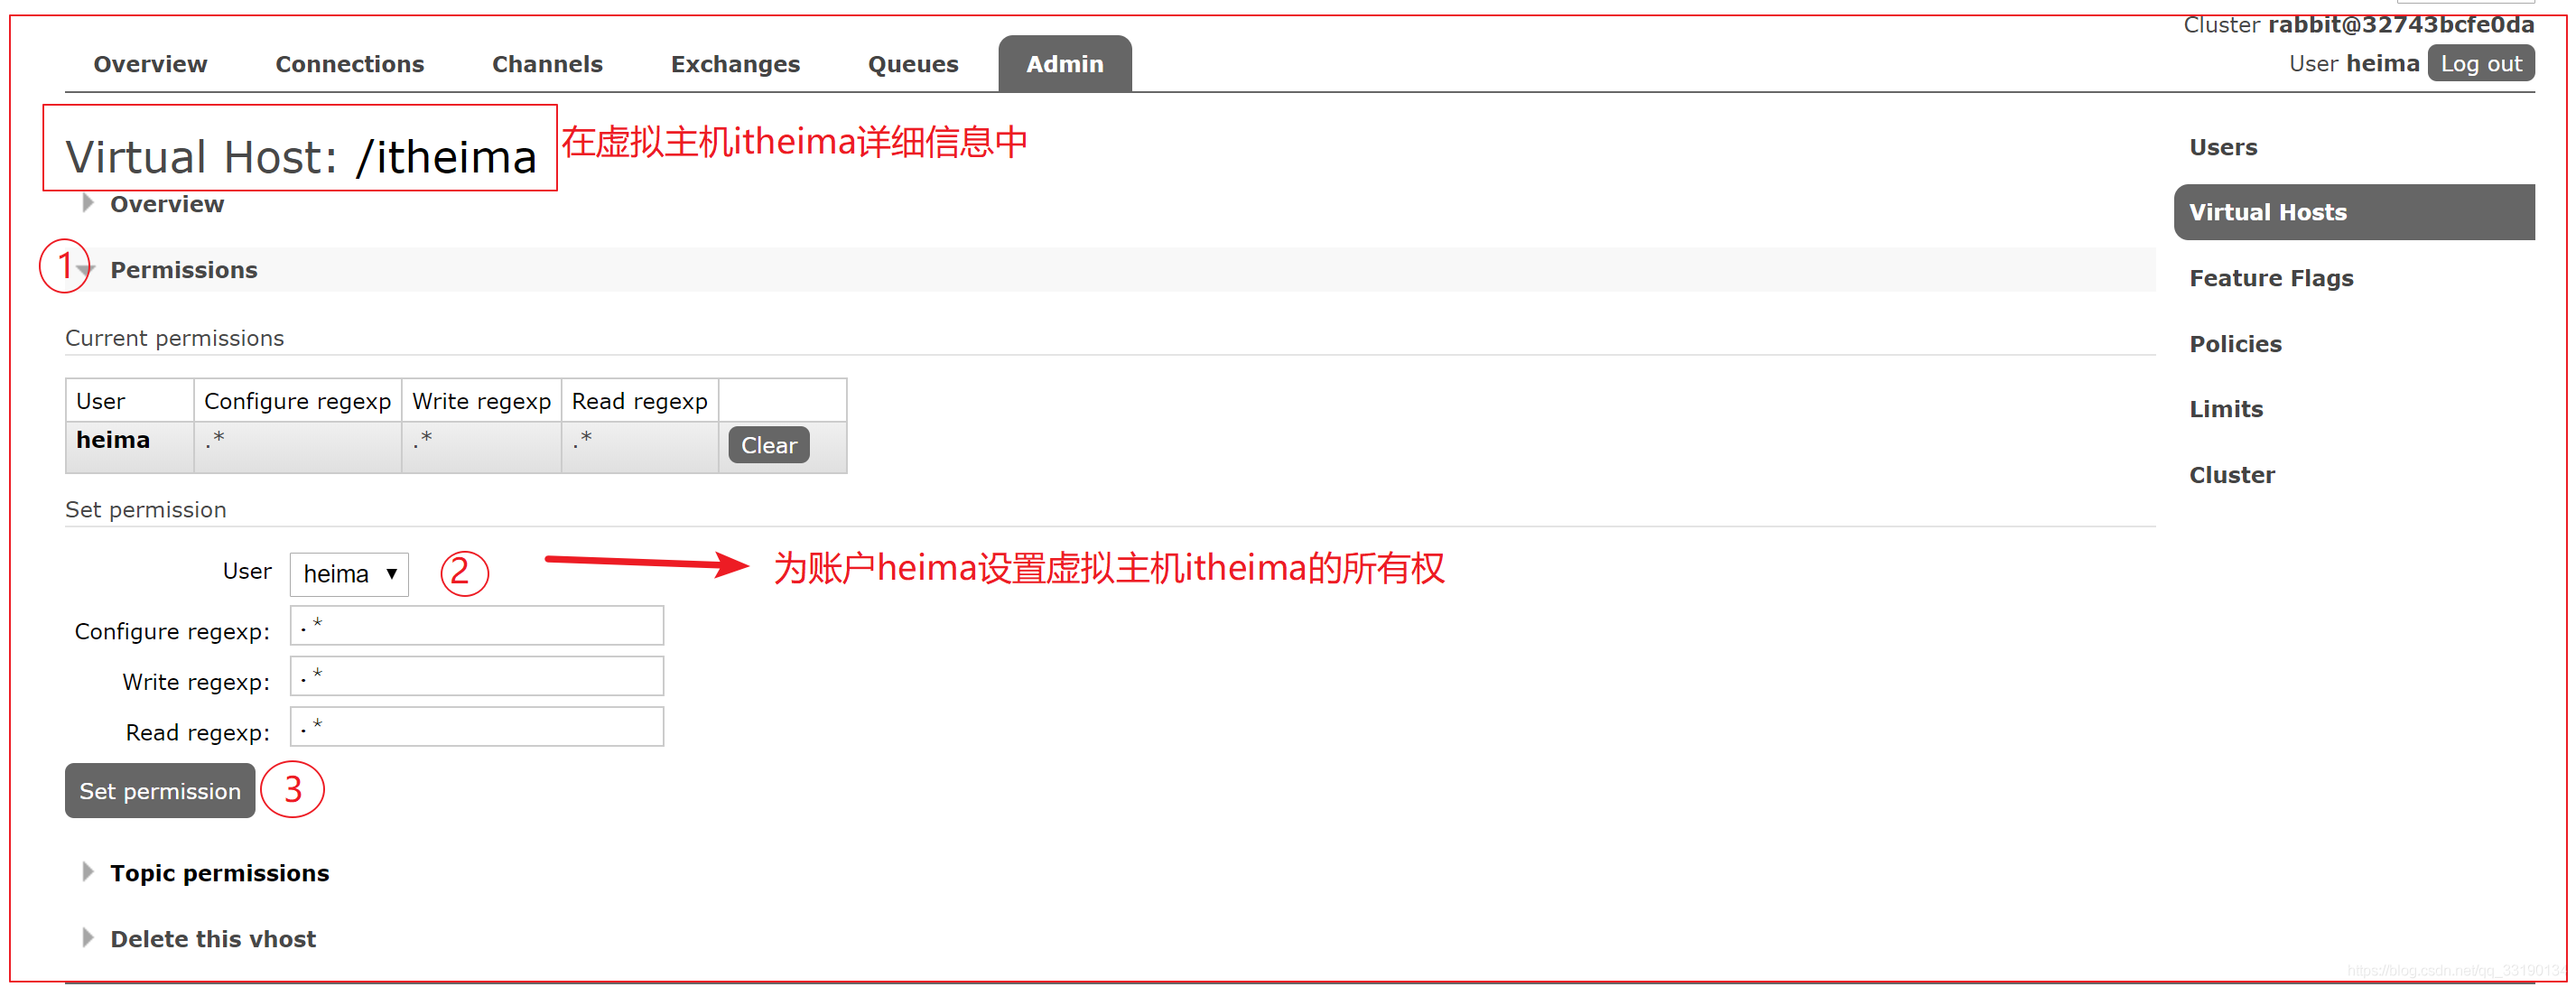
2.2.2. Virtual Hosts設定
RabbitMQ的許可權管理;在RabbitMQ中可以虛擬訊息伺服器Virtual Host,每個Virtual Hosts相當於一個相對獨立的RabbitMQ伺服器,每個VirtualHost之間是相互隔離的。exchange、queue、message不能互通。相當於mysql的db。Virtual Name一般以/開頭。
- 建立Virtual Hosts
2.設定Virtual Hosts許可權

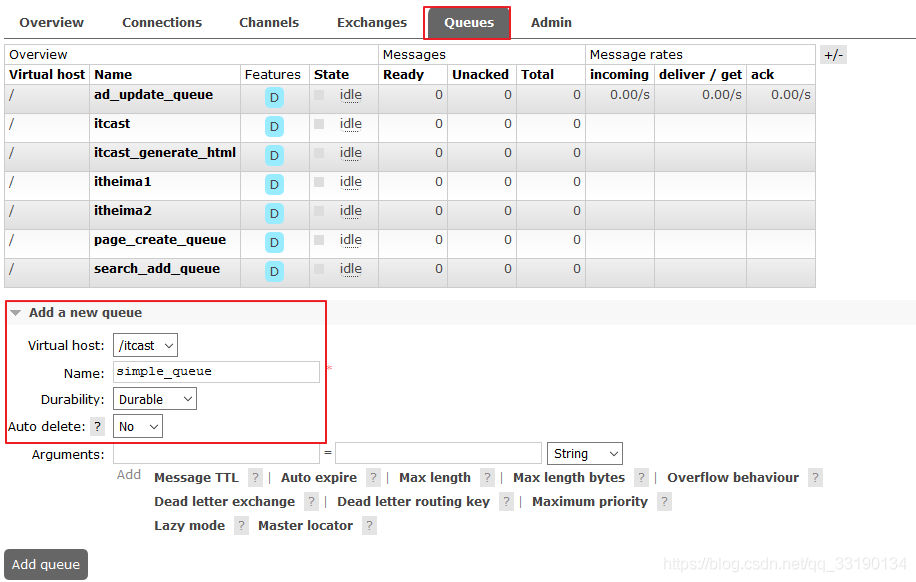
2.2.3 新增佇列
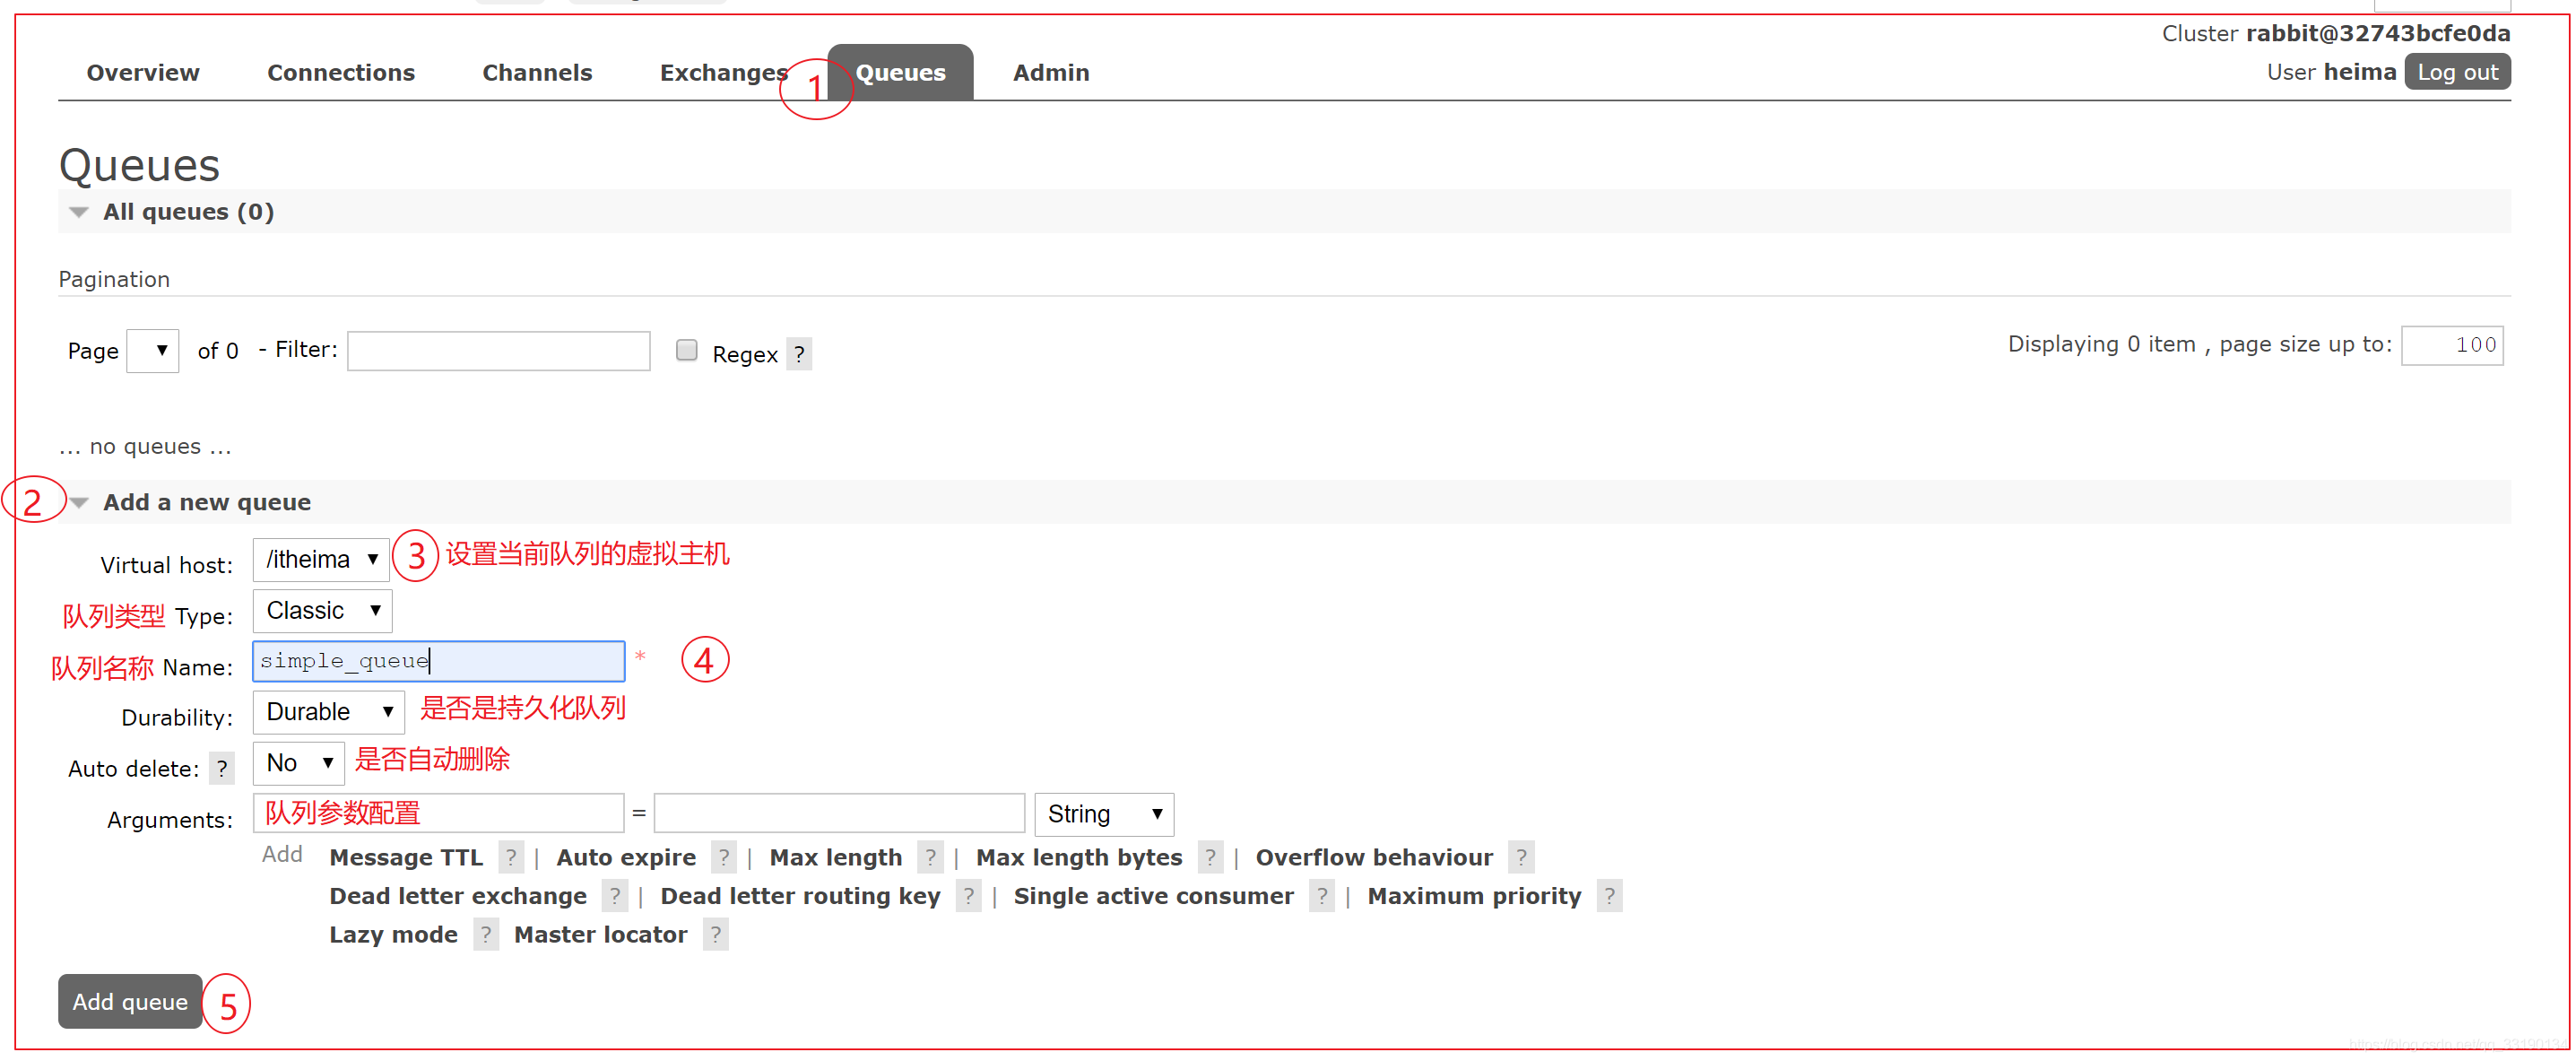
持久化:如果選durable,則佇列訊息自動持久化到磁碟上,如果選transient,則不會持久化;
自動刪除:預設值no,如果yes,則在訊息佇列沒有使用的情況下,佇列自行刪除。
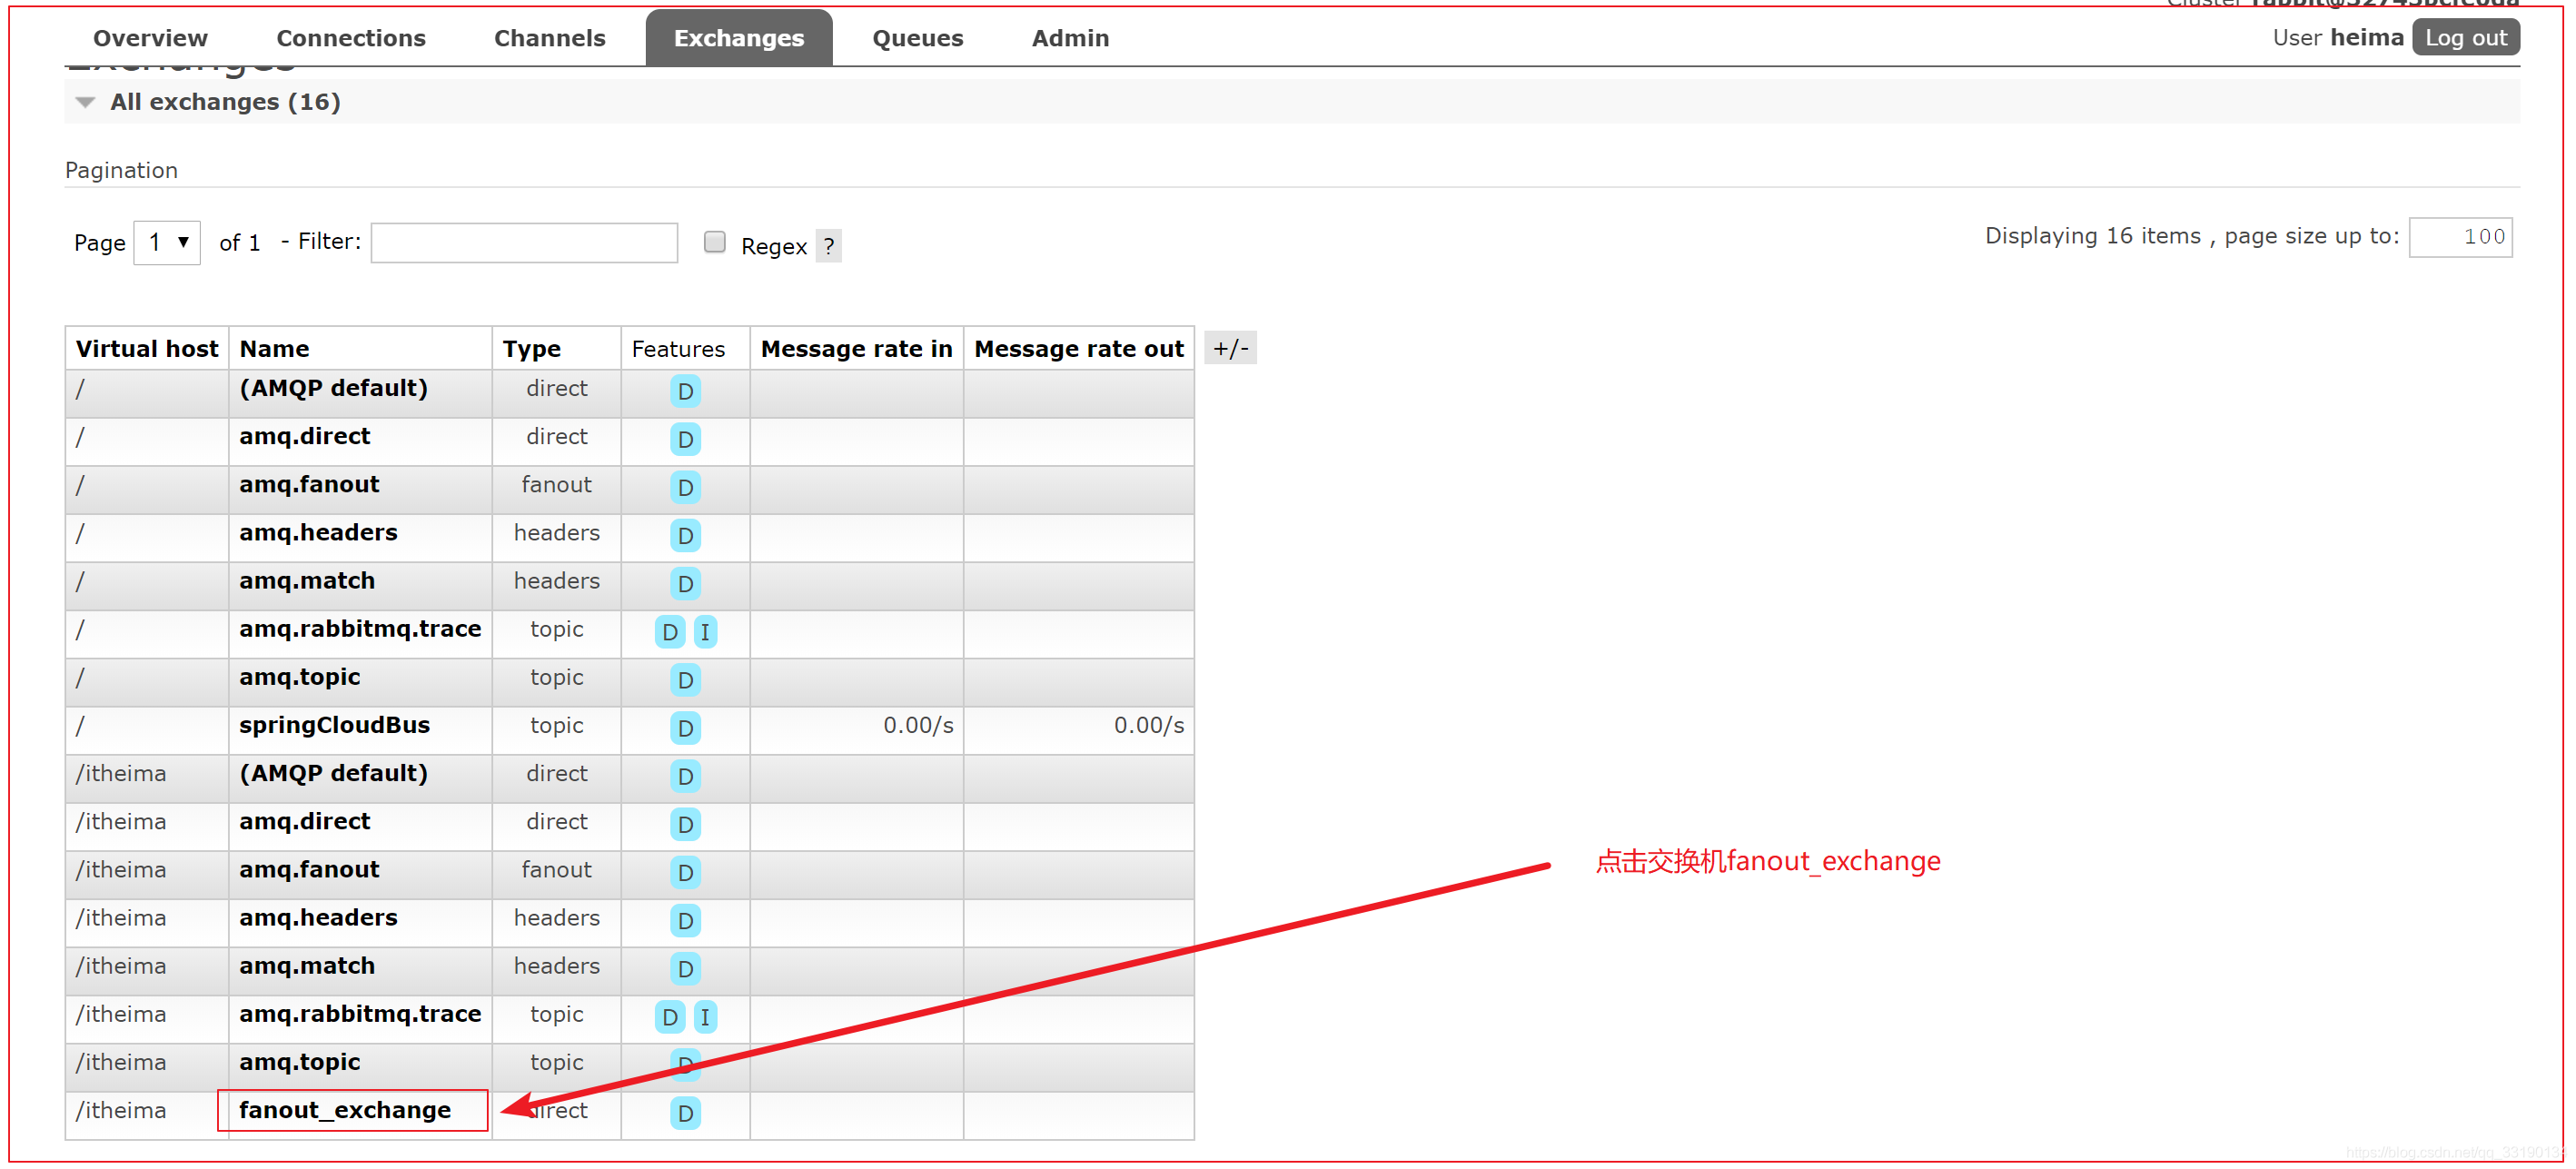
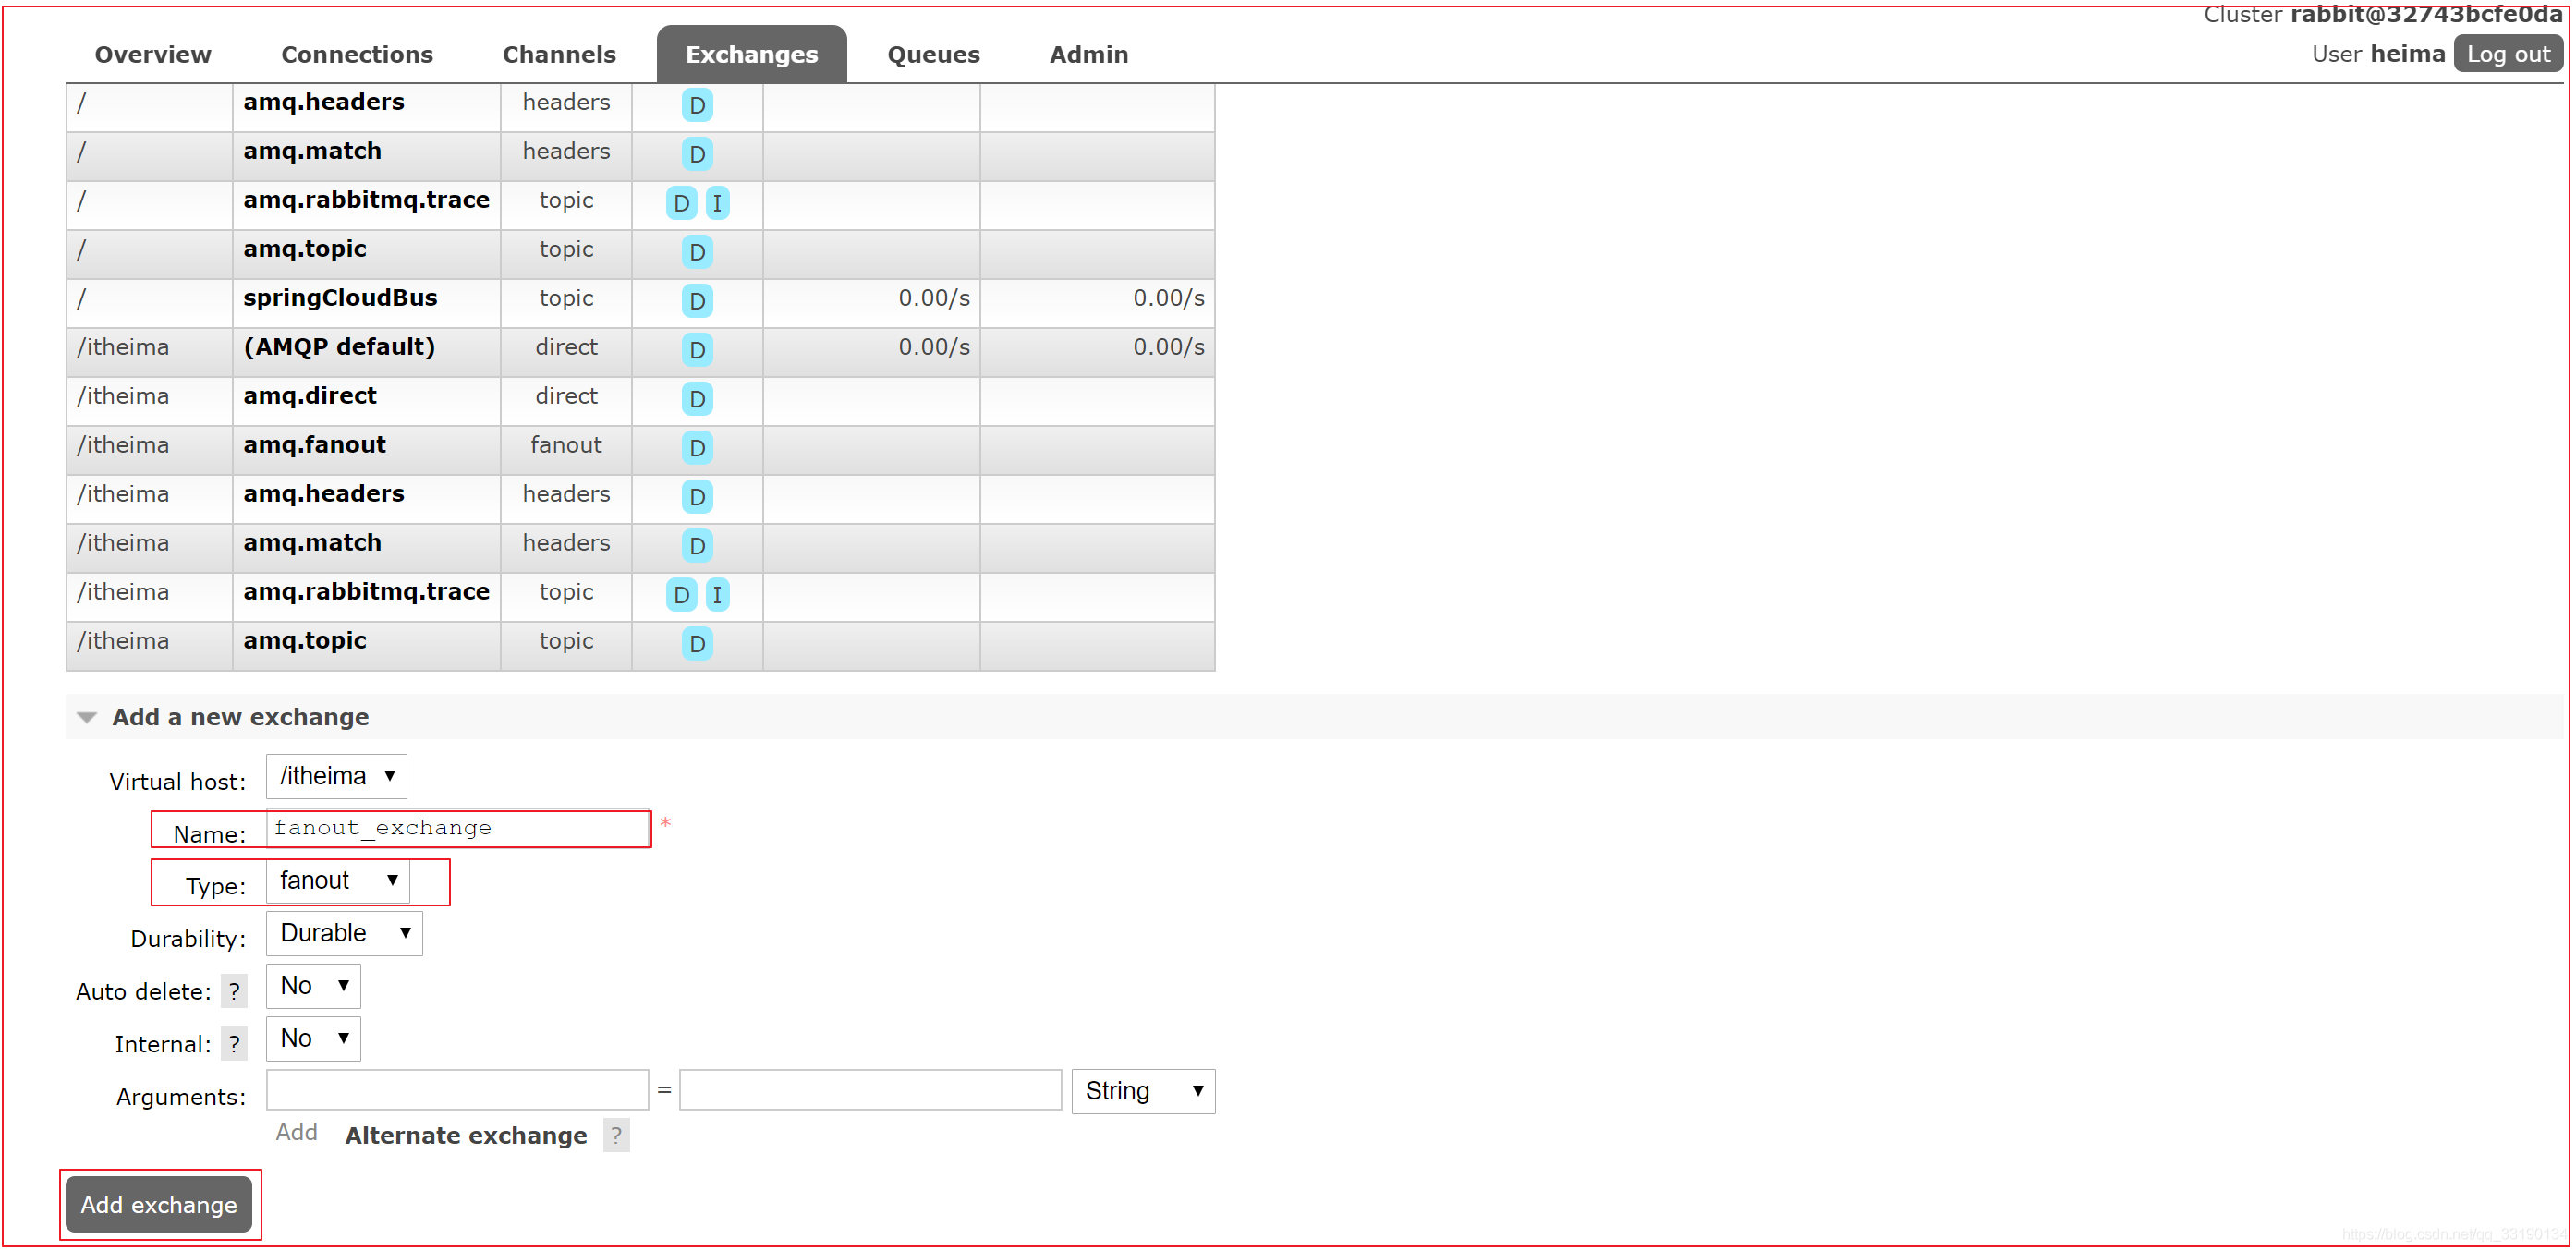
2.2.4 新增交換機
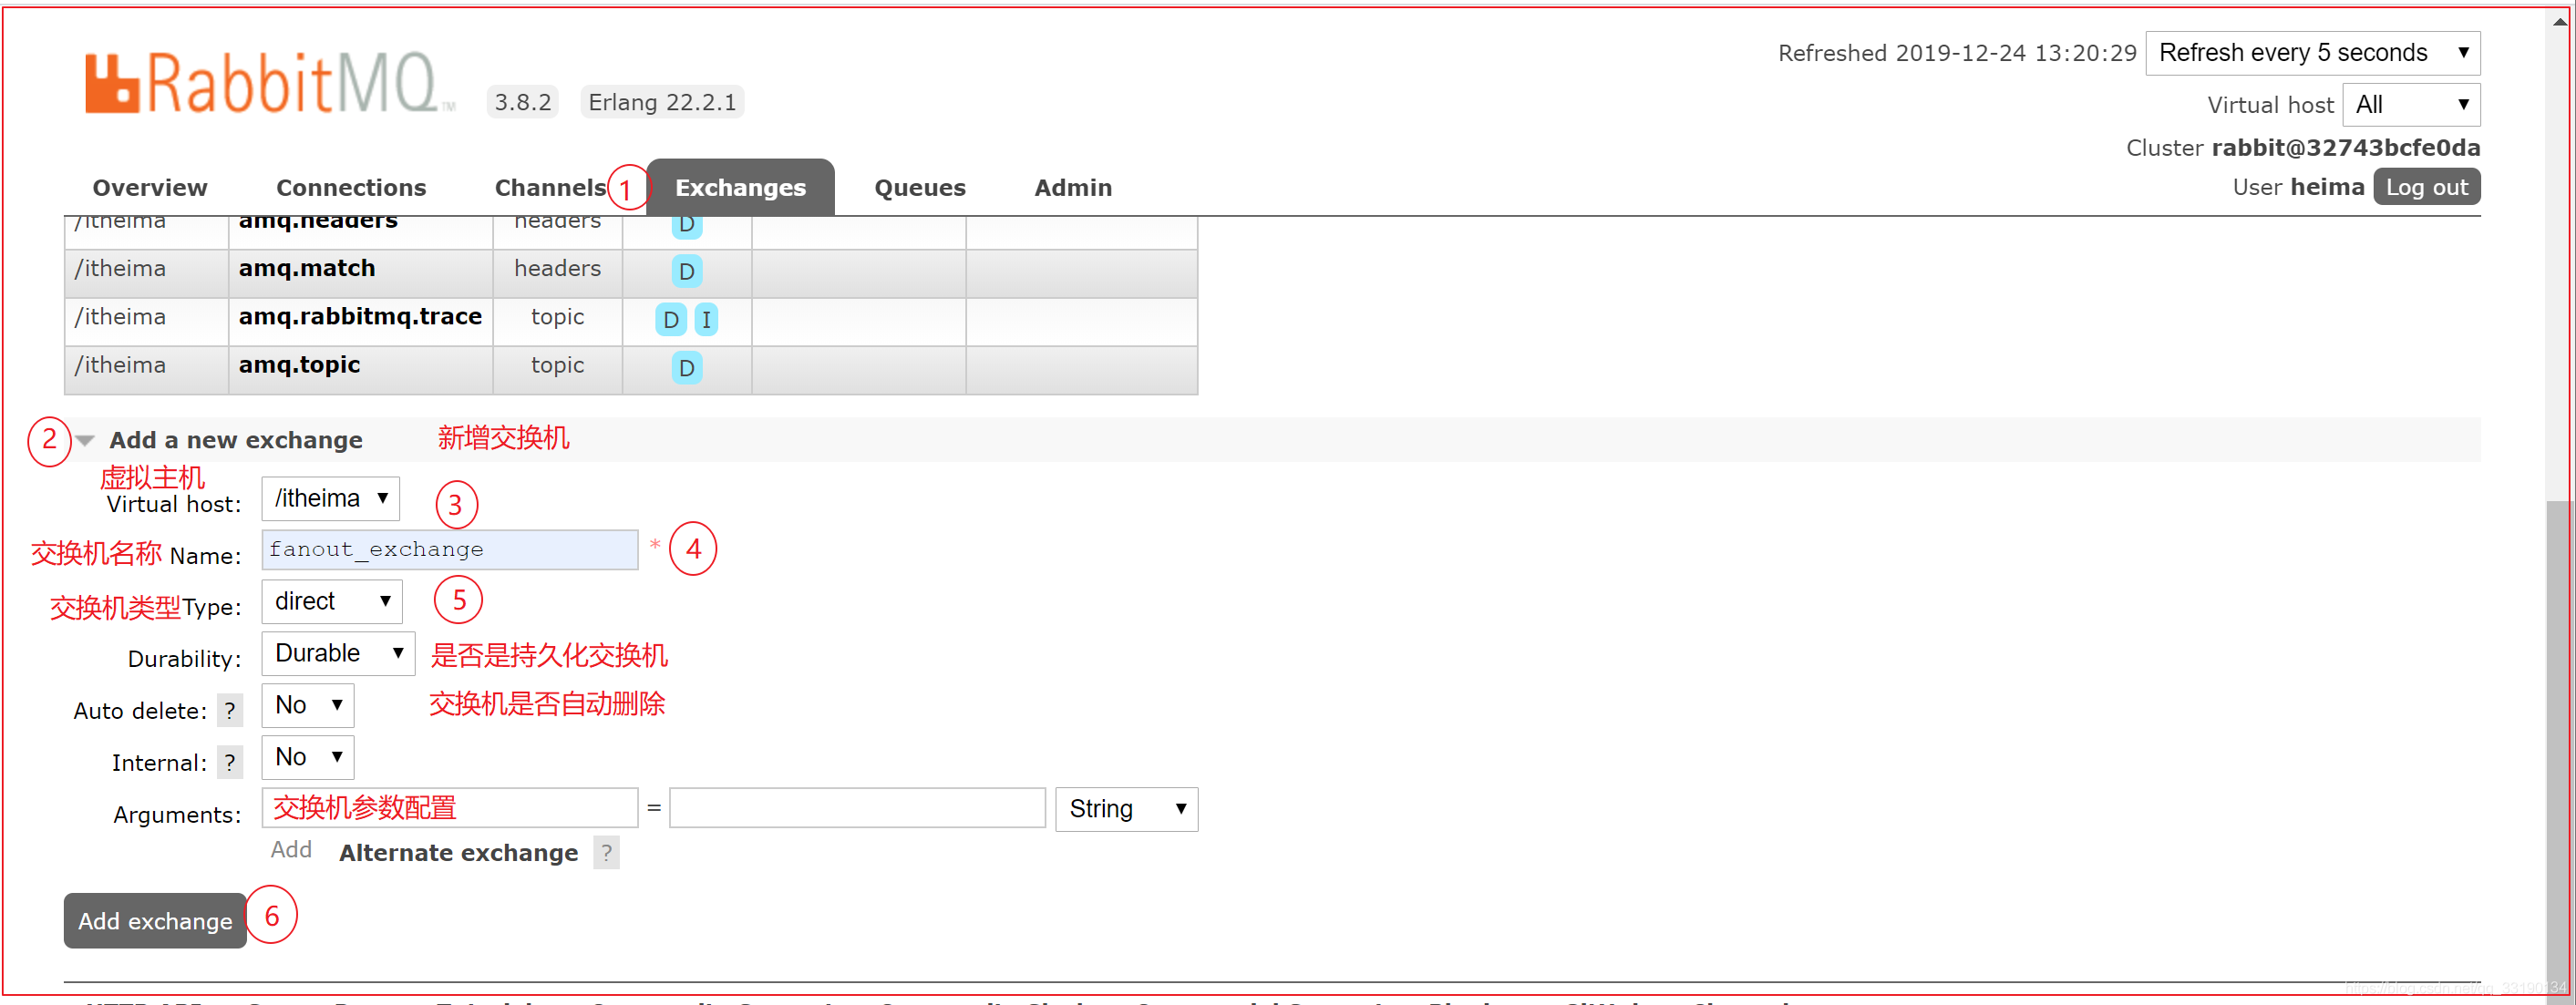
自動刪除:預設值no,如果是yes,則在將所有佇列與交換機取消系結之後,交換機將自動刪除。
交換機型別:
- fanout:廣播型別
- direct:路由型別
- topic:萬用字元型別,基於訊息的路由鍵路由
- headers:萬用字元型別,基於訊息的header路由
內部交換器:預設值no,如果是yes,訊息無法直接發送到該交換機,必須通過交換機的轉發才能 纔能到達次交換機。本交換機只能與交換機系結。
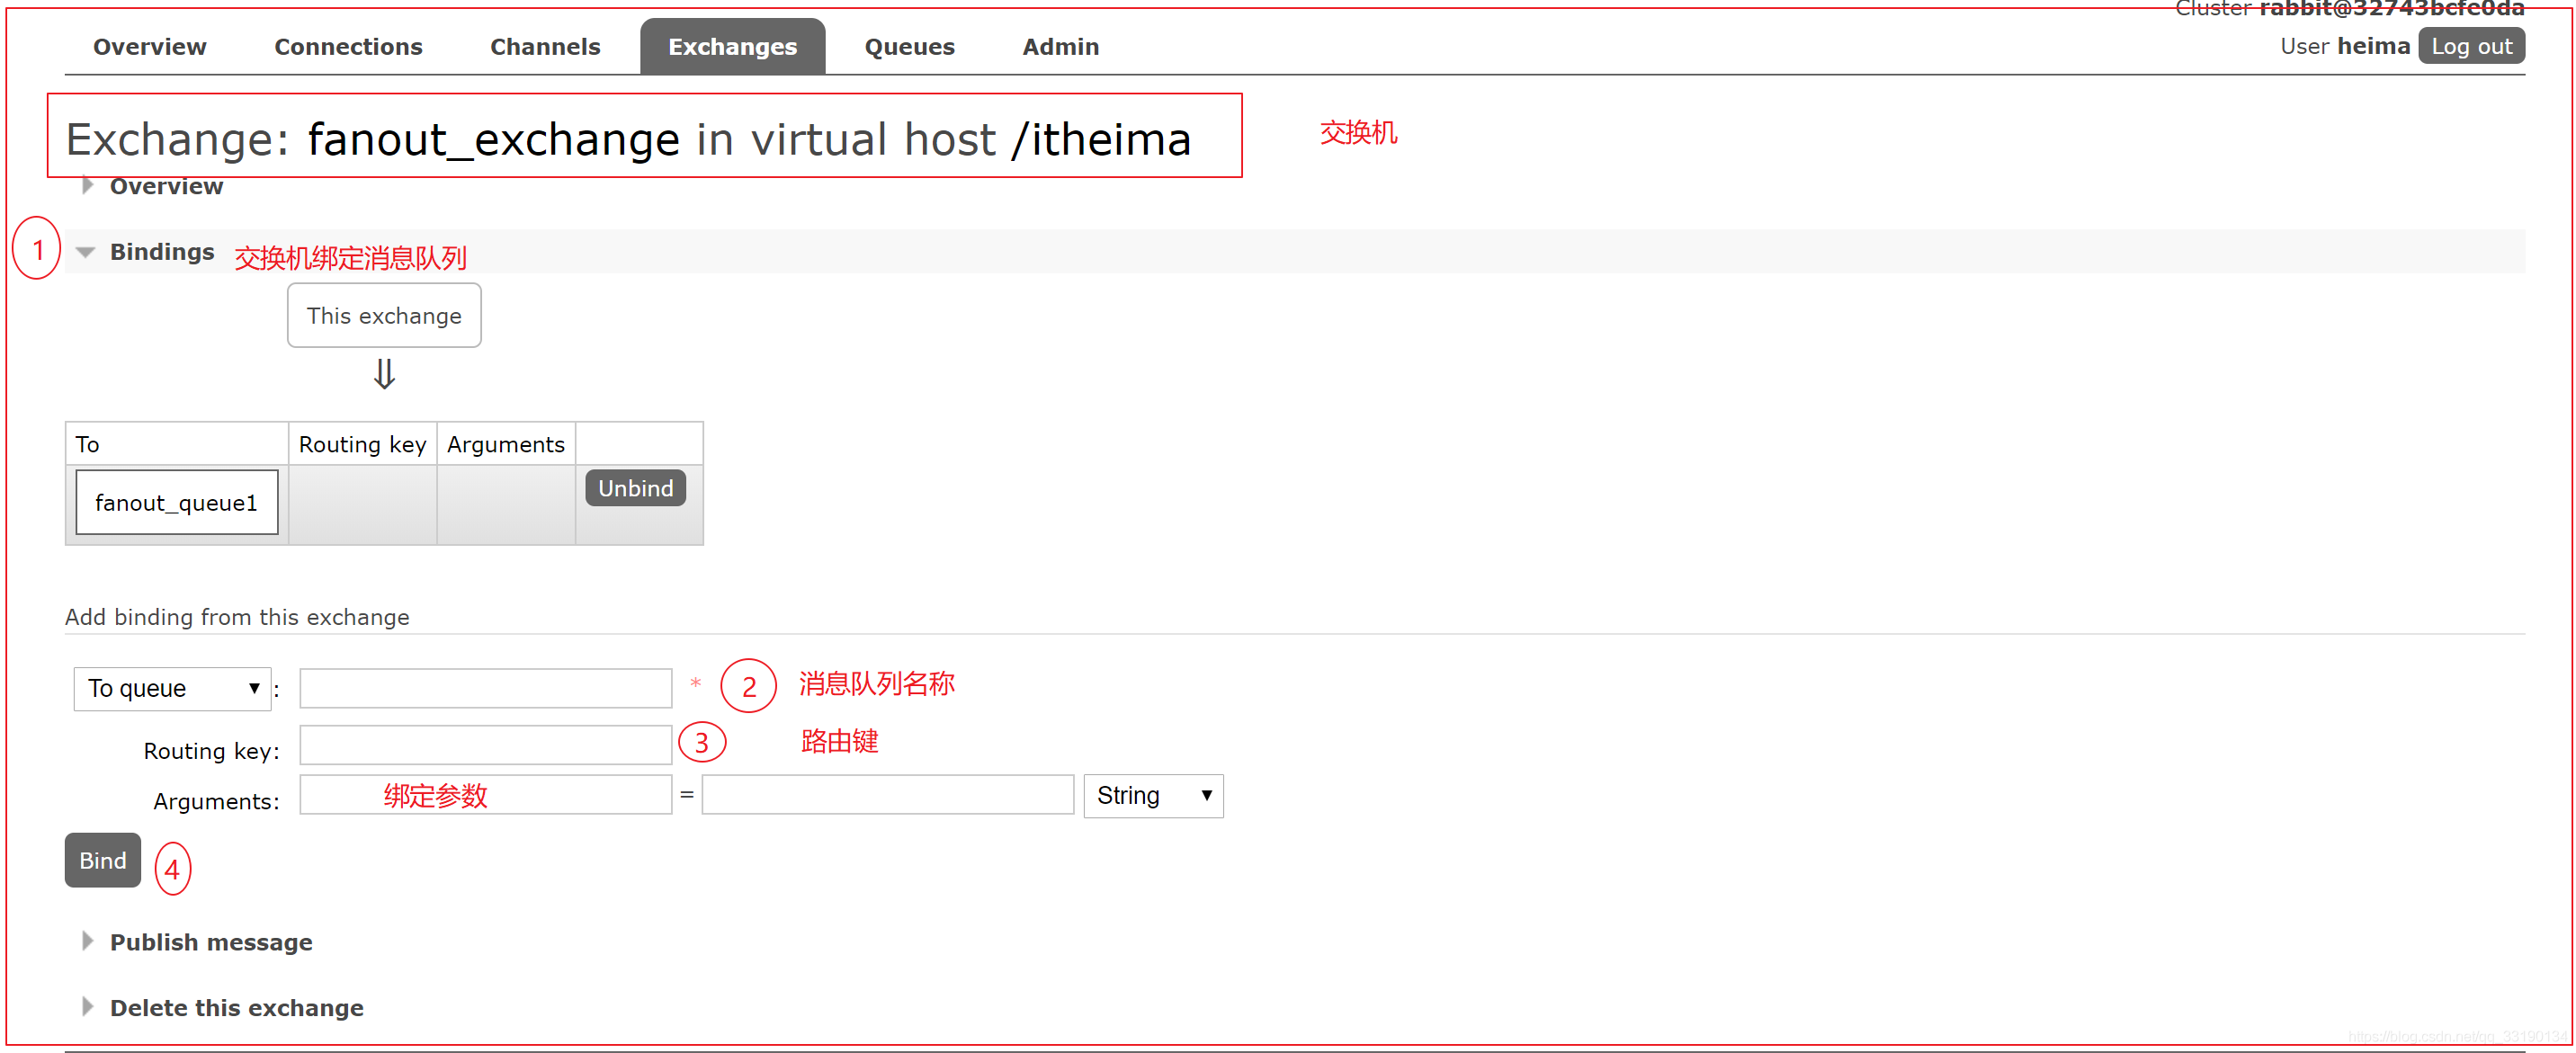
2.2.5 佇列與交換機進行系結
三、Spring Boot整合RabbitMQ
3.1. 簡介
在spring boot專案中,只需要引入start-amqp起步依賴,即可整合RabbitMQ成功;我們基於SpringBoot封裝的RabbitTemplate模板物件,可以非常方便的發送訊息,接收訊息(使用註解)。
amqp的官方GitHub地址:https://github.com/spring-projects/spring-amqp
一般在開發過程中,我們有兩個角色:
3.2. 搭建步驟:
1、建立父工程:
2、生產者工程:
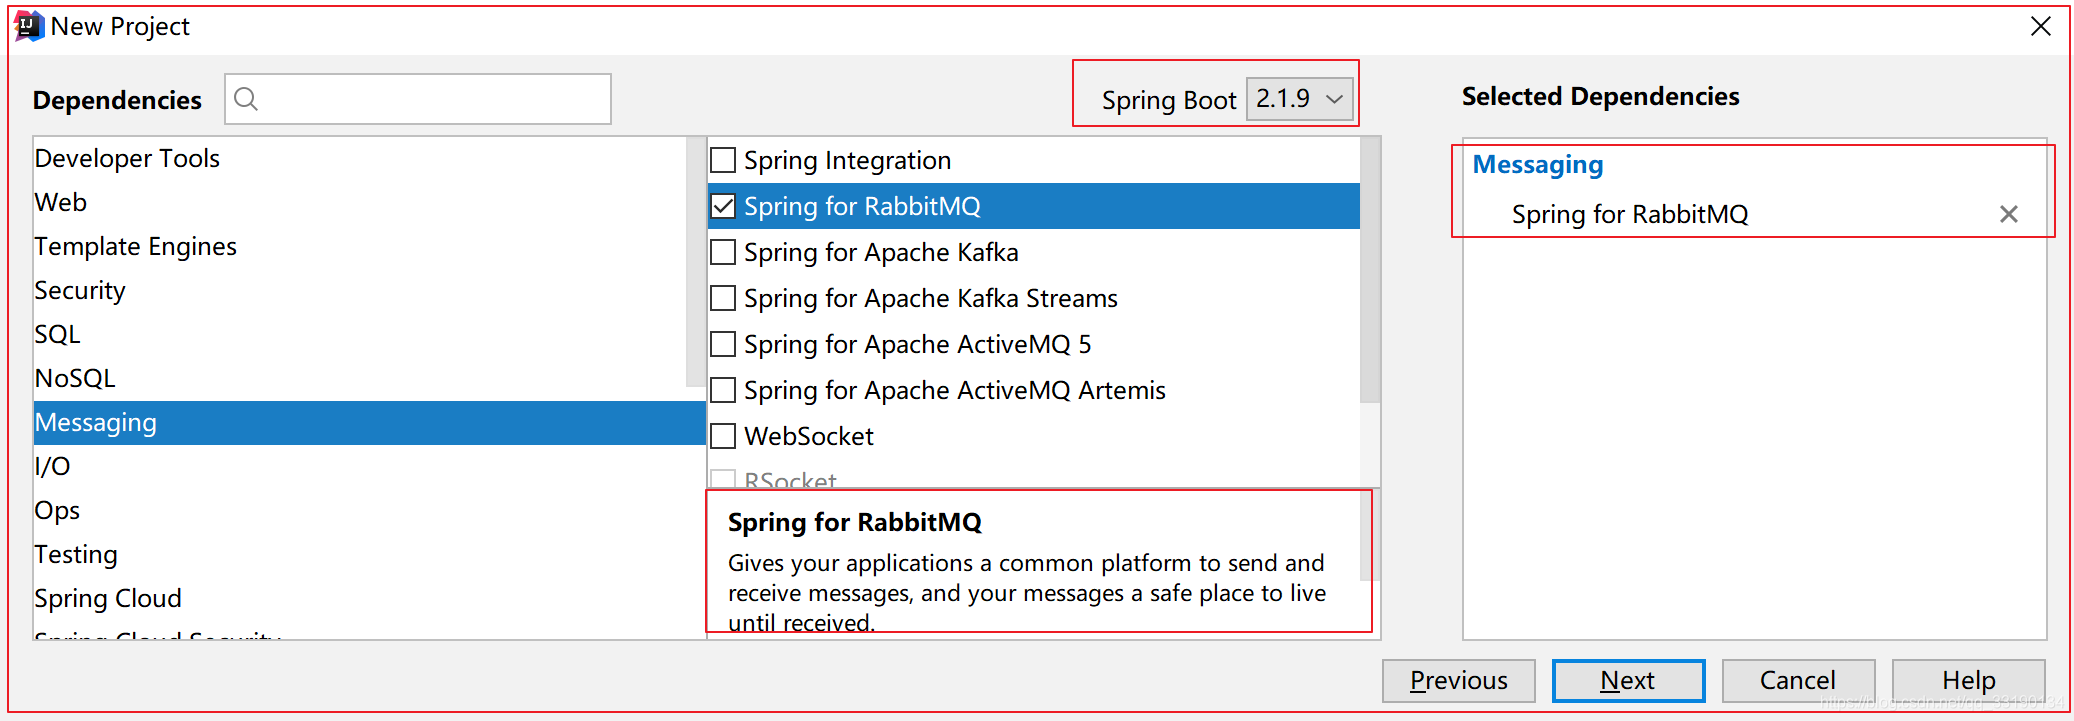
- 建立SpringBoot工程:rabbitmq-producer
- 勾選起步依賴座標:spring for RabbitMQ
- 設定RabbitMQ:服務host地址及埠、虛擬主機、服務賬戶密碼
3、消費者工程:
- 建立SpringBoot工程:
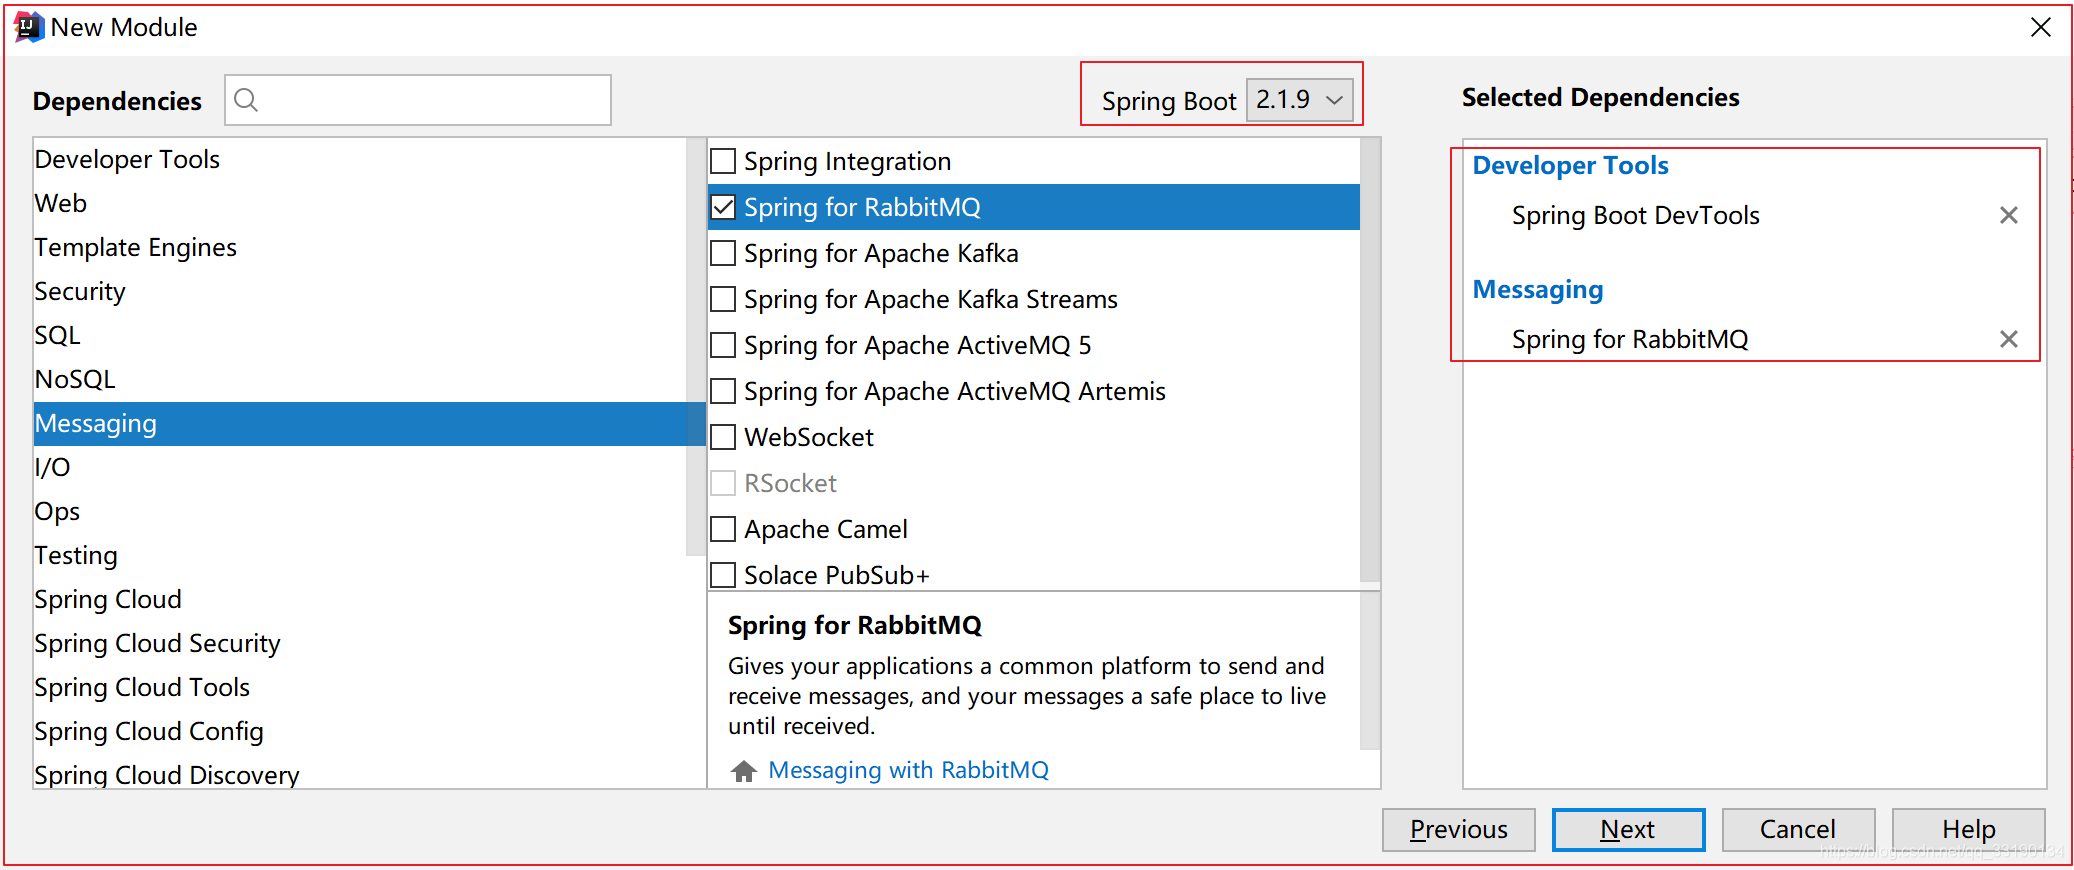
- 勾選起步依賴座標:spring for RabbitMQ
- 設定RabbitMQ:服務host地址及埠、虛擬主機、服務賬戶密碼
3.3. 搭建過程:
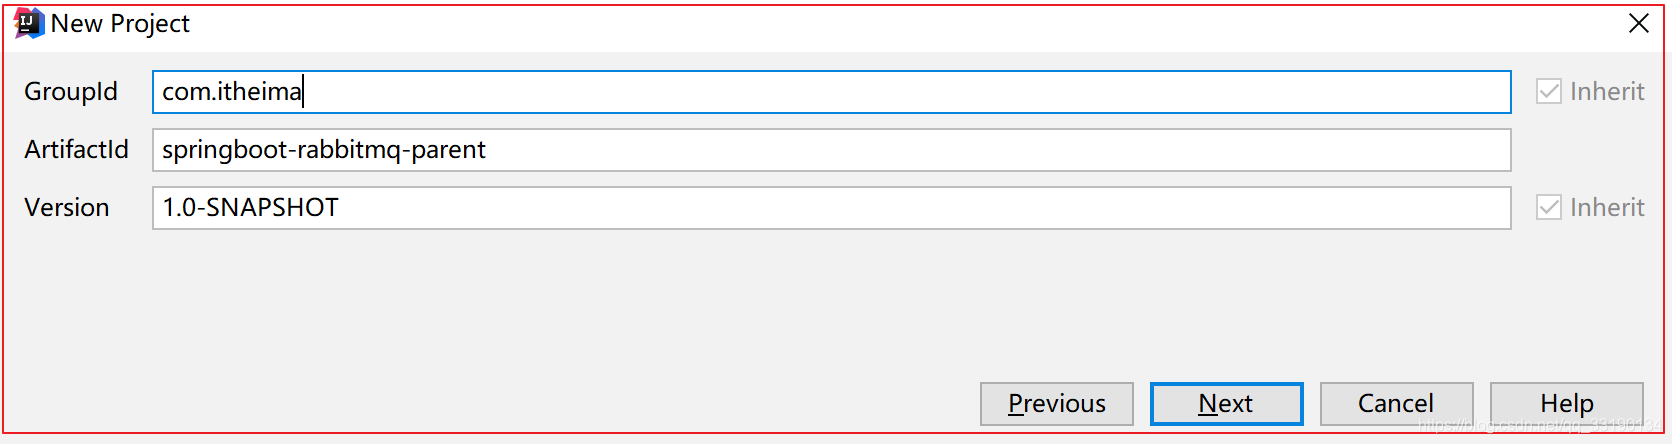
3.3.1 建立父工程:
建立父maven空的工程:springboot-rabbitmq-parent
3.3.2 搭建生產者工程
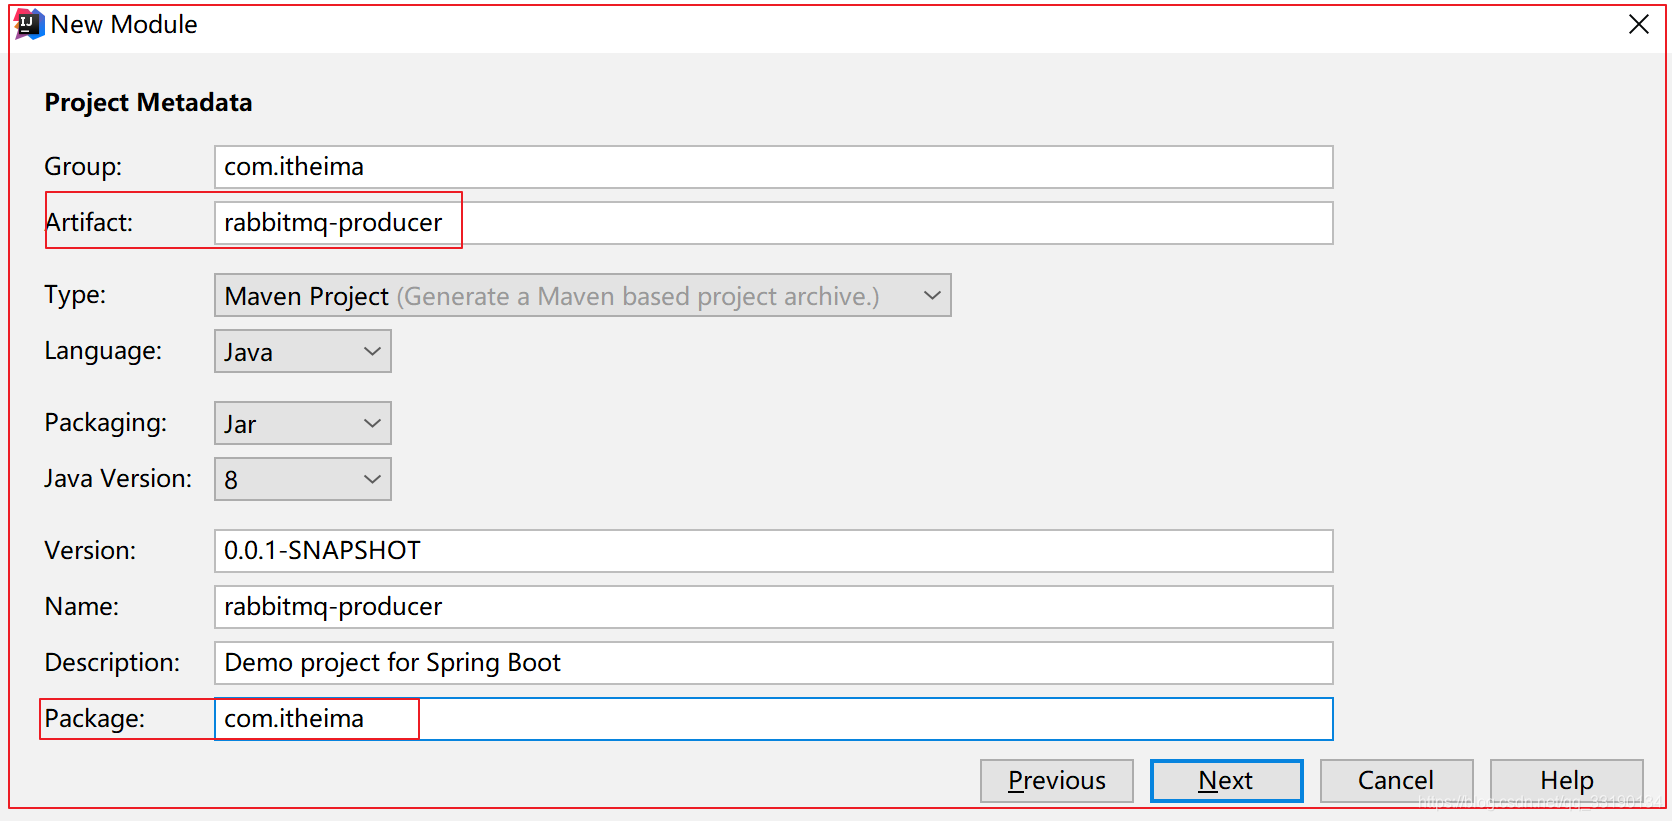
1、建立工程
建立SpringBoot的生產者工程:rabbitmq-producer
2、起步依賴座標
pom.xml檔案內容爲如下:
<parent>
    <groupId>org.springframework.boot</groupId>
    <artifactId>spring-boot-starter-parent</artifactId>
    <version>2.1.9.RELEASE</version>
    <relativePath/> <!-- lookup parent from repository -->
</parent>
<dependencies>
    <!--amqp協定的起步依賴座標-->
    <dependency>
        <groupId>org.springframework.boot</groupId>
        <artifactId>spring-boot-starter-amqp</artifactId>
    </dependency>
    <!--rabbit測試依賴座標-->
    <dependency>
        <groupId>org.springframework.amqp</groupId>
        <artifactId>spring-rabbit-test</artifactId>
        <scope>test</scope>
    </dependency>
    <!--SpringBoot測試依賴座標-->
    <dependency>
        <groupId>org.springframework.boot</groupId>
        <artifactId>spring-boot-starter-test</artifactId>
        <scope>test</scope>
    </dependency>
</dependencies>
3、啓動類
@SpringBootApplication
public class SpringbootRabbitmqProducerApplication {
    public static void main(String[] args) {
        SpringApplication.run(SpringbootRabbitmqProducerApplication.class, args);
    }
}
4、設定RabbitMQ
1)組態檔application.properties,內容如下:
# RabbitMQ 服務host地址
spring.rabbitmq.host=192.168.200.128
# 埠
spring.rabbitmq.port=5672
# 虛擬主機地址
spring.rabbitmq.virtual-host=/itheima
# rabbit服務的使用者名稱
spring.rabbitmq.username=heima
# rabbit服務的密碼
spring.rabbitmq.password=heima
3.3.3 搭建消費者工程
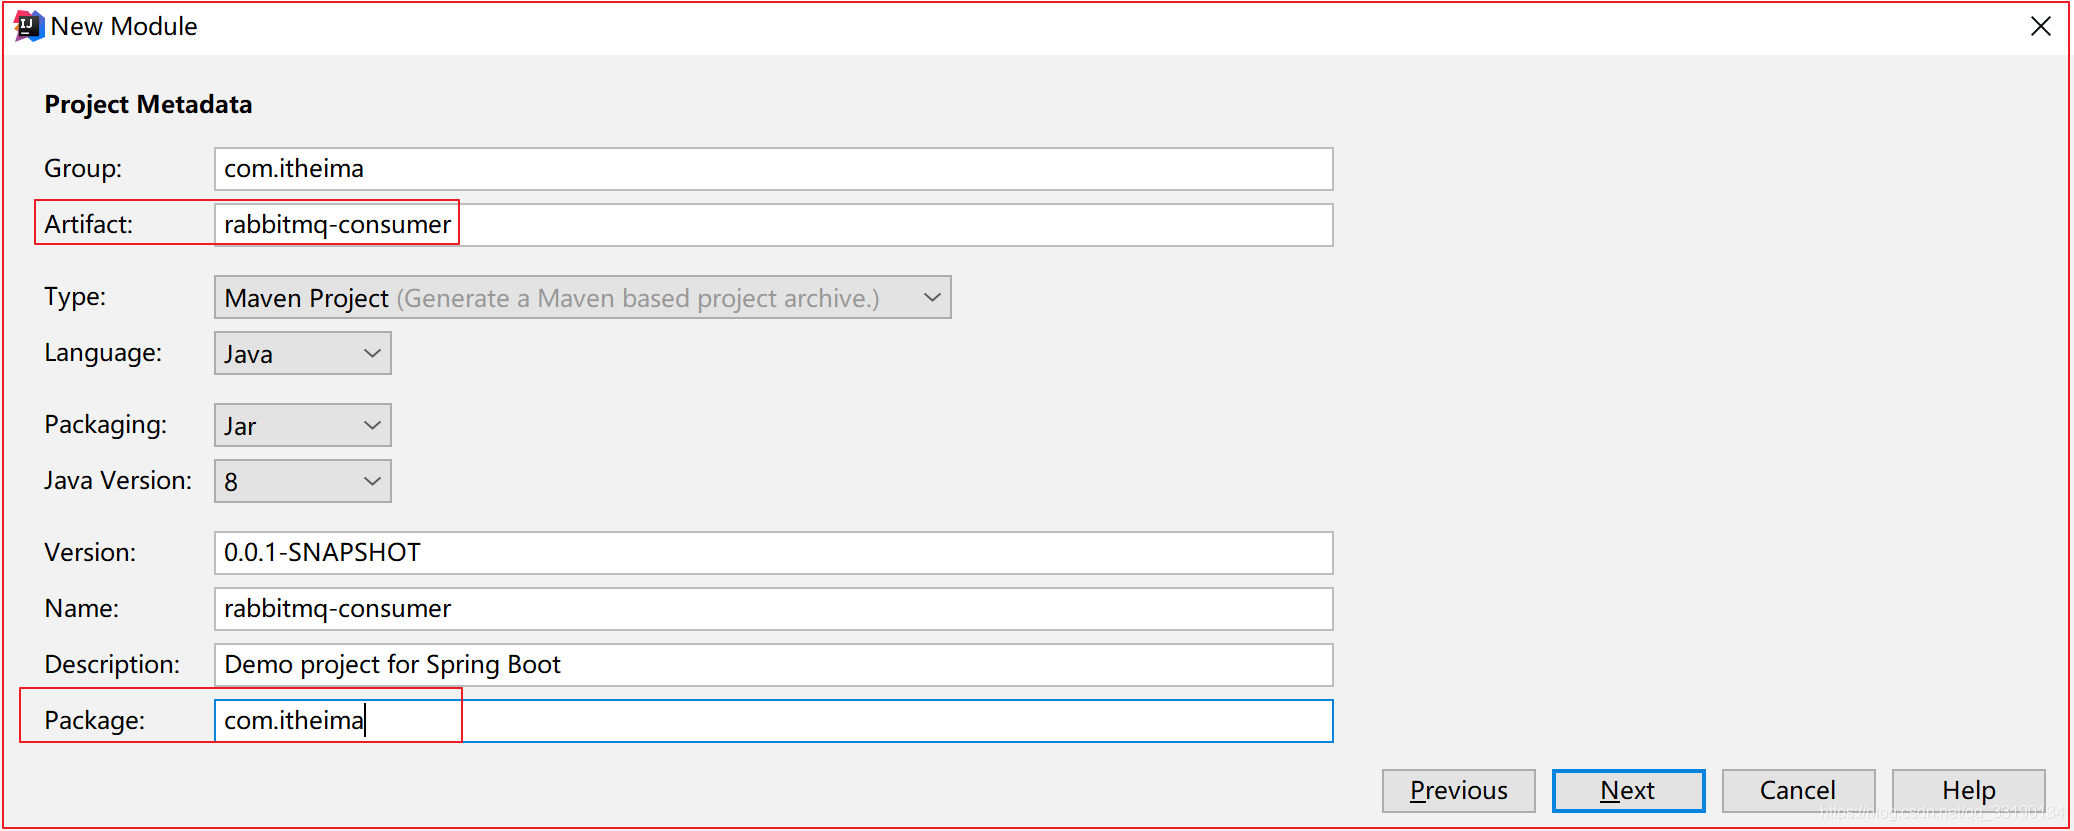
1、建立工程
建立SpringBoot的消費者工程:rabbitmq-consumer
2、勾選起步依賴座標
pom.xml檔案內容爲如下:
<parent>
    <groupId>org.springframework.boot</groupId>
    <artifactId>spring-boot-starter-parent</artifactId>
    <version>2.1.9.RELEASE</version>
    <relativePath/> <!-- lookup parent from repository -->
</parent>
<dependencies>
    <!--amqp的起步依賴座標-->
    <dependency>
        <groupId>org.springframework.boot</groupId>
        <artifactId>spring-boot-starter-amqp</artifactId>
    </dependency>
</dependencies>
3、啓動類
@SpringBootApplication
public class SpringbootRabbitmqConsumerApplication {

    public static void main(String[] args) {
        SpringApplication.run(SpringbootRabbitmqConsumerApplication.class, args);
    }

}
4、設定RabbitMQ
application.properties,內容如下:
# RabbitMQ 服務host地址
spring.rabbitmq.host=192.168.200.128
# 埠
spring.rabbitmq.port=5672
# 虛擬主機地址
spring.rabbitmq.virtual-host=/itheima
# rabbit服務的使用者名稱
spring.rabbitmq.username=heima
# rabbit服務的密碼
spring.rabbitmq.password=heima
四、RabbitMQ五種工作模式【重要】
4.1 Hello World簡單模式
4.1.1 什麼是簡單模式
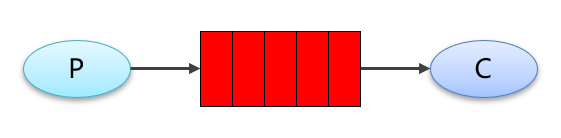
在上圖的模型中,有以下概念:
**P:生產者: ** 也就是要發送訊息的程式
**C:消費者:**訊息的接受者,會一直等待訊息到來。
**queue:**訊息佇列,圖中紅色部分。可以快取訊息;生產者向其中投遞訊息,消費者從其中取出訊息。
【最簡單訊息佇列模式】
4.1.2 RabbitMQ管理介面操作
- 建立simple_queue佇列用於演示Hello World簡單模式
- 點選
simple_queue可以進入到這個queue的管理介面
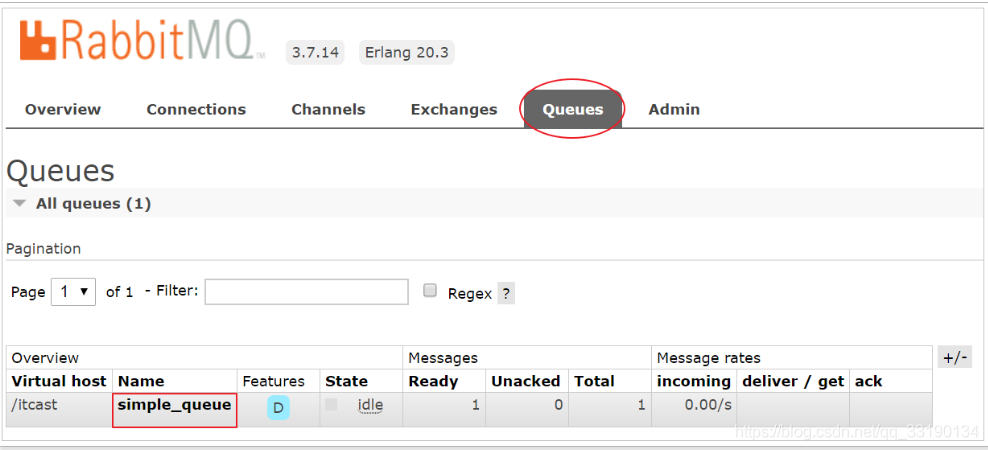
- 點選
Get Message按鈕可以獲取檢視佇列中的訊息

4.1.3 生產者程式碼
- rabbitmq-producer專案測試程式碼如下:
package com.itheima.test;

import org.junit.Test;
import org.junit.runner.RunWith;
import org.springframework.amqp.rabbit.core.RabbitTemplate;
import org.springframework.beans.factory.annotation.Autowired;
import org.springframework.boot.test.context.SpringBootTest;
import org.springframework.test.context.junit4.SpringRunner;

@RunWith(SpringRunner.class)
@SpringBootTest
public class Demo01TestSimpleQueue {

    @Autowired
    private RabbitTemplate rabbitTemplate;

    @Test
    public void contextLoads() {
        //向訊息佇列發送一條簡單訊息
        /**
         * 參數1:訊息佇列名稱
         * 參數2:訊息內容
         */
        rabbitTemplate.convertAndSend("simple_queue","hello 小兔子!");
    }
}
4.1.4 消費者程式碼
- rabbitmq-consumer專案建立監聽器:
package com.itheima.rabbitmq.simple;

import org.springframework.amqp.rabbit.annotation.RabbitHandler;
import org.springframework.amqp.rabbit.annotation.RabbitListener;
import org.springframework.stereotype.Component;

/**
 * 消費者,接收訊息佇列訊息監聽器
 * 必須將當前監聽器物件注入Spring的容器中
 */
@Component
@RabbitListener(queues = "simple_queue")
public class SimpleListener {

    @RabbitHandler
    public void simpleHandler(String msg){
        System.out.println("=====接收訊息====>"+msg);
    }
}
然後啓動SpringbootRabbitmqConsumerApplication, 就可以接收到RabbitMQ伺服器發送來的訊息
4.2 Work queues工作佇列模式
4.2.1 什麼是工作佇列模式
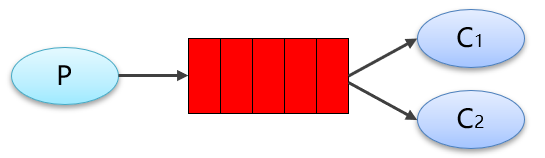
Work Queues與入門程式的簡單模式相比,多了一個或一些消費端,多個消費端共同消費同一個佇列中的訊息。應用場景:對於任務過重或任務較多情況使用工作佇列可以提高任務處理的速度。
在一個佇列中如果有多個消費者,那麼消費者之間對於同一個訊息的關係是競爭的關係。
【多個節點分片任務處理,提升任務處理的效率】
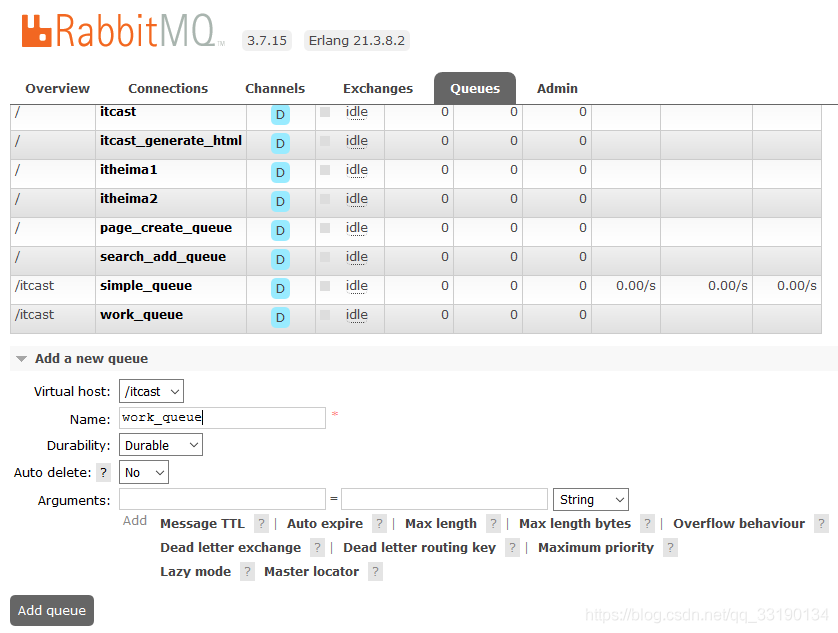
4.2.2 RabbitMQ管理介面操作
- 建立
work_queue佇列用於演示work工作佇列模式
4.2.3 生產者程式碼
rabbitmq-producer專案測試程式碼如下:
package com.itheima.test;

import org.junit.Test;
import org.junit.runner.RunWith;
import org.springframework.amqp.rabbit.core.RabbitTemplate;
import org.springframework.beans.factory.annotation.Autowired;
import org.springframework.boot.test.context.SpringBootTest;
import org.springframework.test.context.junit4.SpringRunner;

@RunWith(SpringRunner.class)
@SpringBootTest
public class Demo02TestWorkQueue {

    @Autowired
    private RabbitTemplate rabbitTemplate;
    @Test
    public void contextLoads() {
        //向工作佇列發送1千條訊息
        for (int i = 0; i < 1000; i++) {
            /**
             * 參數1:訊息佇列名稱
             * 參數2:訊息內容
             */
            rabbitTemplate.convertAndSend("work_queue","hello 我是小兔子【"+i+"】!");
        }
    }
}
4.2.4 消費者程式碼
- rabbitmq-consumer專案建立監聽器1:
package com.itheima.rabbitmq.work;

import org.springframework.amqp.rabbit.annotation.RabbitHandler;
import org.springframework.amqp.rabbit.annotation.RabbitListener;
import org.springframework.stereotype.Component;

/**
 * 工作佇列:消費者接收監聽器1,接收來自訊息佇列中的訊息
 */
@Component
@RabbitListener(queues = "work_queue")
public class WorkListener1 {

    @RabbitHandler
    public void workHandler(String msg){
        System.out.println("=====工作佇列接收訊息端1====>"+msg);
    }
}
- rabbitmq-consumer專案建立監聽器2:
package com.itheima.rabbitmq.work;

import org.springframework.amqp.rabbit.annotation.RabbitHandler;
import org.springframework.amqp.rabbit.annotation.RabbitListener;
import org.springframework.stereotype.Component;

/**
 * 工作佇列:消費者接收監聽器2,接收來自訊息佇列中的訊息
 */
@Component
@RabbitListener(queues = "work_queue")
public class WorkListener2 {

    @RabbitHandler
    public void workHandler(String msg){
        System.out.println("=====工作佇列訊息接收端2====>"+msg);
    }
}
4.3 三種模式概覽

前面2個案例中,只有3個角色:
-
P:生產者,也就是要發送訊息的程式
-
C:消費者:訊息的接受者,會一直等待訊息到來。
-
queue:訊息佇列,圖中紅色部分
而在訂閱模型中,多了一個exchange角色,而且過程略有變化:
- P:生產者,也就是要發送訊息的程式,但是不再發送到佇列中,而是發給X(交換機)
- C:消費者,訊息的接受者,會一直等待訊息到來。
- Queue:訊息佇列,接收訊息、快取訊息。
- Exchange:交換機,圖中的X。一方面,接收生產者發送的訊息。另一方面,知道如何處理訊息,例如遞交給某個特別佇列、遞交給所有佇列、或是將訊息丟棄。到底如何操作,取決於Exchange的型別。
Exchange有常見以下3種類型:
-
Fanout:廣播 將訊息交給所有系結到交換機的佇列, 不處理路由鍵。只需要簡單的將佇列系結到交換機上。fanout 型別交換機轉發訊息是最快的。
-
Direct:定向 把訊息交給符合指定routing key 的佇列. 處理路由鍵。需要將一個佇列系結到交換機上,要求該訊息與一個特定的路由鍵完全匹配。如果一個佇列系結到該交換機上要求路由鍵 「dog」,則只有被標記爲 「dog」 的訊息才被轉發,不會轉發 dog.puppy,也不會轉發 dog.guard,只會轉發dog。
其中,路由模式使用的是 direct 型別的交換機。
-
Topic:主題(萬用字元) 把訊息交給符合routing pattern(路由模式)的佇列. 將路由鍵和某模式進行匹配。此時佇列需要系結要一個模式上。符號 「#」 匹配一個或多個詞,符號"*"匹配不多不少一個詞。因此「audit.#」 能夠匹配到「audit.irs.corporate」,但是「audit.*」 只會匹配到 「audit.irs」。
其中,主題模式(萬用字元模式)使用的是 topic 型別的交換機。
Exchange(交換機)只負責轉發訊息,不具備儲存訊息的能力,因此如果沒有任何佇列與Exchange系結,或者沒有符合路由規則的佇列,那麼訊息會丟失
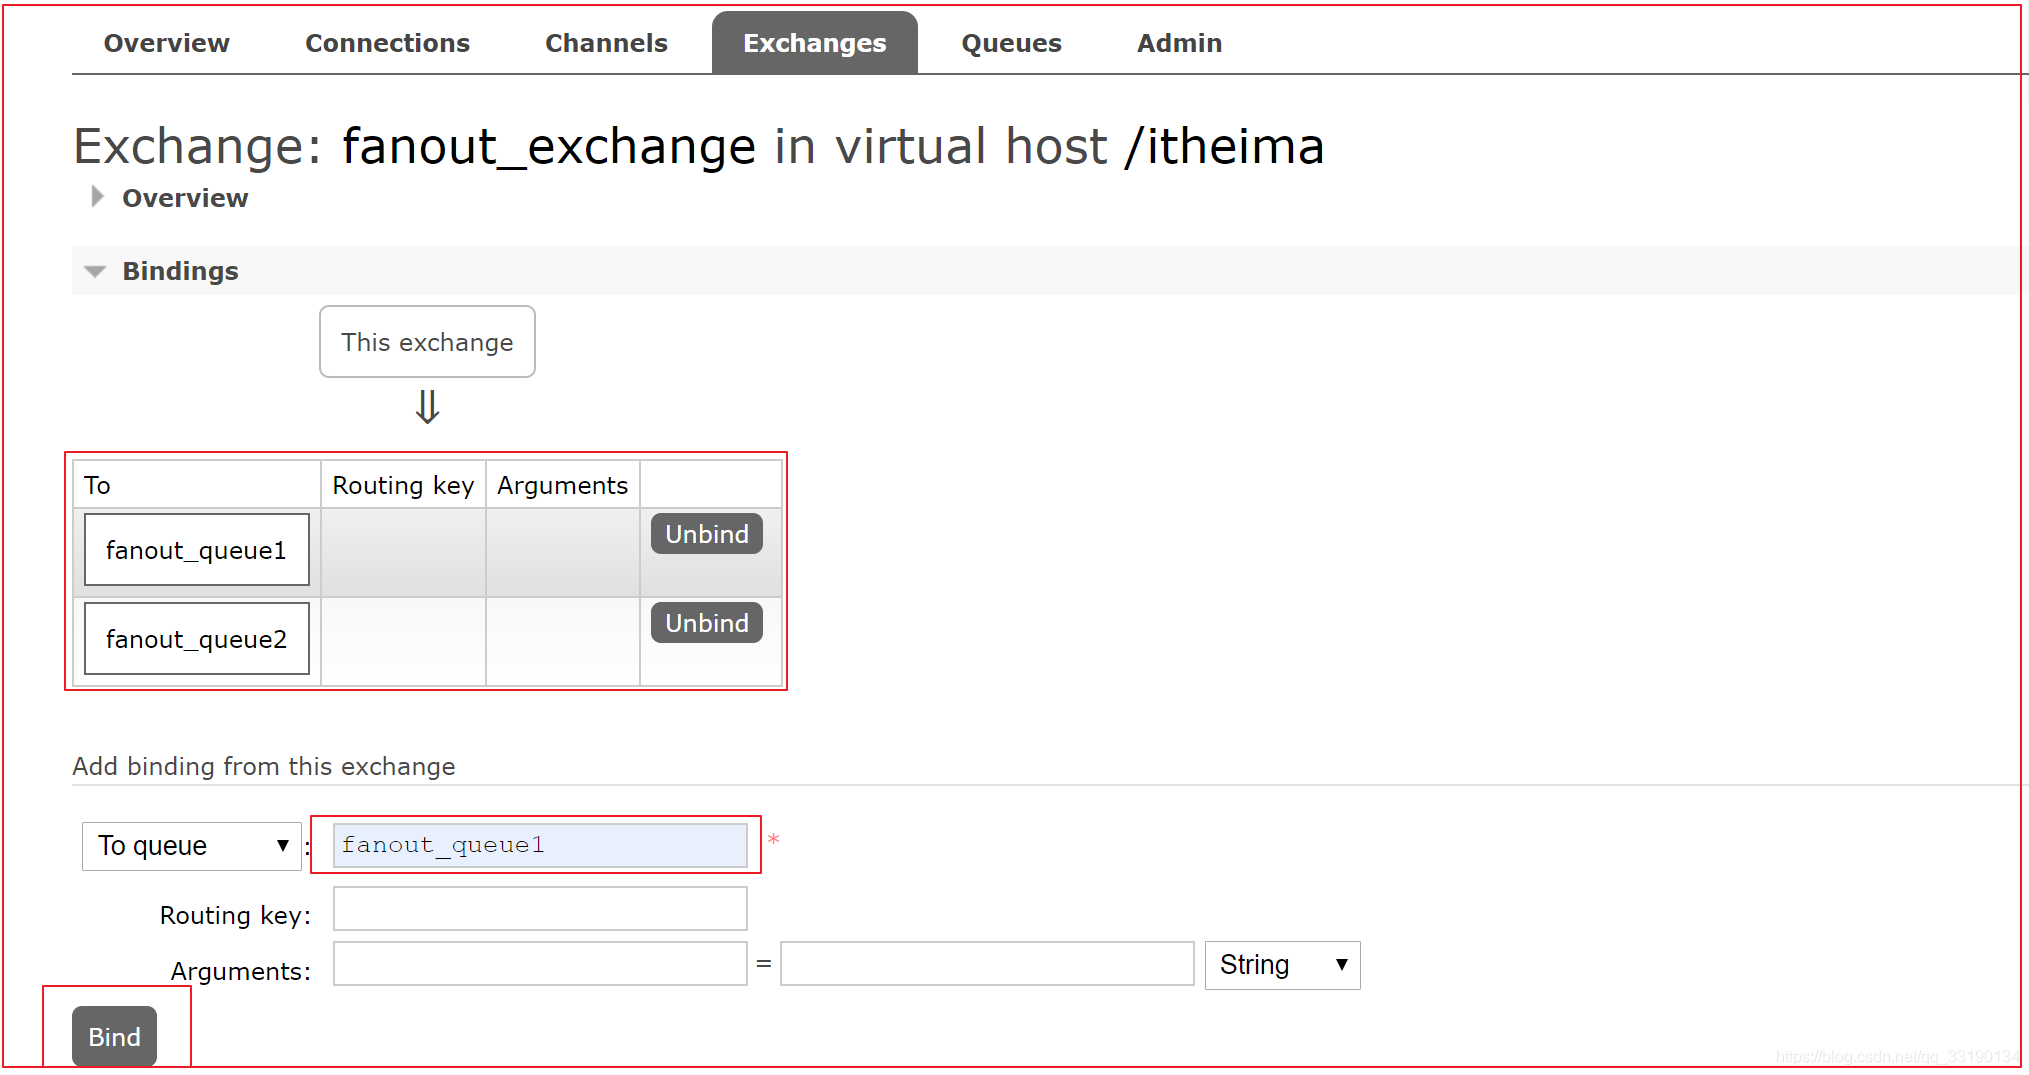
4.4 Publish/Subscribe發佈與訂閱模式
4.4.1 什麼是發佈訂閱模式
發佈訂閱模式:
1、每個消費者監聽自己的佇列。
2、生產者將訊息發給broker,由交換機將訊息轉發到系結此交換機的每個佇列,每個系結交換機的佇列都將接收到訊息
【廣播訊息:一次性將訊息發送給所有消費者,每個消費者收到訊息均一致】
4.4.2 RabbitMQ管理介面操作
- 建立兩個佇列 fanout_queue1和 fanout_queue2
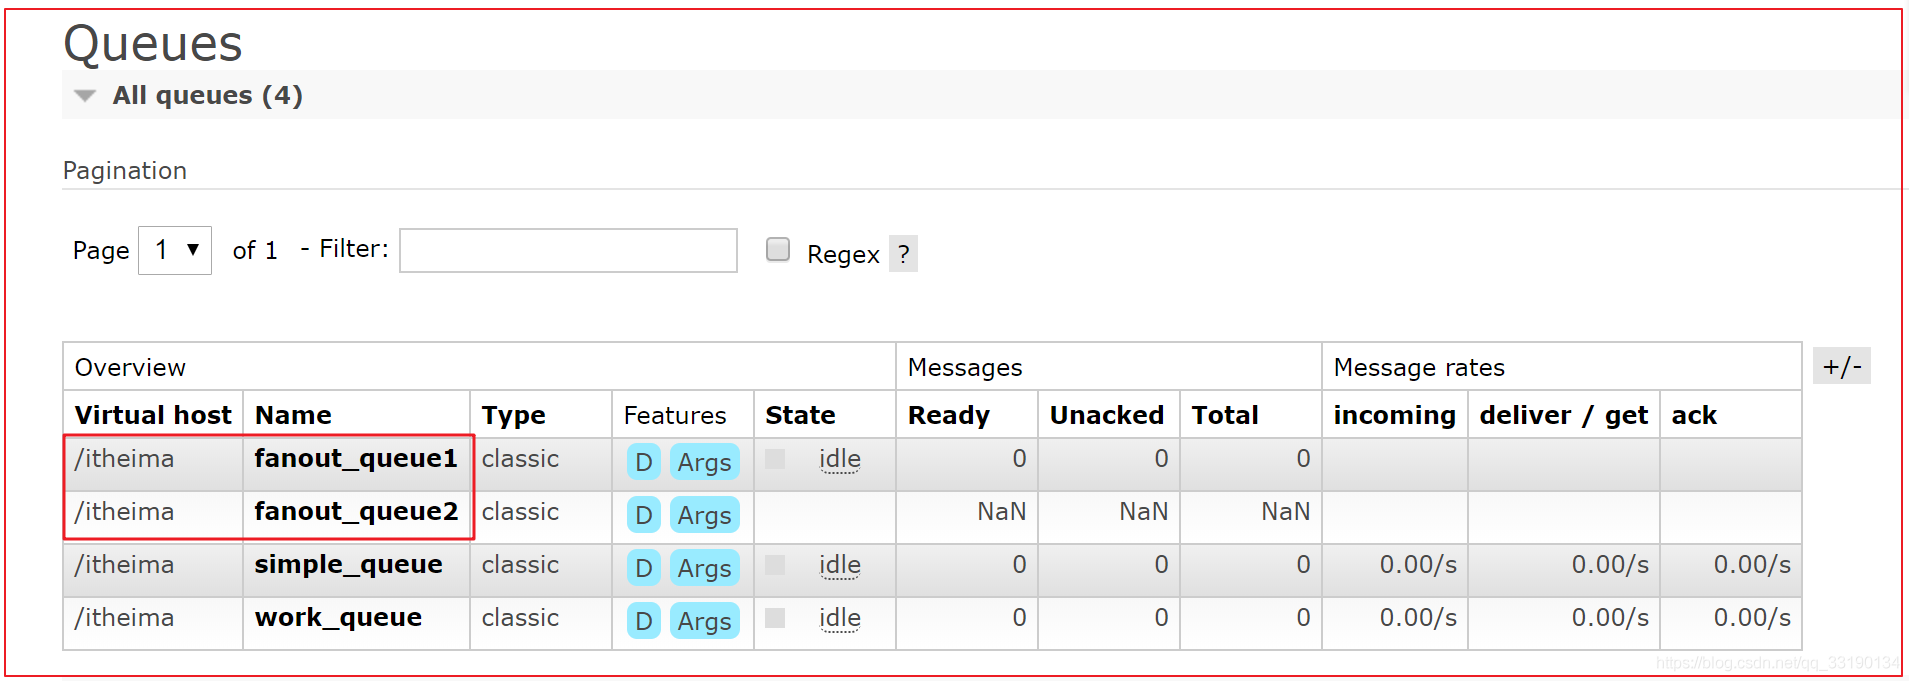
- 建立Exchange交換器
fanout_exchange
- 將建立的fanout_exchange交換器和 fanout_queue1, fanout_queue2佇列系結
4.4.3 生產者程式碼
- rabbitmq-producer專案測試程式碼如下:
package com.itheima.test;

import org.junit.Test;
import org.junit.runner.RunWith;
import org.springframework.amqp.rabbit.core.RabbitTemplate;
import org.springframework.beans.factory.annotation.Autowired;
import org.springframework.boot.test.context.SpringBootTest;
import org.springframework.test.context.junit4.SpringRunner;

/**
 * 目標:將訊息發送給交換機,通過交換機廣播給訊息佇列,路由鍵爲空字串
 */
@RunWith(SpringRunner.class)
@SpringBootTest
public class Demo03TestPublishAndSubscribe {

    @Autowired
    private RabbitTemplate rabbitTemplate;

    @Test
    public void contextLoads() {
        //向廣播交換機發送1千條訊息
        for (int i = 0; i < 1000; i++) {
            /**
             * 參數1:交換機名稱
             * 參數2:路由鍵
             * 參數3:訊息內容
             */
            rabbitTemplate.convertAndSend("fanout_exchange","","hello 我是小兔子【"+i+"】!");
        }
    }
}
4.4.4 消費者程式碼
- rabbitmq-consumer專案建立監聽器:
package com.itheima.rabbitmq.pubandsub;

import org.springframework.amqp.rabbit.annotation.RabbitHandler;
import org.springframework.amqp.rabbit.annotation.RabbitListener;
import org.springframework.stereotype.Component;

/**
 * 發佈訂閱模式:訊息監聽1
 */
@Component
@RabbitListener(queues = "fanout_queue1")
public class PubAndSubListener1 {

    @RabbitHandler
    public void pubAndSubHandler(String msg){
        System.out.println("=====發佈訂閱模式接收訊息端【1】=====>"+msg);
    }
}
- rabbitmq-consumer專案建立監聽器:
package com.itheima.rabbitmq.pubandsub;

import org.springframework.amqp.rabbit.annotation.RabbitHandler;
import org.springframework.amqp.rabbit.annotation.RabbitListener;
import org.springframework.stereotype.Component;

/**
 * 發佈訂閱模式:訊息監聽2
 */
@Component
@RabbitListener(queues = "fanout_queue2")
public class PubAndSubListener2 {

    @RabbitHandler
    public void pubAndSubHandler(String msg){
        System.out.println("=====發佈訂閱模式接收訊息端【2】=====>"+msg);
    }
}
4.5 Routing路由模式
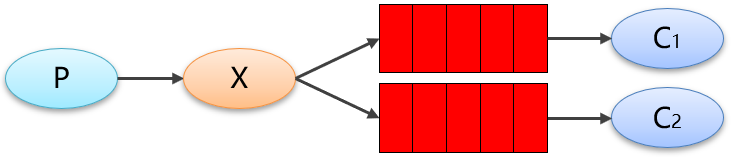
4.5.1 什麼是路由模式
路由模式特點:佇列與交換機的系結,不能是任意系結了,而是要指定一個RoutingKey(路由key)訊息的發送方在向 Exchange發送訊息時,也必須指定訊息的RoutingKey。Exchange不再把訊息交給每一個系結的佇列,而是根據訊息的Routing Key進行判斷,只有佇列的Routingkey與訊息的Routing key完全一致,纔會接收到訊息.
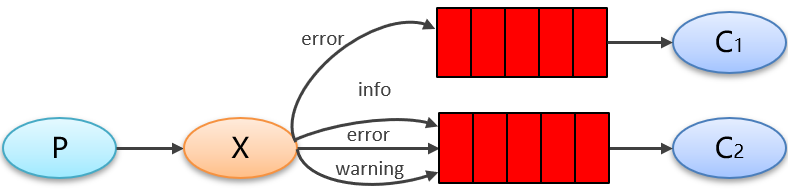
圖解:
P:生產者,向Exchange發送訊息,發送訊息時,會指定一個routing key。
X:Exchange(交換機),接收生產者的訊息,然後把訊息遞交給與routing key完全匹配的佇列
C1:消費者,其所在佇列指定了需要routing key 爲 error 的訊息
C2:消費者,其所在佇列指定了需要routing key 爲 info、error、warning 的訊息
【有選擇性的接收訊息】
4.5.2 RabbitMQ管理介面操作
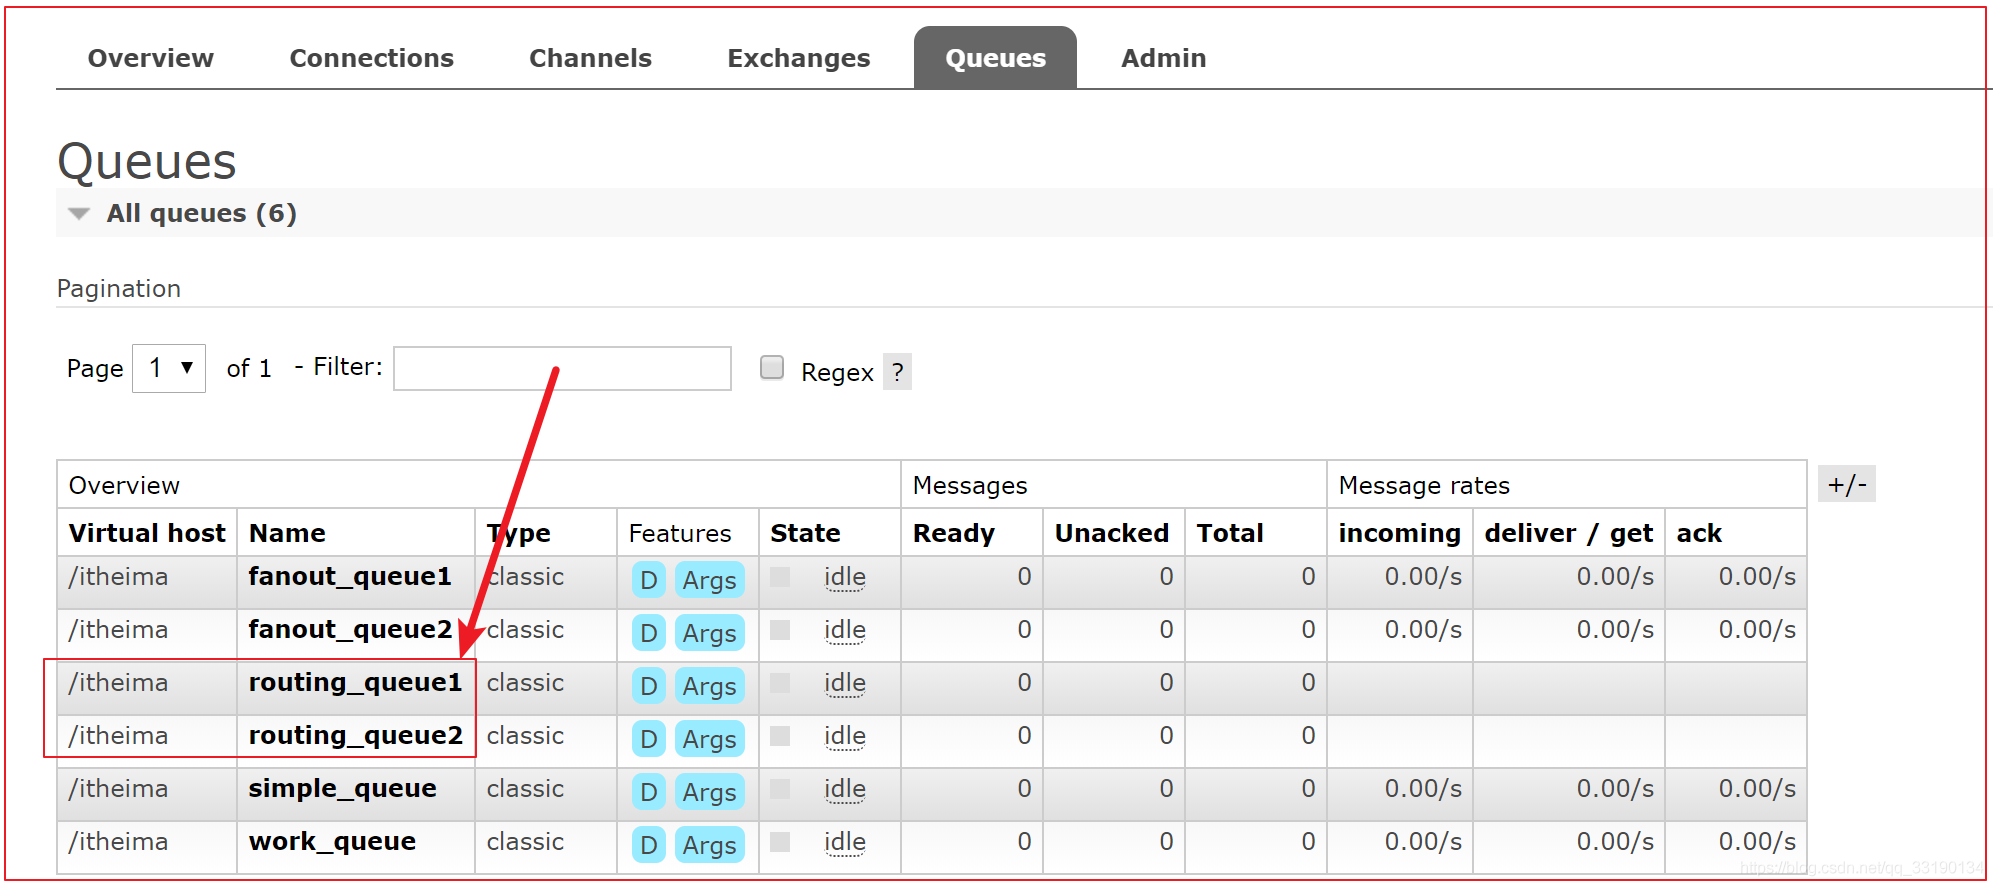
- 建立兩個佇列分別叫做
routing_queue1和routing_queue2使用者演示
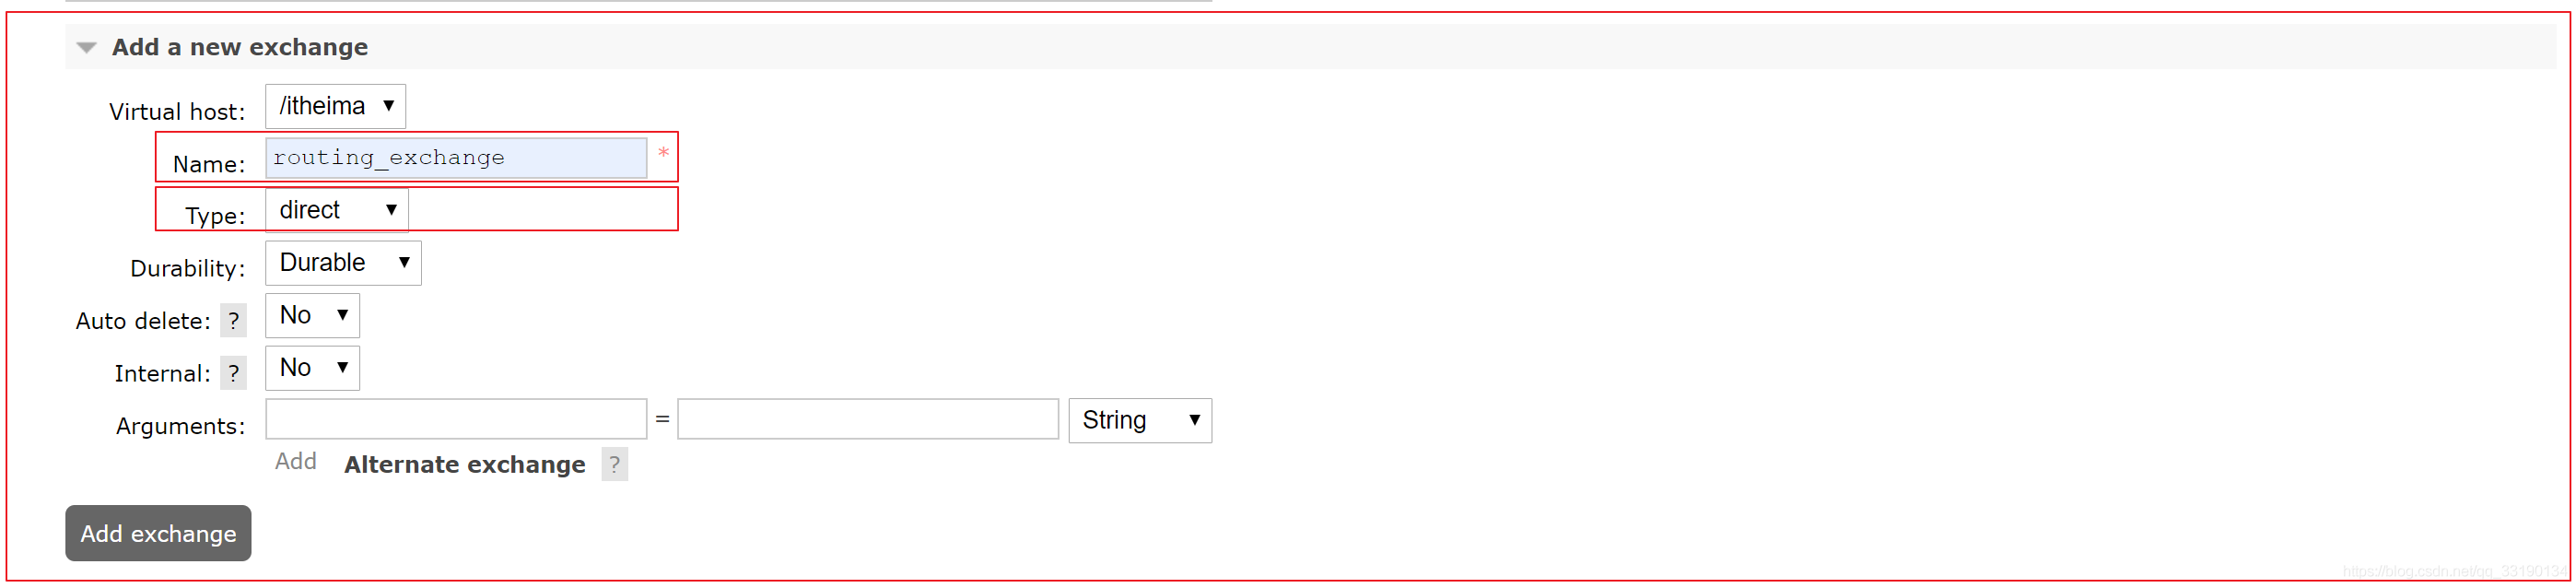
2.建立交換器routing_exchange, 型別爲direct, 用於演示路由模式
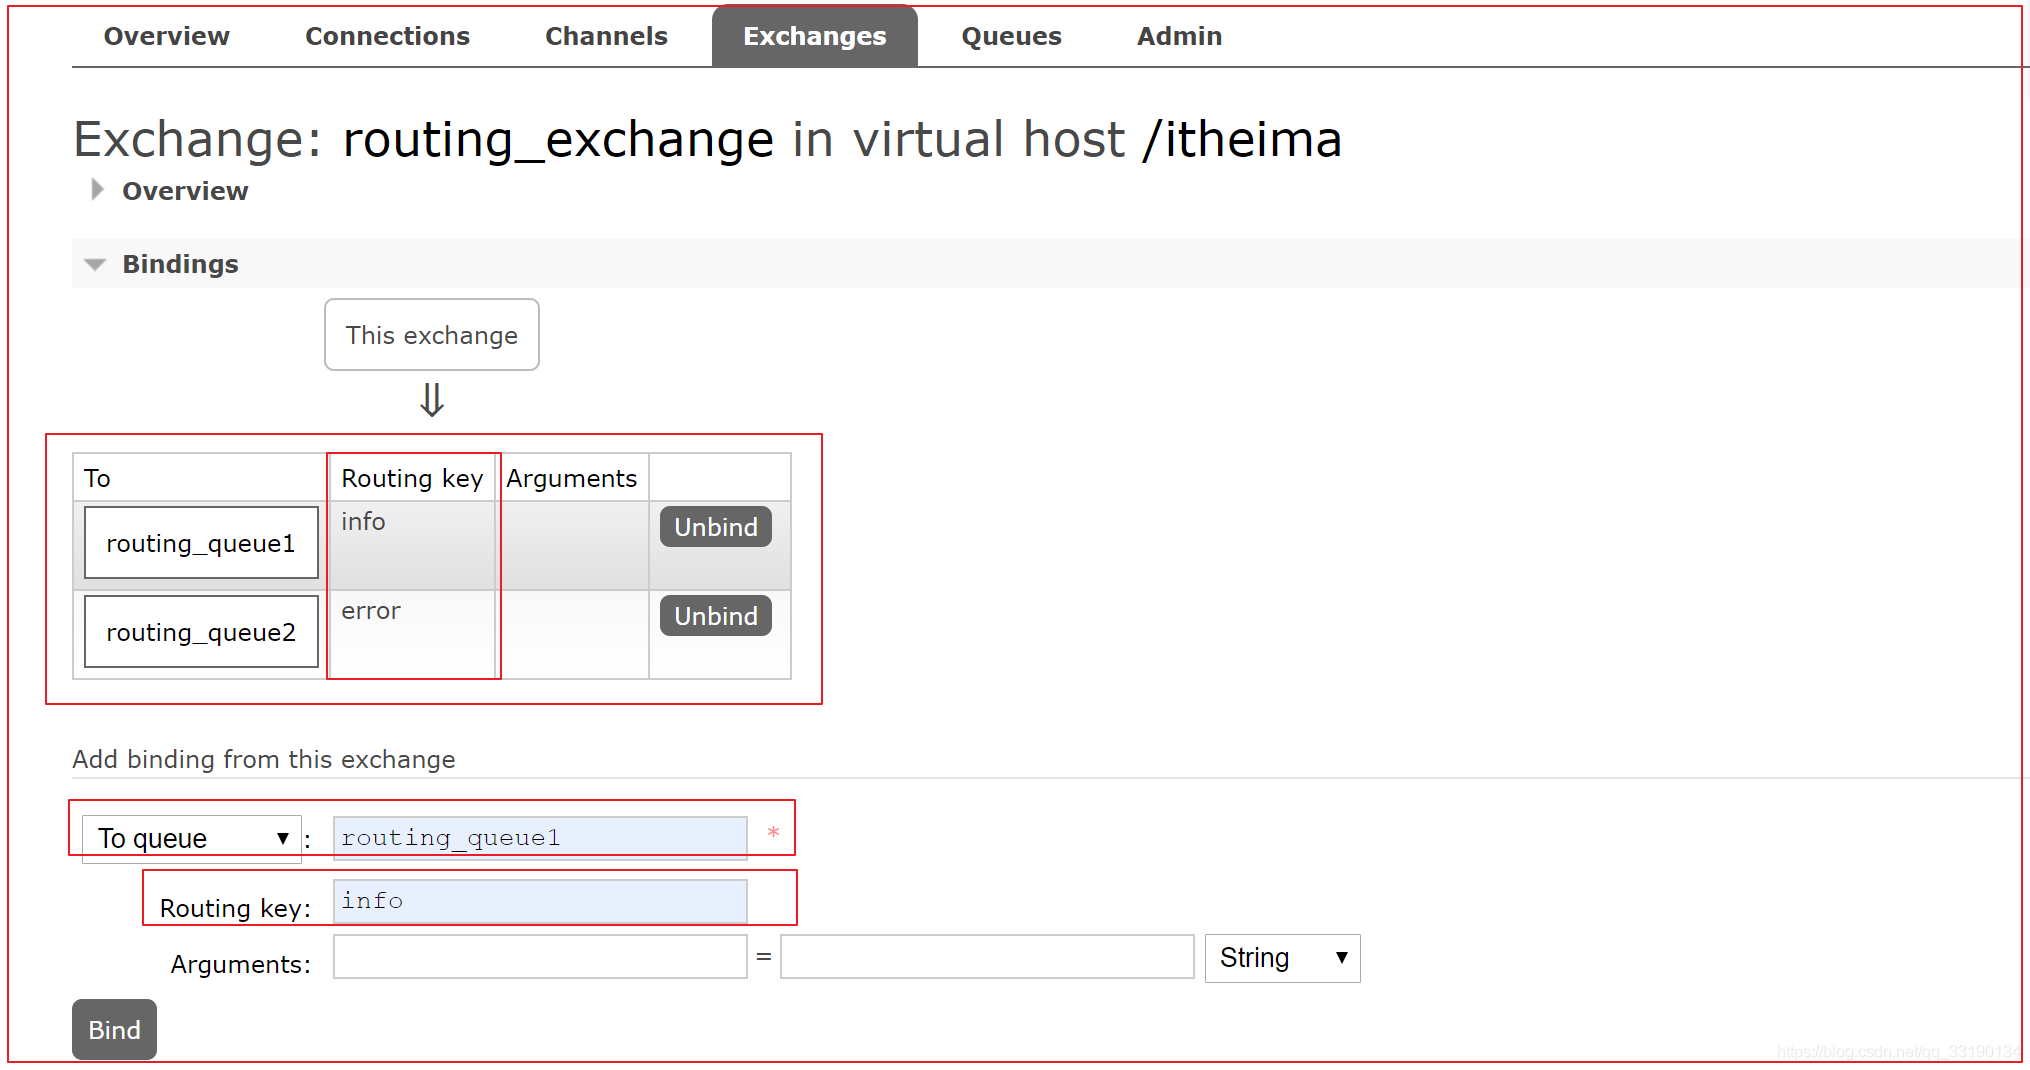
3.設定系結: 將建立的交換器routing_exchange和routing_queue1,routing_queue2系結在一起, 路由鍵Routing Key分別爲info和error;
4.5.3 生產者程式碼
- rabbitmq-producer專案測試程式碼如下:
package com.itheima.test;

import org.junit.Test;
import org.junit.runner.RunWith;
import org.springframework.amqp.rabbit.core.RabbitTemplate;
import org.springframework.beans.factory.annotation.Autowired;
import org.springframework.boot.test.context.SpringBootTest;
import org.springframework.test.context.junit4.SpringRunner;

/**
 * 目標:將訊息發送給交換機,通過交換機路由給指定的訊息佇列,通過路由鍵類指定
 */
@RunWith(SpringRunner.class)
@SpringBootTest
public class Demo04TestRoutingModel {

    @Autowired
    private RabbitTemplate rabbitTemplate;

    @Test
    public void contextLoads() {
        //向路由交換機發送1千條訊息
        for (int i = 0; i < 1000; i++) {
            /**
             * 參數1:交換機名稱
             * 參數2:路由鍵:error , info ,指定要投遞的訊息佇列
             * 參數3:訊息內容
             */
            if(i%2 == 0){
                rabbitTemplate.convertAndSend("routing_exchange","info","hello 我是小兔子【"+i+"】!");
            } else {
                rabbitTemplate.convertAndSend("routing_exchange","error","hello 我是小兔子【"+i+"】!");
            }
        }
    }
}
4.5.4 消費者程式碼
- rabbitmq-consumer專案建立監聽器:
package com.itheima.rabbitmq.routing;

import org.springframework.amqp.rabbit.annotation.RabbitHandler;
import org.springframework.amqp.rabbit.annotation.RabbitListener;
import org.springframework.stereotype.Component;

/**
 * 路由模式:訊息佇列接收監聽器1,接收來自路由模式發送的訊息
 */
@Component
@RabbitListener(queues = "routing_queue1")
public class RoutingListener1 {

    @RabbitHandler
    public void routingHandler(String msg){
        System.out.println("=====路由模式訊息接收監聽器【1】=====>"+msg);
    }
}
- rabbitmq-consumer專案建立監聽器:
package com.itheima.rabbitmq.routing;

import org.springframework.amqp.rabbit.annotation.RabbitHandler;
import org.springframework.amqp.rabbit.annotation.RabbitListener;
import org.springframework.stereotype.Component;

/**
 * 路由模式:訊息佇列接收監聽器2,接收來自路由模式發送的訊息
 */
@Component
@RabbitListener(queues = "routing_queue2")
public class RoutingListener2 {

    @RabbitHandler
    public void routingHandler(String msg){
        System.out.println("=====路由模式訊息接收監聽器【2】=====>"+msg);
    }
}
4.6 Topics萬用字元模式(主題模式)
4.6.1 什麼是萬用字元(主題)模式
Topic型別與Direct相比,都是可以根據RoutingKey把訊息路由到不同的佇列。只不過Topic型別Exchange可以讓佇列在系結Routing key的時候使用萬用字元!
Routingkey: 一般都是有一個或多個單詞組成,多個單詞之間以」.」分割,例如:item.insert
萬用字元規則:
#:匹配一個或多個詞,多個詞用點號分隔
*:匹配不多不少恰好1個詞
舉例:
item.#: 能夠匹配item.insert.abc.bbc或者item.insert
**item.*:**只能匹配item.insert
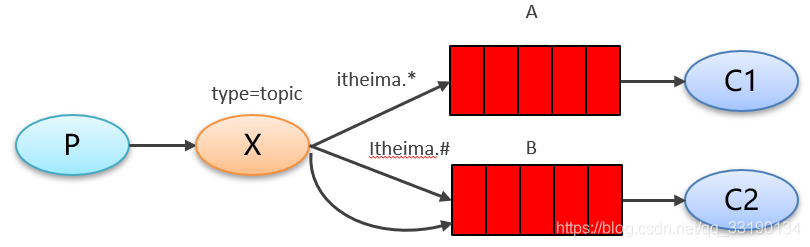
【基於萬用字元接收訊息】
4.6.2 RabbitMQ管理介面操作
- 建立佇列
topic_queue1和topic_queue1
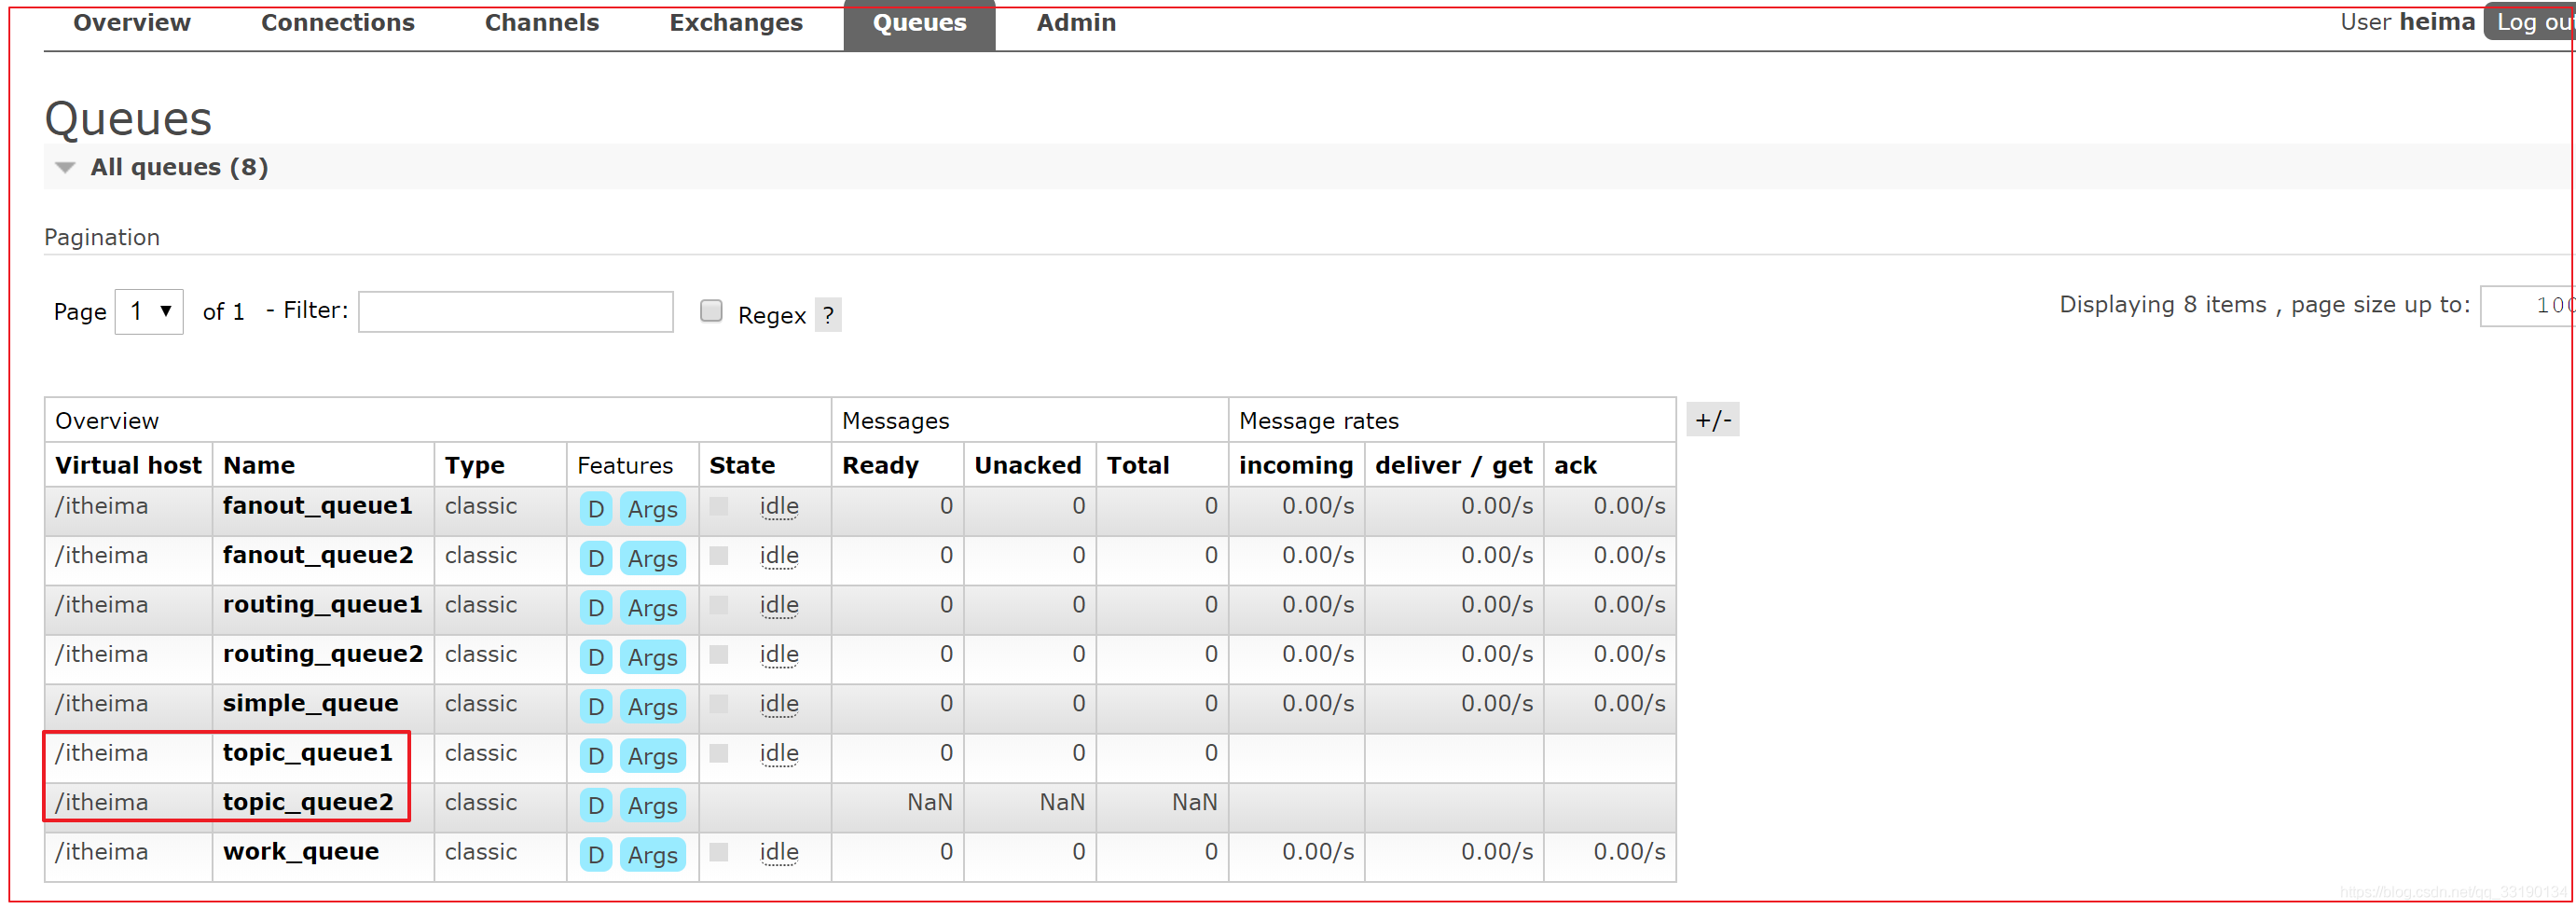
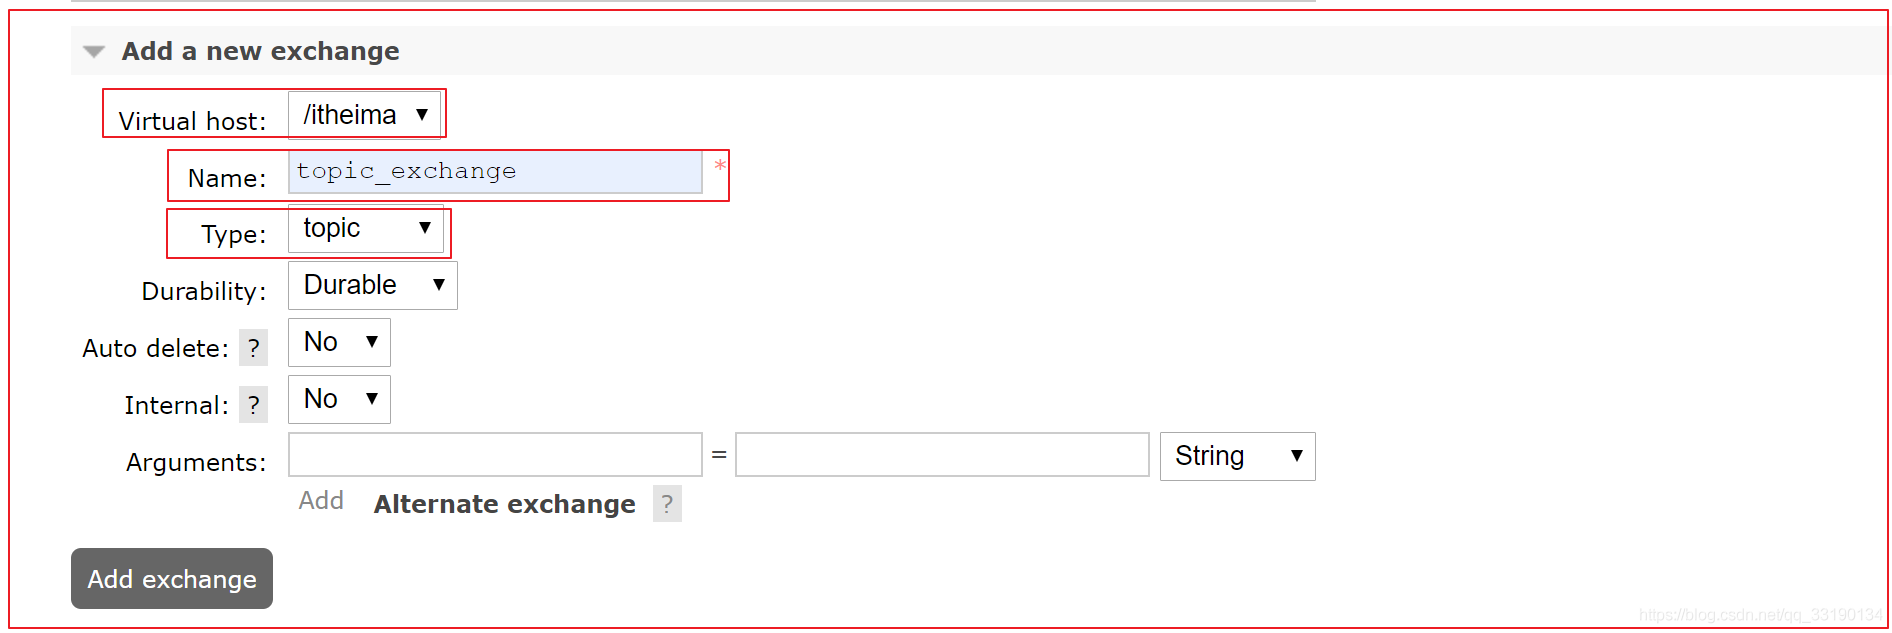
2.建立交換器topic_exchange, type型別爲topic
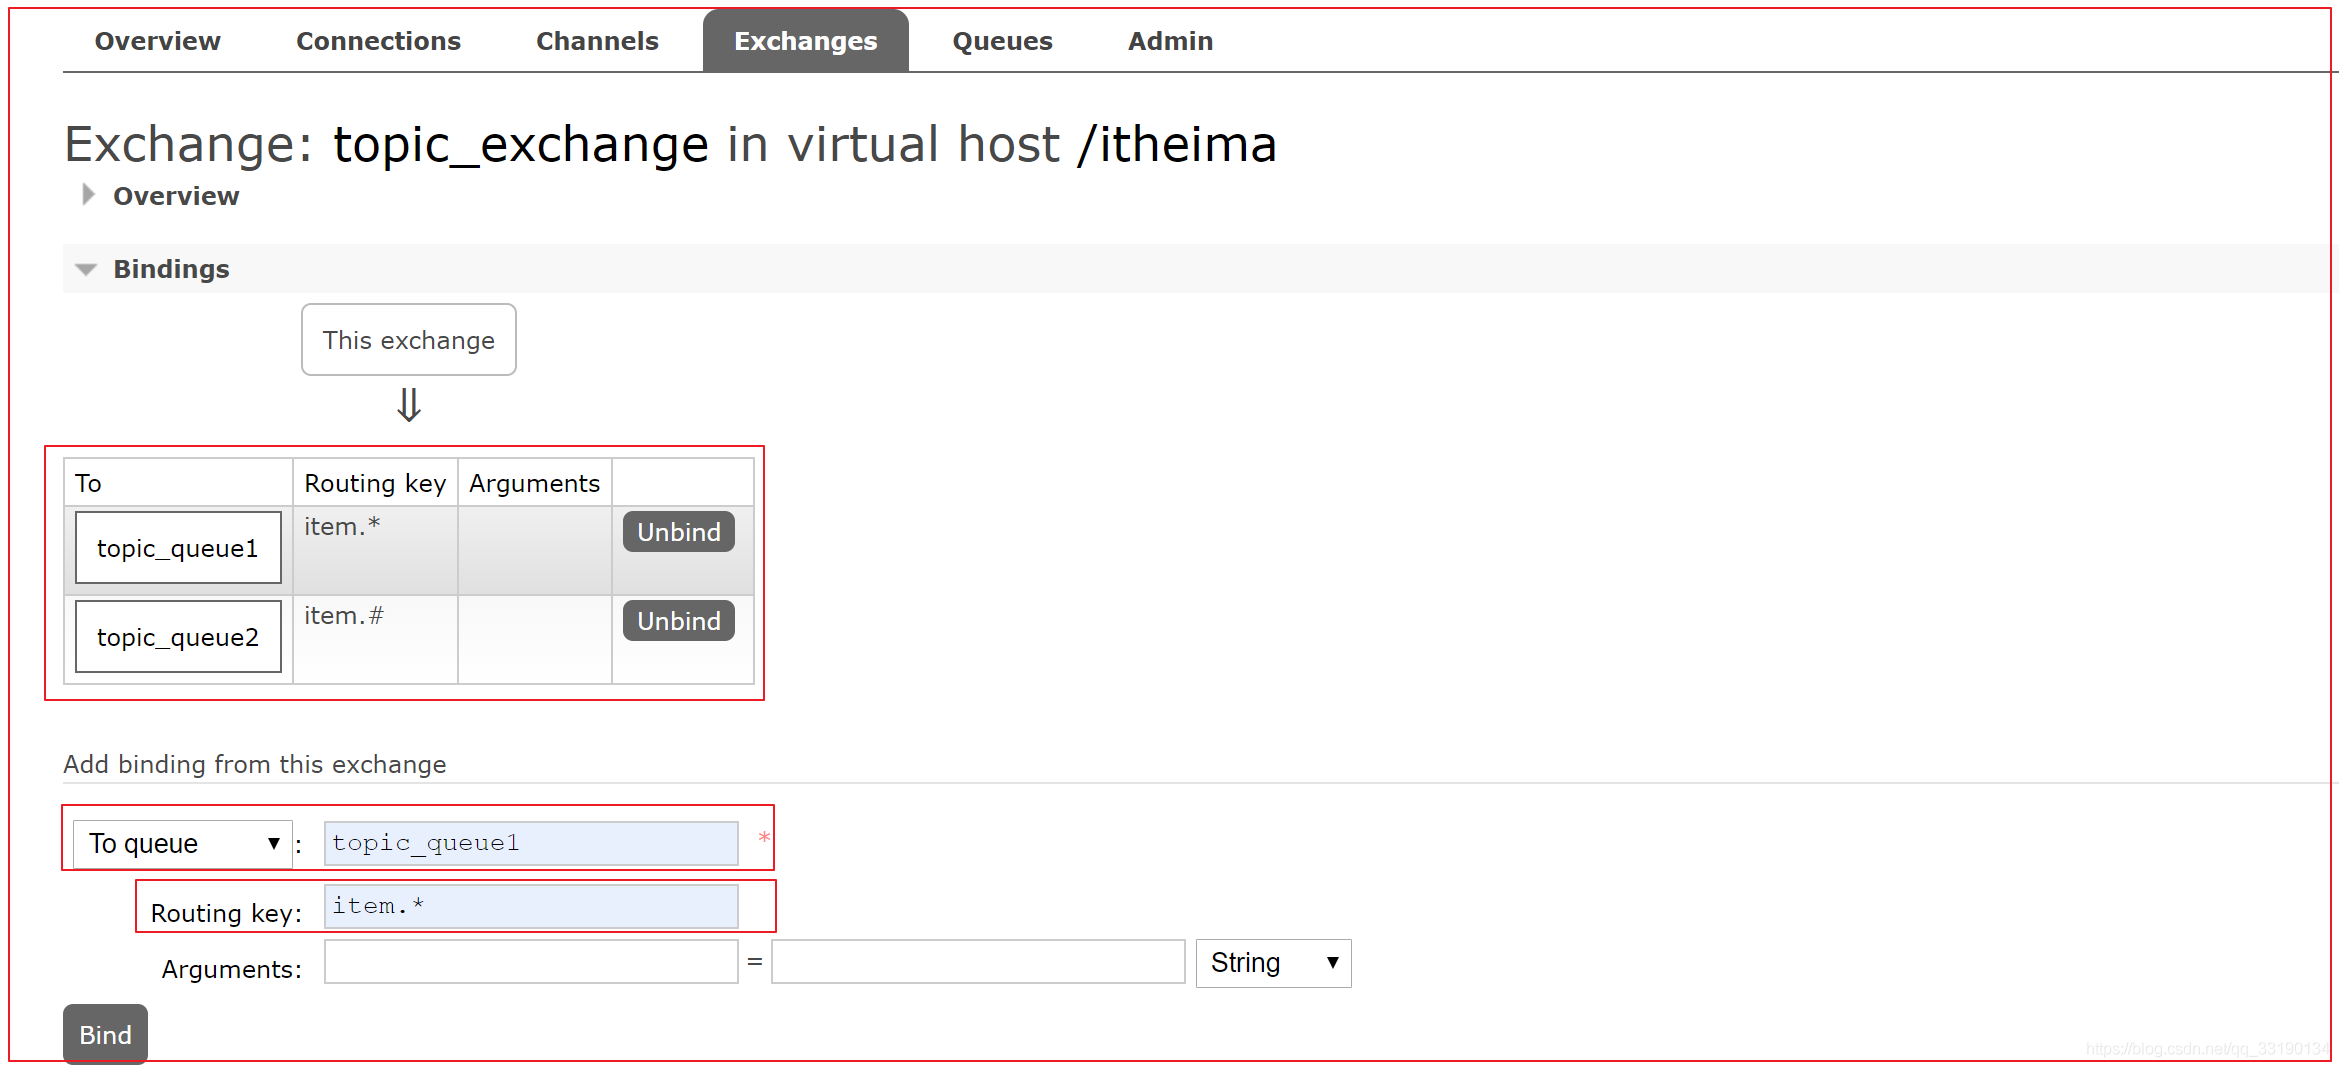
設定系結:
topic_queue1系結的Routing Key路由鍵爲item.*
topic_queue2系結的Routing Key路由鍵爲item.#
4.6.3 生產者程式碼
- rabbitmq-producer專案測試程式碼如下:
package com.itheima.test;

import org.junit.Test;
import org.junit.runner.RunWith;
import org.springframework.amqp.rabbit.core.RabbitTemplate;
import org.springframework.beans.factory.annotation.Autowired;
import org.springframework.boot.test.context.SpringBootTest;
import org.springframework.test.context.junit4.SpringRunner;

/**
 * 目標:將訊息發送給交換機,通過交換機路由給指定的訊息佇列,路由鍵使用萬用字元
 */
@RunWith(SpringRunner.class)
@SpringBootTest
public class Demo05TestTopicModel {

    @Autowired
    private RabbitTemplate rabbitTemplate;

    @Test
    public void contextLoads() {
        //向萬用字元交換機發送訊息
        rabbitTemplate.convertAndSend("topic_exchange","item.insert","hello 我是小兔子,路由鍵item.insert");
        rabbitTemplate.convertAndSend("topic_exchange","item.insert.abc","hello 我是小兔子,路由鍵:item.insert.abc");
    }
}
4.6.4 消費者程式碼
- rabbitmq-consumer專案建立監聽器:
package com.itheima.rabbitmq.topic;

import org.springframework.amqp.rabbit.annotation.RabbitHandler;
import org.springframework.amqp.rabbit.annotation.RabbitListener;
import org.springframework.stereotype.Component;

/**
 * 萬用字元模式:訊息佇列接收監聽器1,接收來自萬用字元模式發送的訊息
 *
 */
@Component
@RabbitListener(queues = "topic_queue1")
public class TopicListener1 {

    @RabbitHandler
    public void topicHandler(String msg){
        System.out.println("=====萬用字元模式訊息接收監聽器【1】=====>"+msg);
    }
}
- rabbitmq-consumer專案建立監聽器:
package com.itheima.rabbitmq.topic;

import org.springframework.amqp.rabbit.annotation.RabbitHandler;
import org.springframework.amqp.rabbit.annotation.RabbitListener;
import org.springframework.stereotype.Component;

/**
 * 萬用字元模式:訊息佇列接收監聽器1,接收來自萬用字元模式發送的訊息
 *
 */
@Component
@RabbitListener(queues = "topic_queue2")
public class TopicListener2 {

    @RabbitHandler
    public void topicHandler(String msg){
        System.out.println("=====萬用字元模式訊息接收監聽器【2】=====>"+msg);
    }
}
4.7 模式總結RabbitMQ
工作模式:
**1、簡單模式 HelloWorld : ** 一個生產者、一個消費者,不需要設定交換機(使用預設的交換機)
2、工作佇列模式 Work Queue: 一個生產者、多個消費者(競爭關係),不需要設定交換機(使用預設的交換機)
**3、發佈訂閱模式 Publish/subscribe: 需要設定型別爲fanout**的交換機,並且交換機和佇列進行系結,當發送訊息到交換機後,交換機會將訊息廣播發送到系結的佇列
4、路由模式 Routing: ** 需要設定型別爲direct**的交換機,交換機和佇列進行系結,並且指定routing key,當發送訊息到交換機後,交換機會根據routing key將訊息發送到對應的佇列
**5、萬用字元模式 Topic: ** 需要設定型別爲==topic==的交換機,交換機和佇列進行系結,並且指定萬用字元方式的routing key,當發送訊息到交換機後,交換機會根據routing key將訊息發送到對應的佇列