Windows 11 和 Rocky 9 Linux 平臺 MySQL 8.0.33 簡易安裝教學
Windows 11 和 Rocky 9 Linux 初體驗 MySQL8.0.33 簡易安裝教學。
MySQL 8.0 目前最新穩定版本已經更新到了 MySQL 8.0.33,估計下一個穩定版本(大約在今年 7月份)推出。當然,這是我個人根據 MySQL 的發行註記做出的推測。
本篇總結作為對之前發出的 MySQL 系列博文 《MySQL8.0.28安裝教學全程參考MySQL官方檔案》補充說明。
注意:如果你想在 MySQL 官網獲取 8.0.29 ,是找不到資源的。因為出現了重大問題,官網直接移除了下載資源。推薦跳過 MySQL 8.0.29,升級到更高的版本或者使用歷史穩定版本。
Important
This release is no longer available for download. It was removed due to a critical issue that could cause data in InnoDB
tables having added columns to be interpreted incorrectly. Please upgrade to MySQL 8.0.30 instead.
Windows 平臺安裝 MySQL
Windows install MySQL 8.0.x (Archive zip) 簡易安裝教學
友情提示:從 MySQL 5.7 開始,Archive zip 預設不再提供預設的 my.ini 或者 my.cnf 組態檔,需要手動構建。
注意:x 代表使用 MySQL 8.0 某個具體版本,比如我演示:mysql-8.0.33-winx64.zip。
- 獲取 mysql-8.0.33-winx64.zip:https://cdn.mysql.com//Downloads/MySQL-8.0/mysql-8.0.33-winx64.zip
- 解壓免安裝版 MySQL:unzip mysql-8.0.x-winx64.zip
- 切換到 MySQL 解壓目錄:cd mysql-8.0.x-winx64
- 新增 MySQL 組態檔: my.ini,詳細設定可以參考官方檔案,或者安裝 msi 安裝包,複製一份作為參考。
- 初始化 MySQL:
bin\mysqld --initialize-insecure或者bin\mysqld --initialize-insecure --console - 註冊 MySQL 服務:
bin\mysqld --install MySQL80(將 MySQL 服務註冊到 service,可以使用 net 命令進行管理) - 啟動 MySQL 服務:
net start MySQL80或者sc start MySQL80 - 登入 MySQL 字元管理介面:mysql -uroot -p
Windows 環境新建 my.ini 做如下設定,指定基本安裝目錄(basedir)與資料存放目錄(datadir)以及埠號(port):
[mysqld]
port=3307
basedir=D:\\mysql-8.0.33-winx64
datadir=D:\\mysql-8.0.33-winx64\\data
為了便於演示,我設定 port 埠為 3307 ,登入時通過引數 -P 指定特定埠號。
復現在網上看到的一個問題,如果出現如下問題,如何解決?
PS D:\mysql-8.0.33-winx64> bin\mysqld –initialize-insecure –console
[System] [MY-010116] [Server] D:\mysql-8.0.33-winx64\bin\mysqld.exe (mysqld 8.0.33) starting as process 12860
[Warning] [MY-010091] [Server]
Can't create test file D:\mysql-8.0.33-winx64\data\mysqld_tmp_file_case_insensitive_test.lower-test
[Warning] [MY-010091] [Server]
Can't create test file D:\mysql-8.0.33-winx64\data\mysqld_tmp_file_case_insensitive_test.lower-test
[ERROR] [MY-013376] [Server] Failed to set datadir to 'D:\mysql-8.0.33-winx64\data\' (OS errno: 2 - No such file or directory)
[ERROR] [MY-010119] [Server] Aborting
[System] [MY-010910] [Server] D:\mysql-8.0.33-winx64\bin\mysqld.exe: Shutdown complete (mysqld 8.0.33)  MySQL Community Server - GPL.
需要檢查初始化命令引數是否有缺失:bin\mysqld.exe –initialize-insecure –console,才發現 Windows powershell 中從檔案複製過來的 -- 變成了 – 拼接在一起的單橫槓。
注意:注意細節問題。如果出現初始化 data 目錄失敗,某某檔案、目錄無法建立等等問題。有可能是格式顯示問題,複製貼上引數時單 - 中橫槓 和 -- 雙中橫槓沒有區分開來,如果放在程式碼塊中正常顯示。
如下是範例,初始化 MySQL 方式:
- 密碼隨機:
bin\mysqld --initialize - 密碼置空:
bin\mysqld --initialize-insecure - 密碼置空且將資訊列印在字元命令列介面上:
bin\mysqld --initialize-insecure --console
bin\mysqld --initialize  			# 密碼隨機
bin\mysqld --initialize-insecure 	# 密碼置空
bin\mysqld --initialize-insecure --console 	# 密碼置空且將資訊列印在字元命令列介面上
友情提示:開啟 CMD 或者 PowerShell 時,請以管理員身份執行,如果沒有,安裝服務時則會提示許可權拒絕,如下所示。
D:\software\mysql-8.0.33-winx64\bin>mysqld --install MySQL80
Install/Remove of the Service Denied!
Windows 11 作業系統中安裝 MySQL8.0.33 (noinstall Archive zip) 步驟
使用 Windows 自帶的終端管理工具,開啟 PowerShell:
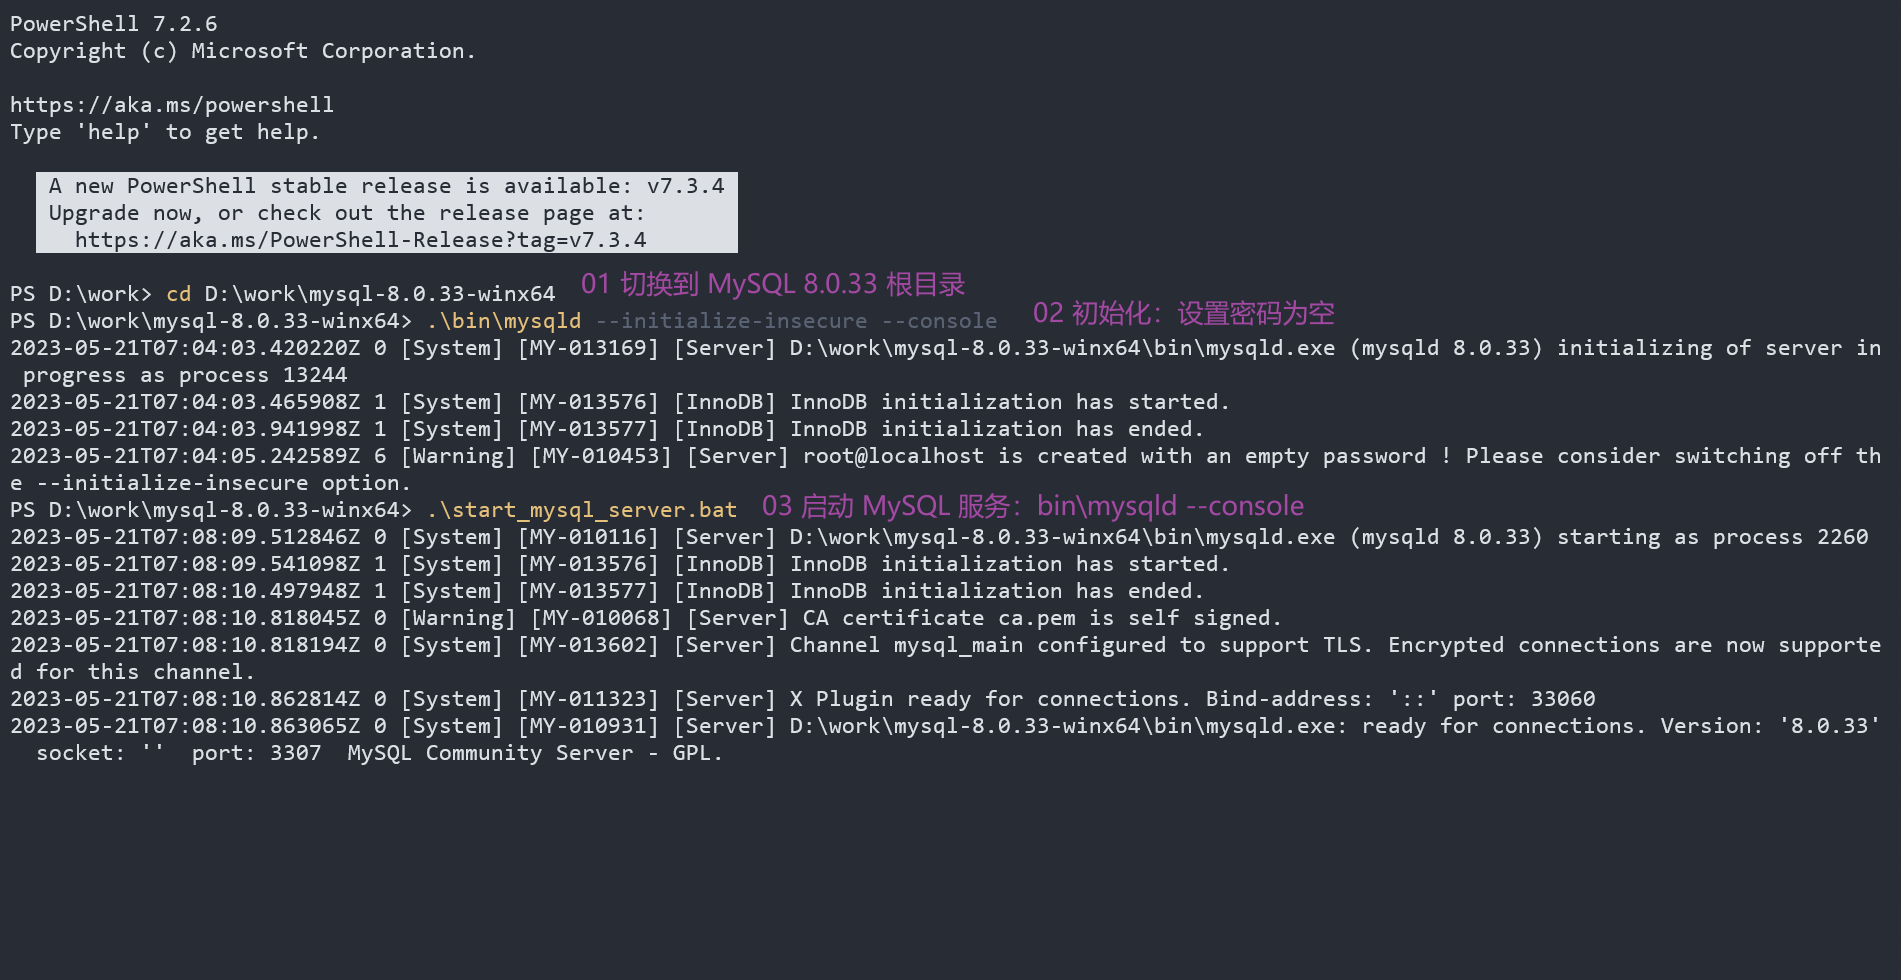
PS D:\work> cd D:\work\mysql-8.0.33-winx64
PS D:\work\mysql-8.0.33-winx64> .\bin\mysqld --initialize-insecure --console
2023-05-21T07:04:03.420220Z 0 [System] [MY-013169] [Server] D:\work\mysql-8.0.33-winx64\bin\mysqld.exe (mysqld 8.0.33) initializing of server in progress as process 13344
2023-05-21T07:04:03.465908Z 1 [System] [MY-013576] [InnoDB] InnoDB initialization has started.
2023-05-21T07:04:03.941998Z 1 [System] [MY-013577] [InnoDB] InnoDB initialization has ended.
2023-05-21T07:04:05.242589Z 6 [Warning] [MY-010453] [Server] root@localhost is created with an empty password ! Please consider switching off the --initialize-insecure option.
D:\work\mysql-8.0.33-winx64>bin\mysqld --install MySQL80
Service successfully installed.
D:\work\mysql-8.0.33-winx64>net start MySQL80
MySQL80 服務正在啟動 .
MySQL80 服務已經啟動成功。
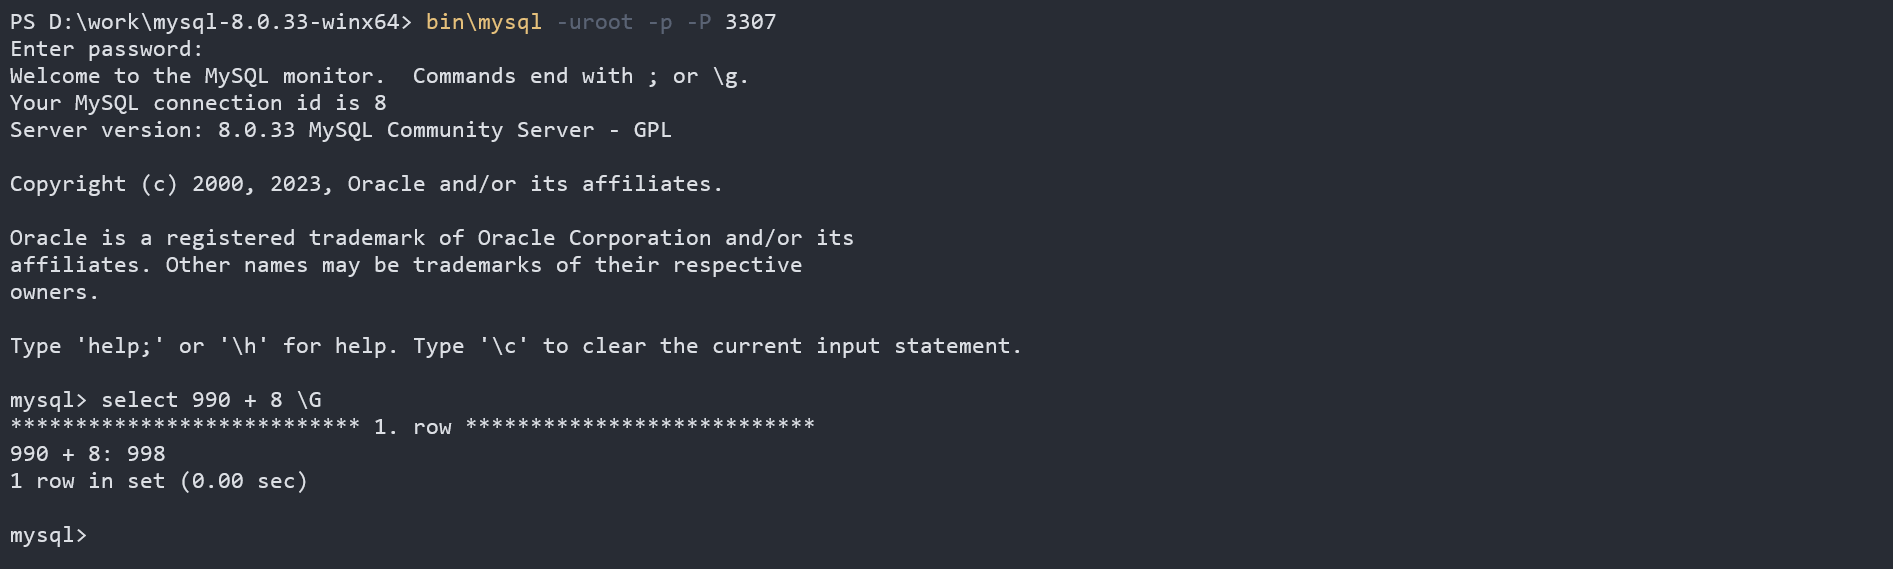
PS D:\work\mysql-8.0.33-winx64> bin\mysql -uroot -p -P 3307
Enter password:
Welcome to the MySQL monitor. Commands end with ; or \g.
Your MySQL connection id is 8
Server version: 8.0.33 MySQL Community Server - GPL
Copyright (c) 2000, 2023, Oracle and/or its affiliates.
Oracle is a registered trademark of Oracle Corporation and/or its
affiliates. Other names may be trademarks of their respective
owners.
Type 'help;' or '\h' for help. Type '\c' to clear the current input statement.
mysql>
初步使用 MySQL
預設登入:
mysql -uroot -p
指定 ip 地址以及埠號:
mysql -uroot -p -h 192.168.245.133 -P 3307
引數含義:
- -u:指定使用者名稱(user)
- -p:指定密碼(password)
- -h:指定主機地址(host)
- -P:指定埠號(port)
PS D:\work\mysql-8.0.33-winx64> bin\mysql -uroot -p -P 3307
Enter password:
Welcome to the MySQL monitor.  Commands end with ; or \g.
Your MySQL connection id is 8
Server version: 8.0.33 MySQL Community Server - GPL

Copyright (c) 2000, 2023, Oracle and/or its affiliates.

Oracle is a registered trademark of Oracle Corporation and/or its
affiliates. Other names may be trademarks of their respective
owners.

Type 'help;' or '\h' for help. Type '\c' to clear the current input statement.

mysql> select 990 + 8 \G
*************************** 1. row ***************************
990 + 8: 998
1 row in set (0.00 sec)

mysql> create database study;
Query OK, 1 row affected (0.01 sec)

mysql> use study;
Database changed

mysql> create table books(books_id int primary key,books_name varchar(64),isbn varchar(64),author varchar(33));
Query OK, 0 rows affected (0.02 sec)

mysql> select * from books\G
Empty set (0.01 sec)

mysql> insert into books(books_id,books_name,isbn,author) values(1001,'絕世武功祕籍','22-90-12345','不詳');
Query OK, 1 row affected (0.00 sec)

mysql> select * from books\G
*************************** 1. row ***************************
  books_id: 1001
books_name: 絕世武功祕籍
      isbn: 22-90-12345
    author: 不詳
1 row in set (0.00 sec)
檢查紀錄檔檔案 :data directory host_name.err file.could not open the mysql.plugin table
711538Z 0 [System] [MY-013169] [Server] d:\mysql-8.0.33-winx64\bin\mysqld.exe (mysqld 8.0.33) initializing of server in progress as process 13908
746579Z 1 [System] [MY-013576] [InnoDB] InnoDB initialization has started.
205845Z 1 [System] [MY-013577] [InnoDB] InnoDB initialization has ended.
399260Z 6 [Warning] [MY-010453] [Server] root@localhost is created with an empty password ! Please consider switching off the --initialize-insecure option.**
020963Z 0 [System] [MY-010116] [Server] D:\mysql-8.0.33-winx64\bin\mysqld (mysqld 8.0.33) starting as process 13756
038677Z 1 [System] [MY-013576] [InnoDB] InnoDB initialization has started.
333181Z 1 [System] [MY-013577] [InnoDB] InnoDB initialization has ended.
552785Z 0 [Warning] [MY-010068] [Server] CA certificate ca.pem is self signed.
553344Z 0 [System] [MY-013602] [Server] Channel mysql_main configured to support TLS. Encrypted connections are now supported for this channel.
583339Z 0 [System] [MY-011333] [Server] X Plugin ready for connections. Bind-address: '::' port: 33360
583379Z 0 [System] [MY-010931] [Server] D:\mysql-8.0.33-winx64\bin\mysqld: ready for connections. Version: '8.0.33'  socket: ''  port: 3307  MySQL Community Server - GPL.
085937Z 0 [System] [MY-013105] [Server] D:\mysql-8.0.33-winx64\bin\mysqld: Normal shutdown.
812152Z 0 [System] [MY-010910] [Server] D:\mysql-8.0.33-winx64\bin\mysqld: Shutdown complete (mysqld 8.0.33)  MySQL Community Server - GPL.
發現問題:
could not open the mysql.plugin table
嘗試解決問題:
- 檢查組態檔:my.ini
- 分析問題,檢查初始化和安裝服務:
mysqld --initialize或者mysqld --initialize-insecure --console - 移除服務:
mysqld --remove MySQL80 - 移除資料目錄:data
- 排查問題,再次初始化:
mysqld --initialize或者mysqld --initialize-insecure --console - 再次安裝服務:
mysqld --install MySQL80
Linux 平臺 Rocky 9 安裝 MySQL
Rocky 9 Linux 平臺 MySQL 安裝方式:
- yum 源:使用 Linux 發行版自帶的 yum 工具進行安裝。
- rpm 包安裝:最為簡單,但不靈活,適合初學者使用。
- 二進位制包(binary package):編譯好的原始碼包,比 rpm 包更靈活。個人認為是安裝多個服務最佳選擇。
- 原始碼包(source package):最靈活,可根據需求編譯安裝功能,難易度最高。
- docker 形式安裝:其實是在容器中安裝。
如下,介紹二進位制包、rpm 包、yum 源以及原始碼包形式 MySQL 簡易安裝教學。
binary package
01 binary package:使用 Linux 平臺通用的二進位制包安裝
獲取:mysql-8.0.33-linux-glibc2.28-x86_64.tar.gz
https://cdn.mysql.com//Downloads/MySQL-8.0/mysql-8.0.33-linux-glibc2.28-x86_64.tar.gz
解壓:
tar -zxvf mysql-8.0.33-linux-glibc2.28-x86_64.tar.gz
需要安裝依賴包:
dnf install libaio
dnf -y install ncurses-compat-libs
如下是詳細安裝步驟:
2.2 Installing MySQL on Unix/Linux Using Generic Binaries
- 建立 mysql 組;
- 建立 mysql 使用者並做軟連結;
- 切換到 local 目錄;
- 解壓 tar 包 mysql 檔案;
- 建立軟連結,full-path-to-mysql-VERSION-OS 是你解壓後 mysql 檔案目錄名稱;
- 進入到 mysql 目錄;
- 建立 mysql-files 目錄;
- 賦予 mysql 使用者 mysql-files 所屬目錄與所屬組為 mysql;
- 賦予 mysql-files 許可權750;
- 初始化並設定使用者為 mysql,生成隨機密碼會列印在字元介面(使用
--initialize-insecure則設定空密碼); - 啟動 ssl_rsa 驗證;
- 啟動 MySQL 服務;
- 複製 mysql.server 指令碼服務到 Linux 環境 init.d 目錄,便於管理。
$> groupadd mysql
$> useradd -r -g mysql -s /bin/false mysql
$> cd /usr/local
$> tar xvf /path/to/mysql-VERSION-OS.tar.xz
$> ln -s full-path-to-mysql-VERSION-OS mysql
$> cd mysql
$> mkdir mysql-files
$> chown mysql:mysql mysql-files
$> chmod 750 mysql-files
$> bin/mysqld --initialize-insecure --user=mysql
$> bin/mysql_ssl_rsa_setup
$> bin/mysqld_safe --user=mysql &

#Next command is optional
$> cp support-files/mysql.server /etc/init.d/mysql.server
如果在 RHEL 9 中預設沒有安裝 chkconfig,沒有軟連線 /etc/init.d/ 目錄,請安裝 chkconfig 管理工具
dnf -y install chkconfig-1.20-2.el9.x86_64
啟動 MySQL 服務
systemctl start mysql.server
如果使用 systemctl 啟動 MySQL 服務,出現/etc/rc.d/init.d/mysql.server:行239: /usr/local/mysql/bin/my_print_defaults: 許可權不夠,Starting MySQL ERROR! Couldn't find MySQL server (/usr/local/mysql/bin/mysqld_safe)
解決方案,設定 MySQL 環境變數。補充一點,此處只介紹設定全域性生效環境變數,需要 root 使用者許可權,或者使用 sudo 提權。
[root@localhost mysql]# systemctl status mysql
● mysql.server.service - LSB: start and stop MySQL
     Loaded: loaded (/etc/rc.d/init.d/mysql.server; generated)
     Active: active (exited) since Tue 2023-05-23 16:26:14 CST; 7min ago
       Docs: man:systemd-sysv-generator(8)
        CPU: 12ms

5月 23 16:26:14 localhost.localdomain systemd[1]: Starting LSB: start and stop MySQL...
5月 23 16:26:14 localhost.localdomain mysql.server[4244]: /etc/rc.d/init.d/mysql.server:行239: /usr/local/mysql/bin/my_print_defaults: 許可權不夠
5月 23 16:26:14 localhost.localdomain mysql.server[4237]: Starting MySQL ERROR! Couldn't find MySQL server (/usr/local/mysql/bin/mysqld_safe)
5月 23 16:26:14 localhost.localdomain systemd[1]: Started LSB: start and stop MySQL.
則做如下設定,編輯:vim /etc/profile,需要 root 使用者許可權,或者使用 sudo vim /etc/profile:
# mysql home
MYSQL_HOME=/usr/local/mysql
PATH=$PATH:$MYSQL_HOME/bin
export MYSQL_HOME PATH
執行 source /etc/profile 或者 sudo source /etc/profile 命令,環境變數立即生效。
再次檢視 MySQL 服務狀態:
[root@localhost mysql]# systemctl status mysql
● mysql.server.service - LSB: start and stop MySQL
     Loaded: loaded (/etc/rc.d/init.d/mysql.server; generated)
     Active: active (running) since Tue 2023-05-23 16:40:35 CST; 4s ago
       Docs: man:systemd-sysv-generator(8)
    Process: 5003 ExecStart=/etc/rc.d/init.d/mysql.server start (code=exited, status=0/SUCCESS)
      Tasks: 39 (limit: 22833)
     Memory: 370.1M
        CPU: 765ms
     CGroup: /system.slice/mysql.server.service
             ├─5014 /bin/sh /usr/local/mysql/bin/mysqld_safe --datadir=/usr/local/mysql/data --pid-file=/usr/local/mysql/data/localhost.localdo>
             └─5153 /usr/local/mysql/bin/mysqld --basedir=/usr/local/mysql --datadir=/usr/local/mysql/data --plugin-dir=/usr/local/mysql/lib/pl>

5月 23 16:40:34 localhost.localdomain systemd[1]: Starting LSB: start and stop MySQL...
5月 23 16:40:35 localhost.localdomain mysql.server[5003]: Starting MySQL. SUCCESS!
5月 23 16:40:35 localhost.localdomain systemd[1]: Started LSB: start and stop MySQL.
設定開機自啟
systemctl enable mysql.server
當然,你還可以通過這種方式啟動與關閉 MySQL 服務:
support-files/mysql.server start
Starting MySQL.. SUCCESS!

support-files/mysql.server stop
Shutting down MySQL. SUCCESS!
使用 mysql.server 指令碼,支援 start|stop|restart|reload|force-reload|status 多種命令操作:
- start:啟動服務
- stop:停止服務
- restart:重啟服務
- reload:過載服務
- force-reload:強制過載服務
- status:檢視服務狀態
[root@localhost mysql]# support-files/mysql.server
Usage: mysql.server  {start|stop|restart|reload|force-reload|status}  [ MySQL server options ]
登入 MySQL 字元命令終端(已經設定好環境變數)
mysql -uroot -p
登入 MySQL 字元命令終端(沒有環境變數),切換到部署 MySQL 根目錄,cd /usr/local/mysql,然後執行如下命令:
bin/mysql -uroot -p
修改使用者密碼
ALTER USER 'root'@'localhost' IDENTIFIED BY 'Mypwd@123';
建立使用者root,主機地址為localhost
CREATE USER 'root'@'localhost' IDENTIFIED BY 'Mypwd@123';
建立使用者root,主機地址%,匹配所有
CREATE USER 'root'@'%' IDENTIFIED BY 'Mypwd@123';
授權root使用者所有許可權,即可使遠端登入
GRANT ALL ON *.* TO 'root'@'localhost' WITH GRANT OPTION;
重新整理許可權
flush privileges;
更多許可權細化設定請參考 MySQL8.0.x 官方檔案第 6 章節 Security。
6.2 Access Control and Account Management
rpm package
02 rpm 包安裝
Rocky 9 Linux 平臺以 rpm 包形式安裝 MySQL8.0.33。
獲取:下載最新版本的 mysql-8.0.33-1.el9.x86_64.rpm-bundle.tar,將下面介紹的 rpm 包通過解壓縮軟體提取出來。
tar -xvf mysql-8.0.33-1.el9.x86_64.rpm-bundle.tar
友情提示:如今有一部分 Linux 發行版已經將 MariaDB 作為預設資料庫軟體。如果安裝時勾選了資料庫軟體選項,你可能需要解除安裝 MariaDB 的依賴庫:yum remove mariadb-libs 。
2.5 Installing MySQL on Linux RPM Packages
yum remove mariadb-libs
rpm -ivh mysql-community-client-plugins-8.0.33-1.el9.x86_64.rpm
rpm -ivh mysql-community-common-8.0.33-1.el9.x86_64.rpm
rpm -ivh mysql-community-icu-data-files-8.0.33-1.el9.x86_64.rpm
rpm -ivh mysql-community-libs-8.0.33-1.el9.x86_64.rpm
dnf -y install openssl-devel-1:3.0.7-6.el9_2.x86_64
rpm -ivh mysql-community-devel-8.0.33-1.el9.x86_64.rpm
rpm -ivh mysql-community-client-8.0.33-1.el9.x86_64.rpm
rpm -ivh mysql-community-server-8.0.33-1.el9.x86_64.rpm
注意:如果你安裝 mysql-community-devel-8.0.33-1.el9.x86_64.rpm 提示依賴檢測需要 pkgconfig ( openssl ),做如下操作
dnf -y install openssl-devel-1:3.0.7-6.el9_2.x86_64
啟動服務
systemctl start mysqld
設定開機自啟
systemctl enable mysqld
安裝後,預設使用臨時隨機密碼,儲存在 /var/log/mysqld.log 檔案中
[wzgy@localhost soft]$ sudo grep 'temporary password' /var/log/mysqld.log
2023-05-21T09:07:15.482313Z 6 [Note] [MY-010454] [Server] A temporary password is generated for root@localhost: WT(yyZgUB0xd
登入
mysql -uroot -p
修改 root 使用者密碼
ALTER USER 'root'@'localhost' IDENTIFIED BY 'Mypwd@833';
友情提示:密碼組成規則,必須包含一位大寫字母和特殊符號,且密碼長度不低於 9 位。如果密碼不符合設定規則,會提醒你當前設定的密碼不安全:
ERROR 1819 (HY000): Your password does not satisfy the current policy requirements
解除安裝就比較簡單,可以使用 Rocky 9 Linux 自帶的 dnf 管理工具:
dnf remove mysql
dnf remove mysql-community-client-plugins-8.0.33-1.el9.x86_64
dnf remove mysql-community-common-8.0.33-1.el9.x86_64
dnf remove mysql-community-icu-data-files-8.0.33-1.el9.x86_64
如果你覺得,使用 rpm 包這樣安裝太繁瑣,尤其是缺乏相關依賴包很頭疼。可以使用發行版自帶的 yum 或者 dnf 工具快速安裝。
yum 源
03 yum 源安裝
Installing MySQL on Linux Using the MySQL Yum Repository
友情提示:Centos 8(RHEL 8) 或者更高版本可以使用 dnf 替代 yum
1. 下載:mysql80-community-release-el9-1.noarch.rpm
   click https://repo.mysql.com//mysql80-community-release-el9-1.noarch.rpm
2. $> sudo yum install platform-and-version-specific-package-name.rpm
3. 基於 EL9 系統安裝:$> sudo yum install mysql80-community-release-el9-{version-number}.noarch.rpm
4. 啟動 MySQL Server:$> systemctl start mysqld
5. 檢測 MySQL Server:$> systemctl status mysqld
6. 登入 mysql:$> mysql -uroot -p
7. 修改密碼:$> ALTER USER 'root'@'localhost' IDENTIFIED BY 'MyNewPwd833!';
source package
04 Source:原始碼包安裝
2.9 Installing MySQL from Source
- 新增 mysql 管理組
- 新增 mysql 使用者
- 解壓 mysql 安裝包
- 建立 bld 目錄
- 切換到 bld 目錄
- 編譯安裝:cmake .. make make install
- 進入原始碼包安裝後的 mysql 目錄
- 建立目錄 mysql-files
- 賦予 mysql-files 目錄所屬組和所屬使用者為 mysql
- 賦予 mysql-files 目錄 750 許可權
- 執行安全命令:
bin/mysql_ssl_rsa_setup - 啟動 mysql 服務:
bin/mysqld_safe --user=mysql & - 複製 mysql.server 指令碼服務到 Linux 環境 init.d 目錄,便於管理
簡易安裝命令參考如下:
#Preconfiguration setup

$> groupadd mysql
$> useradd -r -g mysql -s /bin/false mysql

#Beginning of source-build specific instructions

$> tar zxvf mysql-VERSION.tar.gz
$> cd mysql-VERSION
$> mkdir bld
$> cd bld
$> cmake ..
$> make
$> make install

#End of source-build specific instructions

#Postinstallation setup

$> cd /usr/local/mysql
$> mkdir mysql-files
$> chown mysql:mysql mysql-files
$> chmod 750 mysql-files
$> bin/mysqld --initialize --user=mysql
$> bin/mysql_ssl_rsa_setup
$> bin/mysqld_safe --user=mysql &

#Next command is optional

$> cp support-files/mysql.server /etc/init.d/mysql.server
啟動服務
systemctl start mysql.server
設定開機自啟
systemctl enable mysql.server
登入
mysql -uroot -p
以上總結,僅供參考喲!希望對你的學習或者工作幫助。
參考資料:
MySQL 官方檔案第二章節:Chapter 2 Installing and Upgrading MySQL
MySQL8.0.x 官方檔案第 6 章節 Security:6.2 Access Control and Account Management
—END—
本文來自部落格園,作者:文正耕耘,轉載請註明原文連結:https://www.cnblogs.com/cnwangk/p/17425844.html