Servlet 超全面教學,學習 Servlet 看這篇就夠了!
Servlet 基本使用
本文介紹了Servlet的基本使用,適合初學者學習時參考,相信初學者看完一定有收穫~
還可看看博主的其他文章,超全面總結:
MySQL必知必會,傳送地址:MySQL的使用,看這篇就夠了
JavaScript必知必會,傳送地址:JavaScript小白必看
文章目錄
- Servlet 基本使用
- 一、Servlet介紹
- 二、手動實現Servlet程式
- 三、Servlet程式的存取原理
- 四、Servlet程式的常見錯誤
- 五、Servlet的生命週期
- 六、GET和POST請求的不同處理
- 七、繼承HttpServlet類實現Servlet程式
- 八、使用IDEA建立Servlet程式
- 九、Servlet介面的繼承體系
- 十、ServletConfig介面
- 十一、ServletContext介面
- 十二、HTTP協定
- 十三、谷歌瀏覽器檢視HTTP協定
- 十四、HttpServletRequest類
- 十五、請求轉發
- 十六、base標籤的作用
- 十七、」/」在不同情況下的不同意義
- 十八、HttpServletResponse類
- 十九、請求重定向
一、Servlet介紹
- Servlet是JavaEE規範(介面)之一
- Servlet是JavaWeb三大元件之一,三大元件分別是Servlet程式、Filter過濾器、Listener監聽器
- Servlet是執行在伺服器上的一個Java程式,可以接收用戶端發來的請求,並響應數據給用戶端
二、手動實現Servlet程式
- 編寫一個類實現Servlet介面,並重寫service方法處理請求、響應數據
- 在WEB-INF資料夾中的web.xml檔案中設定Servlet程式的存取地址
程式碼演示:1. 在src下建立一個TestServlet類
public class TestServlet implements Servlet {
    @Override
    public void service(ServletRequest servletRequest, ServletResponse servletResponse) throws ServletException, IOException {
        System.out.println("TestServlet被訪問了!");
    }
}
程式碼演示:2. 在web.xml中的設定
<?xml version="1.0" encoding="UTF-8"?>
<web-app xmlns="http://xmlns.jcp.org/xml/ns/javaee"
         xmlns:xsi="http://www.w3.org/2001/XMLSchema-instance"
         xsi:schemaLocation="http://xmlns.jcp.org/xml/ns/javaee http://xmlns.jcp.org/xml/ns/javaee/web-app_4_0.xsd"
         version="4.0">
    <!--內容寫在<web-app></web-app>中-->
    <!--servlet標籤給Tomcat設定Servlet程式-->
    <servlet>
        <!--servlet-name標籤給Servlet程式起一個別名(一般是類名)-->
        <servlet-name>TestServlet</servlet-name>
        <!--servlet-class標籤是Servlet程式的全類名-->
        <servlet-class>com.qizegao.servlet.TestServlet</servlet-class>
    </servlet>
    <!--servlet-mapping標籤是servlet的對映,給Servlet程式設定存取地址-->
    <servlet-mapping>
        <!--此時servlet-name標籤要與上一個servlet-name標籤中相同-->
        <servlet-name>TestServlet</servlet-name>
        <!--url-pattern標籤設定存取地址:
            /在伺服器解析時表示爲Tomcat的工程路徑(在Edit Configurations中修改),
            /Test代表預設路徑/Test,即http://localhost:8080/MyTest/Test,
            也就是說在瀏覽器的位址列中輸入上述路徑存取到的是TestServlet類-->
        <url-pattern>/Test</url-pattern> //任意起名,用這個名字來存取指定類
    </servlet-mapping>
</web-app>
執行結果:
點選綠色按鈕開啓Tomcat伺服器之後,會自動開啓預設的地址http://localhost:8080/MyTest,
在位址列繼續輸入/Test,會執行指定類的service方法,控制檯輸出:TestServlet被訪問了!
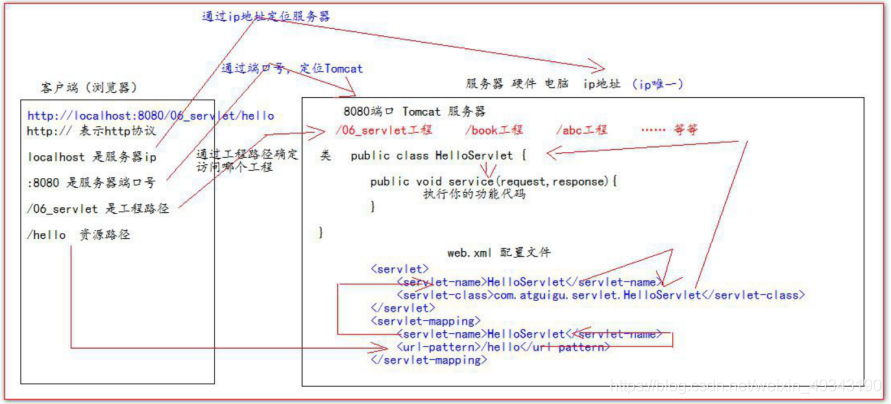
三、Servlet程式的存取原理
四、Servlet程式的常見錯誤
1. url-pattern中設定的路徑沒有以斜槓打頭

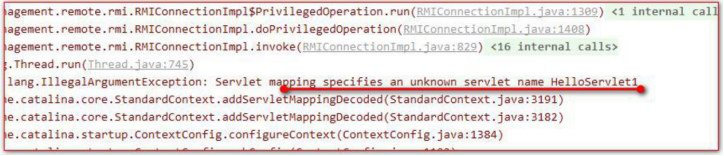
2. servlet-name中的兩個對映值不一致
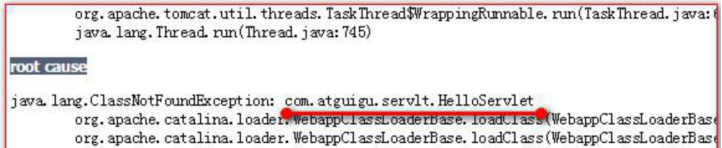
3. servlet-class標籤的全類名設定錯誤
五、Servlet的生命週期
Servlet程式被存取以後按以下順序執行:
- 執行Servlet程式的構造方法
- 執行init方法
- 執行service方法
- 執行destroy方法
其中1和2是在初次存取並建立Servlet程式時會執行(每次啓動服務只執行一次),第3步每次重新整理 (存取)都會執行,第4步點選停止時會執行一次
六、GET和POST請求的不同處理
程式碼演示:1. 在src目錄下建立此類
public class TestServlet implements Servlet {
    @Override
    public void service(ServletRequest servletRequest, ServletResponse servletResponse) throws ServletException, IOException {
        //轉換的原因:HttpServletRequest有getMethod方法,可以得到請求的型別
        HttpServletRequest httpServletRequest = (HttpServletRequest) servletRequest;
        String method = httpServletRequest.getMethod();
        //method值爲GET或POST,取決於表單提交的method
        if (method.equals("POST")){
            System.out.println("POST方式");
        } else if (method.equals("GET")) {
            System.out.println("GET方式");
        }
    }
程式碼演示:2. 在web目錄下建立Test.html頁面
<body>
    <form action="http://localhost:8080/MyTest/Test" method="post">
        <!--action屬性值與web.xml中的<url-pattern>標籤內容一致,用於存取到service方法-->
        <input type="submit">
    </form>
</body>
執行結果:伺服器啓動之後,在瀏覽器的位址列中的後綴加上Test.html,即可存取此頁面,點選提交標籤,即可跳轉到http://localhost:8080/MyTest/Test,執行service方法,控制檯輸出:POST方式
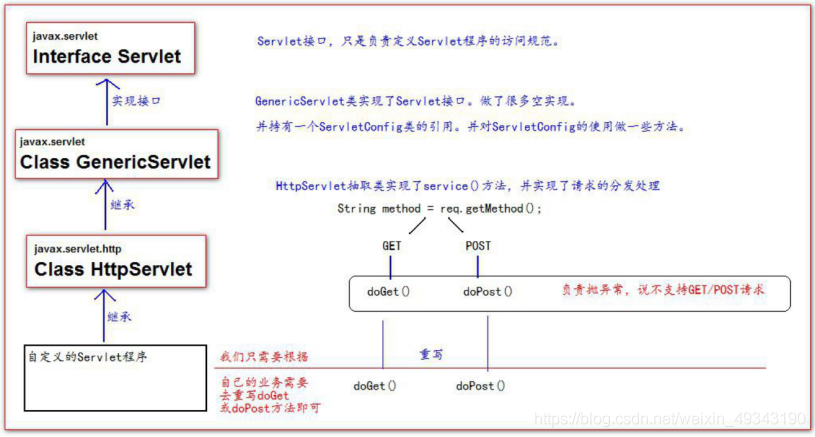
七、繼承HttpServlet類實現Servlet程式
在實際的專案開發中,都是使用繼承HttpServlet類實現Servlet程式的方式,步驟如下:
- 編寫一個類繼承HttpServlet類
- 根據需求重寫doGet或doPost方法,由service方法根據表單的method屬性值呼叫二者之一
- 到web.xml中設定Servlet程式的存取地址
程式碼演示:1. 在src目錄下建立此類
public class TestServlet2 extends HttpServlet {
    @Override
    protected void doGet(HttpServletRequest req, HttpServletResponse resp) throws ServletException, IOException {
        System.out.println("doGet方法執行");
    }
    @Override
    protected void doPost(HttpServletRequest req, HttpServletResponse resp) throws ServletException, IOException {
        System.out.println("doPost方法執行");
    }
}
//HttpServlet的service方法會根據method方式呼叫二者之一
程式碼演示:2. 在web.xml中繼續寫設定
<!--不用刪除原來的servlet標籤,在<web-app>標籤中繼續寫servlet標籤-->
<servlet>
    <servlet-name>TestServlet2</servlet-name>
    <servlet-class>com.qizegao.servlet.TestServlet2</servlet-class>
</servlet>
<servlet-mapping>
    <servlet-name>TestServlet2</servlet-name>
    <url-pattern>/Test2</url-pattern>
</servlet-mapping>
程式碼演示:3. 在web中建立Test.html頁面
<body>
    <form action="http://localhost:8080/MyTest/Test2" method="post">
        <!--action屬性值與web.xml中的<url-pattern>標籤內容一致,用於存取到service方法-->
        <input type="submit">
    </form>
</body>
執行結果:伺服器啓動之後,在瀏覽器的位址列中的後綴加上Test.html,即可存取此頁面,點選提交標籤, 即可跳轉到http://localhost:8080/MyTest/Test2,執行service方法,進而執行doPost方法
八、使用IDEA建立Servlet程式
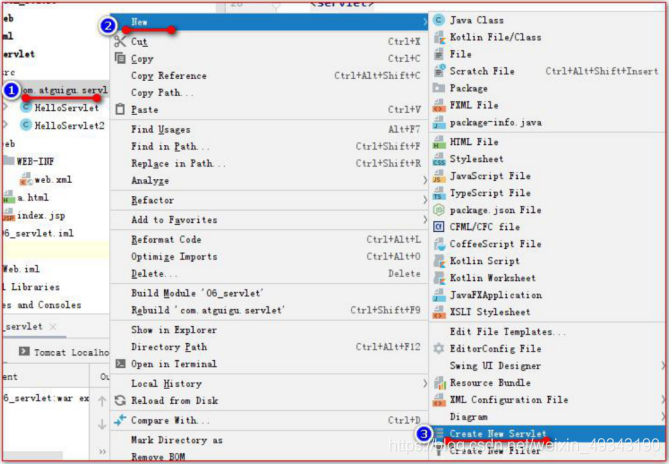

建立之後,會在包下建立此類(類名爲全類名中的類名),此類繼承於HttpServlet類,其中有doGet和doPost方法(無函數體),並自動的在web.xml 檔案中補充新的標籤,但無標籤,需自己補充
九、Servlet介面的繼承體系
十、ServletConfig介面
-
從名字來看,得知此介面中是Servlet程式的設定資訊:
(1) Servlet程式和ServletConfig物件都是由Tomcat負責建立,程式設計人員負責使用
(2) Servlet程式預設是第一次存取時建立,每個Servlet程式建立時對應的建立ServletConfig對 象,二者相互對應,某個Servlet程式只可以獲得他對應的ServletConfig物件,無法獲得別的 Servlet程式的ServletConfig物件 -
ServletConfig介面的三大作用:
(1) 可以獲取Servlet程式的別名(即web.xml的的內容)
(2) 可以獲取web.xml的初始化參數的值
(3) 可以獲取ServletContext物件
程式碼演示:1. 在web.xml中繼續寫設定(寫在標籤中)
<servlet>
    <servlet-name>TestServlet4</servlet-name>
    <servlet-class>com.qizegao.servlet.TestServlet4</servlet-class>
    <!--<init-param>是初始化參數,每個servlet標籤中都可以有,一個servlet標籤中可以有多個-->
    <init-param>
        <!--參數名-->
        <param-name>username</param-name>
        <!--參數值-->
        <param-value>root</param-value>
    </init-param>
    <init-param>
        <param-name>url</param-name>
        <param-value>jdbc:mysql:localhost:3306/test</param-value>
    </init-param>
</servlet>
<servlet-mapping>
    <servlet-name>TestServlet4</servlet-name>
    <url-pattern>/Test4</url-pattern>
</servlet-mapping>
程式碼演示:2. 在src目錄下建立此類
public class TestServlet4 extends HttpServlet {
    @Override  //使用init方法的原因:1.一定會執行 2.參數中有ServletConfig物件
    public void init(ServletConfig config) throws ServletException {
        super.init(config);
        //1.獲取Servlet程式的別名
        System.out.println("此程式的別名是:" + config.getServletName());
        //2.獲取初始化參數init-param,該方法獲取指定的參數名的值
        System.out.println("初始化參數username的值是:" + config.getInitParameter("username"));
        System.out.println("初始化參數url的值是:" + config.getInitParameter("url"));
        //3.獲取ServletContext物件
        System.out.println(config.getServletContext());
    }
    /*執行結果(瀏覽器位址列輸入http://localhost:8080/MyTest/Test4):
      此程式的別名是:TestServlet4
      初始化參數username的值是:root
      初始化參數url的值是:jdbc:mysql:localhost:3306/test
      org.apache.catalina.core.ApplicationContextFacade@64d62c61 */
}
注意:重寫init方法時,必須要在函數體內寫:super.init(config);
原因:父類別GenericServlet中的init方法將參數config儲存起來,子類若不呼叫則無法儲存
十一、ServletContext介面
- ServletContext介面表示Servlet上下文物件
- 一個web工程只有一個ServletContext物件範例
- ServletContext是在web工程啓動時建立,在web工程停止時銷燬
- ServletContext物件是一個域物件
域物件:像Map一樣存取數據的物件稱爲域物件,域指的是存取數據的操作範圍,
ServletContext的域是整個web工程

- ServletContext介面的四個作用:
(1) 獲取web.xml中設定的上下文參數標籤中的值
(2) 獲取當前工程的路徑,格式:/工程路徑,也就是Edit Configurations中Deployment中的 Application context的內容(即地址中8080之後,具體的開啓的頁面之前的內容)
(3) 獲取工程部署後在硬碟上的絕對路徑
(4) 像Map一樣存取數據
程式碼演示:1. 在web.xml中繼續寫設定(在標籤中)
<!--<context-param>標籤中是上下文參數,屬於整個web工程-->
<!--可以有多個,寫在第一個<servlet>標籤之外(之上)-->
<context-param>
    <param-name>username</param-name>
    <param-value>root</param-value>
</context-param>
<context-param>
    <param-name>password</param-name>
    <param-value>root</param-value>
</context-param>
<!--並寫出下方的類對應的<servlet標籤>-->
程式碼演示:2. 在src目錄下建立此類
public class MyContextServlet extends HttpServlet {
    //預設執行doGet方法,故只重寫doGet方法
    @Override
    protected void doGet(HttpServletRequest request, HttpServletResponse response) throws ServletException, IOException {
        //GenericServlet類中有public ServletConfig getServletConfig()方法,返回this.config
        ServletContext servletContext = getServletConfig().getServletContext();
        //1.獲取web.xml中設定的上下文參數<context-param>標籤中的值
        String username = servletContext.getInitParameter("username");
        System.out.println("context-param參數的username值是" + username);
        /* 執行結果:context-param參數的username值是root */
        System.out.println("context-param參數的password值是" + servletContext.getInitParameter("password"));
        /* 執行結果:context-param參數的password值是root */
        //2.獲取當前工程的路徑
        System.out.println("當前工程路徑:" + servletContext.getContextPath());
        /* 執行結果:當前工程路徑:/MyTest */
        //3.獲取工程部署後在硬碟上的絕對路徑
        /* /斜槓(預設路徑)對應IDEA程式碼的web目錄 */
        System.out.println("工程部署的路徑是:" + servletContext.getRealPath("/"));
        /* 執行結果:E:\IDEA WorkSpace\FirstWeb\out\artifacts\FirstWeb_war_exploded\ */
        //在web目錄下建立一個css資料夾
        System.out.println("工程下css目錄的絕對路徑是:" + servletContext.getRealPath("/css"));
        /* 執行結果:E:\IDEA WorkSpace\FirstWeb\out\artifacts\FirstWeb_war_exploded\css */
        //在web目錄下建立一個img資料夾,裏面放1.gif檔案
        System.out.println("工程下img目錄1.gif的絕對路徑是:" + servletContext.getRealPath("/img/1.gif"));
        /* 輸出:E:\IDEA WorkSpace\FirstWeb\out\artifacts\FirstWeb_war_exploded\img\1.gif */
    }
}
//記得要在瀏覽器的位址列輸入http://localhost:8080/MyTest/MyContextServlet纔可存取到此類
程式碼演示:3. 在src中建立此類,並在web.xml中寫對應的設定資訊
public class Servlet extends HttpServlet {
    @Override
    protected void doGet(HttpServletRequest request, HttpServletResponse response) throws ServletException, IOException {
        //GenericServlet類中有public ServletContext getServletContext()方法,return this.getServletConfig().getServletContext();
        ServletContext servletContext = getServletContext();
        System.out.println(servletContext);
        /* 輸出:org.apache.catalina.core.ApplicationContextFacade@2711c490 */
        servletContext.setAttribute("key1","value1");
        System.out.println(servletContext.getAttribute("key1"));
        /* 輸出:value1 */
    }
}
注意:一個web工程只會建立一個ServletContext物件範例,換其他類輸出servletContext得到的結果與上述相同,且一旦給此物件賦值,即使換另一個類getAttribute(key1),得到的結果也是value1
十二、HTTP協定
1. 含義
所謂協定指的是雙方或多方相互約定好,都要遵守的規則,而HTTP協定指的是用戶端和 伺服器之間通訊時發送的數據需要遵守的規則,HTTP協定中的數據又稱爲報文
2. 請求的HTTP協定格式
請求分爲GET請求和POST請求兩種:
(1) GET請求:由請求行、請求頭兩部分組成,如下圖所示:

內容分析:
請求行:
①請求的方式:GET
②請求的資源路徑:/06_servlet/a.html
③請求的協定的版本號:HTTP/1.1
請求頭:
①Accept:告訴伺服器,用戶端可以接收的數據型別
②Accept-Language:告訴伺服器,用戶端可以接收的語言型別:
zh_CN:中文中國
en_US:英文美國
③User-Agent:代表用戶端瀏覽器的資訊
④Accept-Encoding:告訴伺服器,用戶端可以接收的數據編碼(壓縮)格式
⑤Host:表示請求時的伺服器ip和埠號
⑥Connection:告訴伺服器,當前連線如何處理:
Keep-Alive:回傳完數據不要馬上關閉,保持一小段時間的連線
Closed:回傳完數據馬上關閉
(2) POST請求:由請求行、請求頭、空行、請求體組成,如下圖所示:
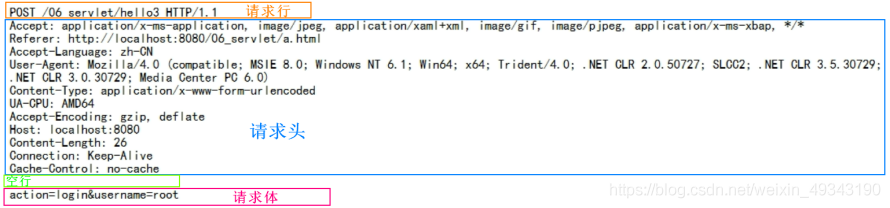
內容分析(僅分析與GET請求的不同之處):
請求頭:
①Referer:表示請求發起時,瀏覽器位址列中的地址
②Content-Type:表示發送的數據的型別:
i. application/x-www-form-ur lencoded:表示提交的數據的格式是 name=value&name=value,然後對其進行url編碼,url編碼是把非英文內容轉換爲:%xx%xx
ii. multipart/form-data:表示以多段的形式提交數據給伺服器,即以流的形式提交,用於上傳
③Content-Length:表示發送的數據的長度
④Cache-Control:表示如何控制快取,no-cache不快取
3. 響應的HTTP協定格式
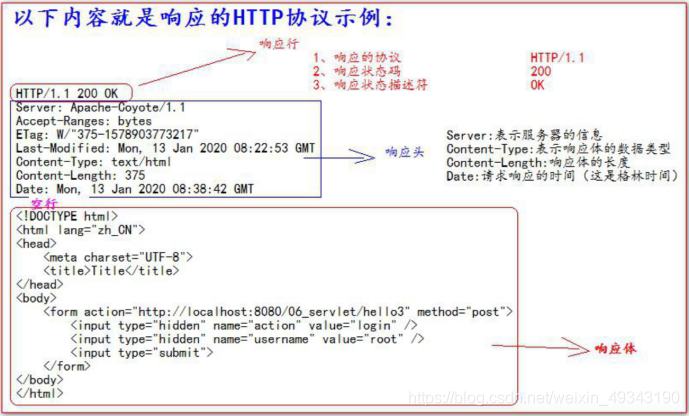
4. 常見的響應碼
200 表示請求成功
302 表示請求重定向
404 表示伺服器收到請求,但是請求的數據不存在(請求地址錯誤)
500 表示伺服器收到請求,但是伺服器內部錯誤(程式碼錯誤)
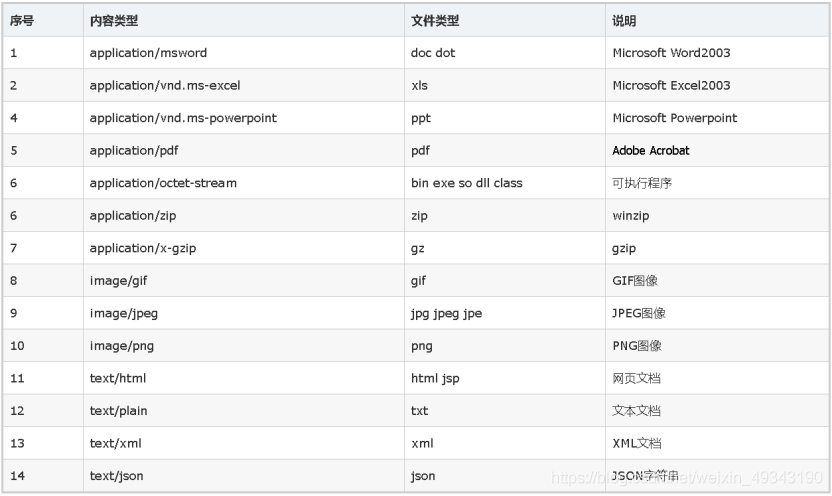
5. MIME型別說明
MIME是HTTP協定中的數據型別,格式是:大型別/小型別,並與某一種檔案的擴充套件名相對應:
十三、谷歌瀏覽器檢視HTTP協定
首先點選F12:
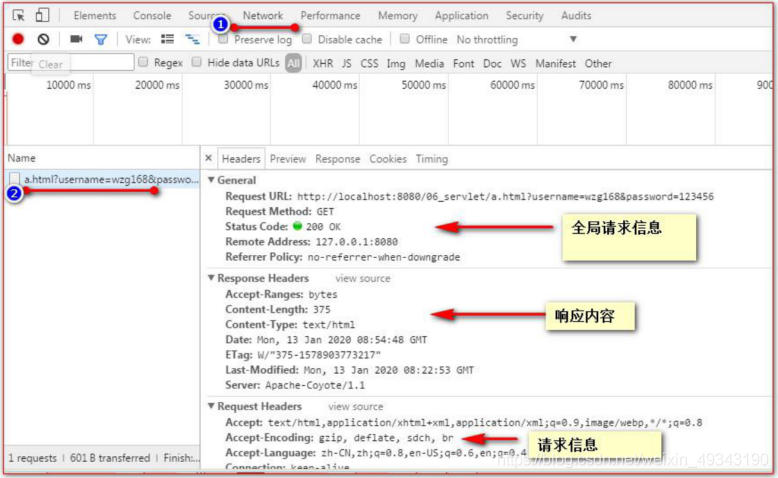
注意點:
- 到目前爲止除了form標籤中method=post之外,其餘均爲GET請求
- 標籤不一定與標籤相鄰,只要根據能對應上即可
- 預設地址值與工程路徑是兩個概念,上述只是將預設地址值修改爲工程路徑,即上述斜槓 等代表存取到的是工程路徑:http://localhost:8080/工程名,而非預設路徑
十四、HttpServletRequest類
-
HttpServletRequest類的作用:
每次只要有請求進入Tomcat伺服器,Tomcat伺服器就會把請求發來的HTTP協定資訊解析好封裝到Request物件中,然後傳遞到service方法中(呼叫doGet或doPost方法)供程式設計人員使用,程式設計人員通過HttpServletRequest物件,可以獲取到請求的所有資訊 -
HttpServletRequest類的常用方法:
getRequestURI():獲取請求的資源路徑
getRequestURL():獲取請求的絕對路徑
getRemoteHost():獲取用戶端的ip地址
getHeader():獲取請求頭
getParameter():獲取請求的參數
getParameterValues():獲取請求的參數(多個值時使用)
getMethod():獲取請求的方式(GET或POST)
setAttribute(key, value):設定域數據
getAttribute(key):獲取域數據
getRequestDispatcher():獲取請求轉發物件
程式碼範例(在src下建立此類):
public class RequestAPI extends HttpServlet {
    @Override
    protected void doGet(HttpServletRequest request, HttpServletResponse response) throws ServletException, IOException {
        //1.獲取請求的資源路徑
        String requestURI = request.getRequestURI();
        //2.獲取請求的絕對路徑
        StringBuffer requestURL = request.getRequestURL();
        //3.獲取用戶端的ip地址
        String requestRemoteHost = request.getRemoteHost();
        //4.獲取請求頭
        String requestHeader = request.getHeader("User-Agent");
        //5.獲取請求的方式
        String requestMethod = request.getMethod();
        //輸出
        System.out.println(requestURI); /* /MyTest/RequestAPI */
        System.out.println(requestURL); /* http://localhost:8080/MyTest/RequestAPI */
        System.out.println(requestHeader); //Mozilla/5.0 (Windows NT 10.0; Win64; x64)...
        System.out.println(requestMethod); //GET
        System.out.println(requestRemoteHost); //127.0.0.1
        /*在IDEA中,使用localhost存取時得到的用戶端ip地址是127.0.0.1
                   使用真實ip存取時,得到的用戶端地址是真實的用戶端ip地址 */
    }
}
- 獲取請求參數
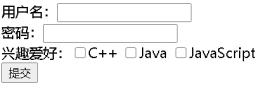
程式碼範例:1. 在web目錄下建立form.html頁面(不可在WEB-INF中建立,無法存取到):
<!DOCTYPE html>
<html lang="en">
<head>
    <meta charset="UTF-8">
    <title>form</title>
</head>
<body>
    <form action="http://localhost:8080/MyTest/RequestAPI2" method="post">
        使用者名稱:<input type="text" name="username"><br/>
        密碼:<input type="password" name="password"><br/>
        興趣愛好:<input type="checkbox" name="hobby" value="cpp">C++
                 <input type="checkbox" name="hobby" value="Java">Java
                 <input type="checkbox" name="hobby" value="JS">JavaScript<br/>
                 <input type="submit">
    </form>
</body>
</html>
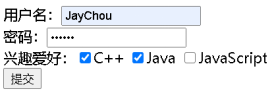
程式碼範例:2. 在src下建立此類
public class RequestAPI2 extends HttpServlet {
@Override
protected void doPost(HttpServletRequest request, HttpServletResponse response) throws ServletException, IOException {
//doPost方法會出現中文請求亂碼問題
//需要在獲取任何參數之前修改字元編碼集,而不僅僅獲取中文參數時才修改:
request.setCharacterEncoding("UTF-8");
//獲取請求的參數(此方法參數中放name屬性值,得到value屬性值)
String username = request.getParameter("username");
String password = request.getParameter("password");
//獲取請求的參數的多個值
String[] hobbies = request.getParameterValues("hobby");
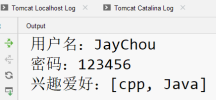
//輸出
System.out.println("使用者名稱:" + username);
System.out.println("密碼:" + password);
//將陣列轉換爲集合輸出
System.out.println("興趣愛好:" + Arrays.asList(hobbies));
}
}
執行結果:
(在web.xml檔案中建立對應的設定,在瀏覽器的位址列輸http://localhost:8080/MyTest/form.html)
注意:doGet請求的中文亂碼問題的解決:
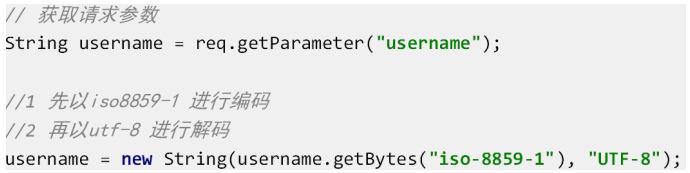
十五、請求轉發
請求轉發指的是伺服器收到請求之後,從一個資源跳轉到另一個資源的操作,如圖所示:
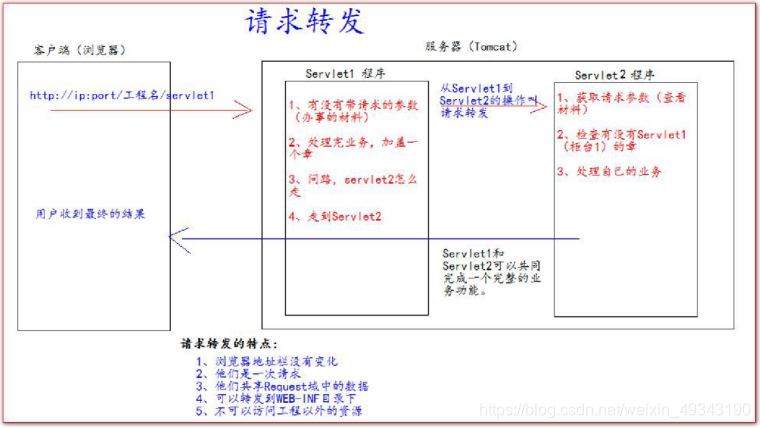
程式碼範例:1. 在src下建立此類,並在web.xml中設定相應的數據
public class Servlet1 extends HttpServlet {
    @Override
    protected void doGet(HttpServletRequest request, HttpServletResponse response) throws ServletException, IOException {
        //獲取請求的參數(檢視辦事的材料)
        String username = request.getParameter("username");
        System.out.println("在Servlet1(櫃檯1)中檢視參數(材料):" + username);
        //給材料蓋章
        request.setAttribute("key1","櫃檯1的章");
        //獲得通向Servlet2的路徑(請求轉發物件)
        //參數必須以斜槓打頭,斜槓代表http://localhost:8080/工程名/,對應IDEA程式碼的web目錄
        RequestDispatcher requestDispatcher = request.getRequestDispatcher("/Servlet2");
        //可以轉發到WEB-INF目錄下:request.getRequestDispatcher("/WEB-INF/xxx");
        //通過得到的路徑走向Servlet2(櫃檯2)
        //forward方法將當前資源的request和response轉發到該requestDispatcher指定的資源
        requestDispatcher.forward(request, response);
        //使得Servlet2中的request和response與Servlet1一致
    }
}
程式碼範例:2. 在src下建立此類,並在web.xml中設定相應的數據
public class Servlet2 extends HttpServlet {
    @Override
    protected void doGet(HttpServletRequest request, HttpServletResponse response) throws ServletException, IOException {
        //獲取請求的參數(檢視辦事的材料)
        String username = request.getParameter("username");
        System.out.println("在Servlet2(櫃檯2)中檢視參數(材料):" + username);
        //檢視是否有櫃檯1的章
        Object key1 = request.getAttribute("key1");
        System.out.println("櫃檯1的章爲:" + key1);
        //出處理自己的業務
        System.out.println("Servlet2處理業務");
    }
}
執行結果:
(在瀏覽器的位址列中輸入:http://localhost:8080/MyTest/Servlet1?username=jaychou)
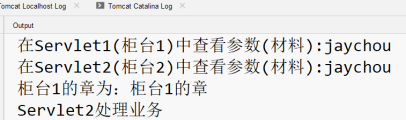
可以得出位址列的內容不發生變化,但頁面自動跳轉(存取)
到了請求轉發物件Servlet2中,即顯示
http://localhost:8080/MyTest/Servlet2的頁面
十六、base標籤的作用
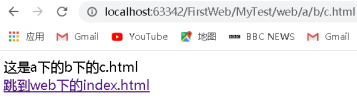
程式碼範例:1. 在web目錄下建立a資料夾下建立b資料夾下建立c.html
<head>
    <meta charset="UTF-8">
    <title>Title</title>
</head>
<body>
    這是a下的b下的c.html<br/>
    <a href="../../index.html">跳到web下的index.html</a>
</body>

程式碼範例:2. 在web目錄下建立index.html
<head>
    <meta charset="UTF-8">
    <title>Title</title>
</head>
<body>
    這是web下的index.html頁面<br/>
    <a href="a/b/c.html">跳轉到a下的b下的c.html</a>
</body>
執行結果:兩個頁面可以來回跳轉
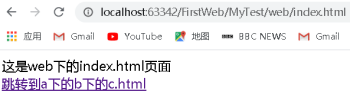
分析:當在c.html頁面準備點選進行跳轉時瀏覽器的位址列是http://localhost:63342/FirstWeb/MyTest/web/a/b/c.html,
跳轉到index.html頁面時的a標籤路徑是…/…/index.html,所有相對路徑在跳轉時都會參照當前瀏覽器位址列中的地址來進行跳轉,此時跳轉的路徑是http://localhost:63342/FirstWeb/MyTest/web/a/b/c.html…/…/index.html,進行抵消之後,剩餘的路徑是http://localhost:63342/FirstWeb/MyTest/web/index.html,路徑正確,跳轉成功。
程式碼範例:1. 在web目錄下建立a資料夾下建立b資料夾下建立c.html
<head>
    <meta charset="UTF-8">
    <title>Title</title>
</head>
<body>
    這是a下的b下的c.html<br/>
    <a href="../../index.html">跳到web下的index.html</a>
</body>
程式碼範例:2. 在src下建立此類,並在web.xml中設定
public class Forward extends HttpServlet {
    @Override
    protected void doGet(HttpServletRequest request, HttpServletResponse response) throws ServletException, IOException {
        request.getRequestDispatcher("a/b/c.html").forward(request,response);
    }
}
程式碼範例:3. 在web目錄下建立index.html
<head>
    <meta charset="UTF-8">
    <title>Title</title>
</head>
<body>
    這是web下的index.html頁面<br/>
    <a href= http://localhost:8080/MyTest/Forward>請求轉發:a/b/c.html</a>
</body>
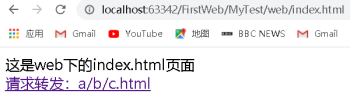
分析:在位址列輸入http://localhost:63342/FirstWeb/MyTest/web/index.html,點選後成功跳轉到 http://localhost:8080/MyTest/Forward,此時的頁面是:
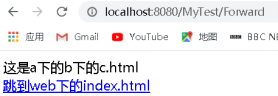
點選之後無法跳轉,根據以上原因,要跳轉的地址是http://localhost:8080/MyTest/Forward…/…/index.html,抵消之後爲http://localhost:8080/…/index.html,這是錯誤的路徑,因此跳轉失敗。解決方案如下:
base標籤可以設定當前頁面中所有相對路徑跳轉時參照指定的路徑來進行跳轉,在href屬性中設定指定路徑
程式碼範例:4. 將上述c.html檔案修改爲如下即可成功跳轉
<head>
    <meta charset="UTF-8">
    <title>Title</title>
    <!--base標籤寫在<title>標籤之後-->
    <base href="http://localhost:8080/MyTest/a/b/">
</head>
<body>
    這是a下的b下的c.html<br/>
    <a href="../../index.html">跳到web下的index.html</a>
</body>
注:實際開發中都使用絕對路徑,而不簡單的使用相對路徑
十七、」/」在不同情況下的不同意義
- 「/」若被瀏覽器解析,得到的地址是:http://ip:port/
(1) 斜槓 - 「/」若被伺服器解析,得到的地址是:http://ip:port/工程路徑
(1) /servlet1
(2) servletContext.getRealPath(「/」);
(3) request.getRequestDispatcher(「/」); - 特殊情況:response.sendRedirect(「/」); 把斜槓發送到瀏覽器解析,得到http://ip:port/
十八、HttpServletResponse類
- HttpServletResponse類的作用:
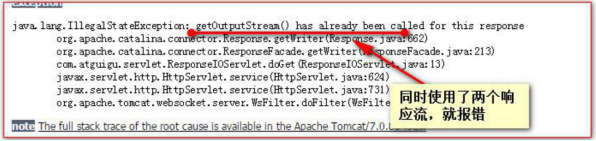
每次只要有請求進入Tomcat伺服器,Tomcat伺服器就會建立一個Response物件傳遞給Servlet程式。HttpServletResponse表示所有響應的資訊(HttpServletRequest表示請求發來的資訊),可以通過HttpServletResponse物件設定返回給用戶端的資訊 - 兩個輸出流的說明:
位元組流 getOutputStream(); 常用於下載(傳遞)二進制數據
字元流 getWriter(); 常用於回傳字串
注:同一個HttpServletResponse物件兩個流不可同時使用,只可二選一,否則報錯:
- 從伺服器往用戶端(瀏覽器)回傳字串數據
程式碼範例:在src下建立此類並在web.xml中進行設定
public class ResponseIO extends HttpServlet {
    @Override
    protected void doGet(HttpServletRequest request, HttpServletResponse response) throws ServletException, IOException {
        //防止中文亂碼問題,在獲取流物件之前呼叫此方法:
        //同時設定伺服器和用戶端都使用UTF-8字元集
        response.setContentType("text/html; charset=UTF-8");
        //獲取流物件
        PrintWriter writer = response.getWriter();
        writer.write("I Love China!");
    }
}
執行結果:
十九、請求重定向
請求重定向指的是用戶端給伺服器發送請求,然後伺服器通知用戶端去存取自己的新地址(之前的地址可能被廢棄)叫請求重定向

程式碼範例:1. 在src下建立此類並在web.xml中進行設定
public class Response1 extends HttpServlet {
    @Override
    protected void doGet(HttpServletRequest request, HttpServletResponse response) throws ServletException, IOException {
        System.out.println("會存取到Response1");
        //1.設定響應狀態碼302
        response.setStatus(302);
        //2.設定響應頭說明新的地址在哪裏
        response.setHeader("Location","http://localhost:8080/MyTest/Response2");
    }
}
程式碼範例:2. 在src下建立此類並在web.xml中進行設定
public class Response2 extends HttpServlet {
    @Override
    protected void doGet(HttpServletRequest request, HttpServletResponse response) throws ServletException, IOException {
        response.getWriter().write("Response2's result!");
    }
}
執行結果:在位址列輸入http://localhost:8080/MyTest/Response1,得到:
並在控制檯輸出:會存取到Response1
注:
- 在Response1中使用以下程式碼替代兩個步驟可得到同樣的效果(推薦使用此方法):
response.sendRedirect(「http://localhost:8080/MyTest/Response2」); - 在Response1中request.setAttribute(「key1」, 「value1」);
在Response2中req.getAttribute(「key1」); 無法得到key1的值,結果爲null
總結不易,點贊收藏~~~